Care team manual
Step-by-step help for nurses, carers and managers using the Kinto care team workspace at kinto.you. One task per page, so you can find what you need between rounds.
Signing in with two-factor authentication
Your password, then a 6-digit code from your phone.
Everyone on the care team signs in at kinto.you/login with their email address, their password and a 6-digit code from an authenticator app on their phone. The code changes every 30 seconds, so even if someone learns your password they can’t get into residents’ records without your phone.
Sign in
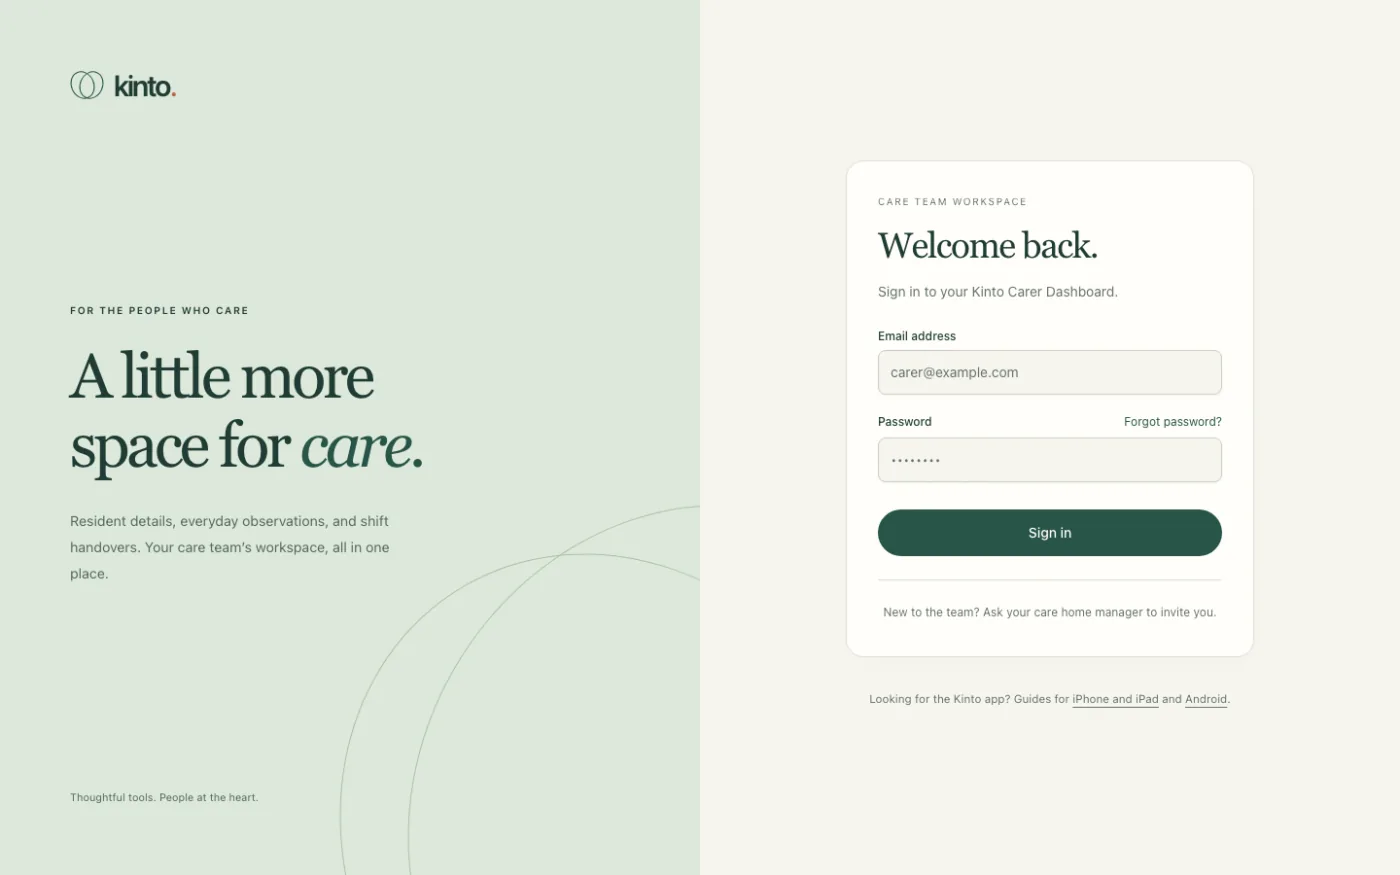
- Go to kinto.you/login, or choose For care teams at the top of the Kinto website.
- Under Welcome back., type your Email address and Password.
- Select Sign in.
- On your phone, open your authenticator app (for example Google Authenticator, Microsoft Authenticator or 1Password) and find Kinto.
- Back on the computer you’ll see Enter your code. Type the 6 digits into the Authentication code boxes.
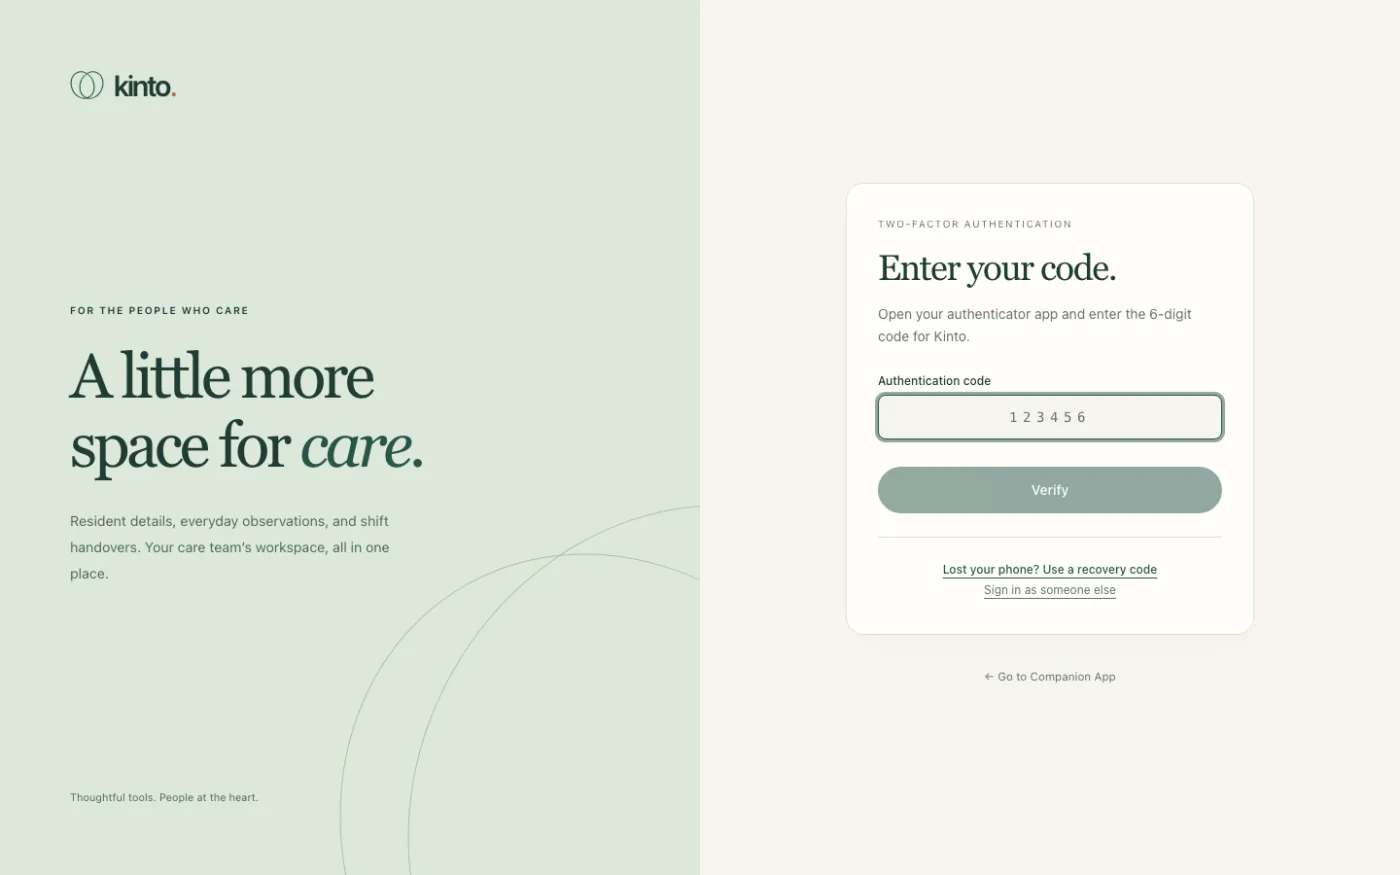
- Select Verify. You’ll see Welcome back! and the dashboard opens.
If the code isn’t accepted
You’ll see That code didn’t work. Please try again. under the boxes.
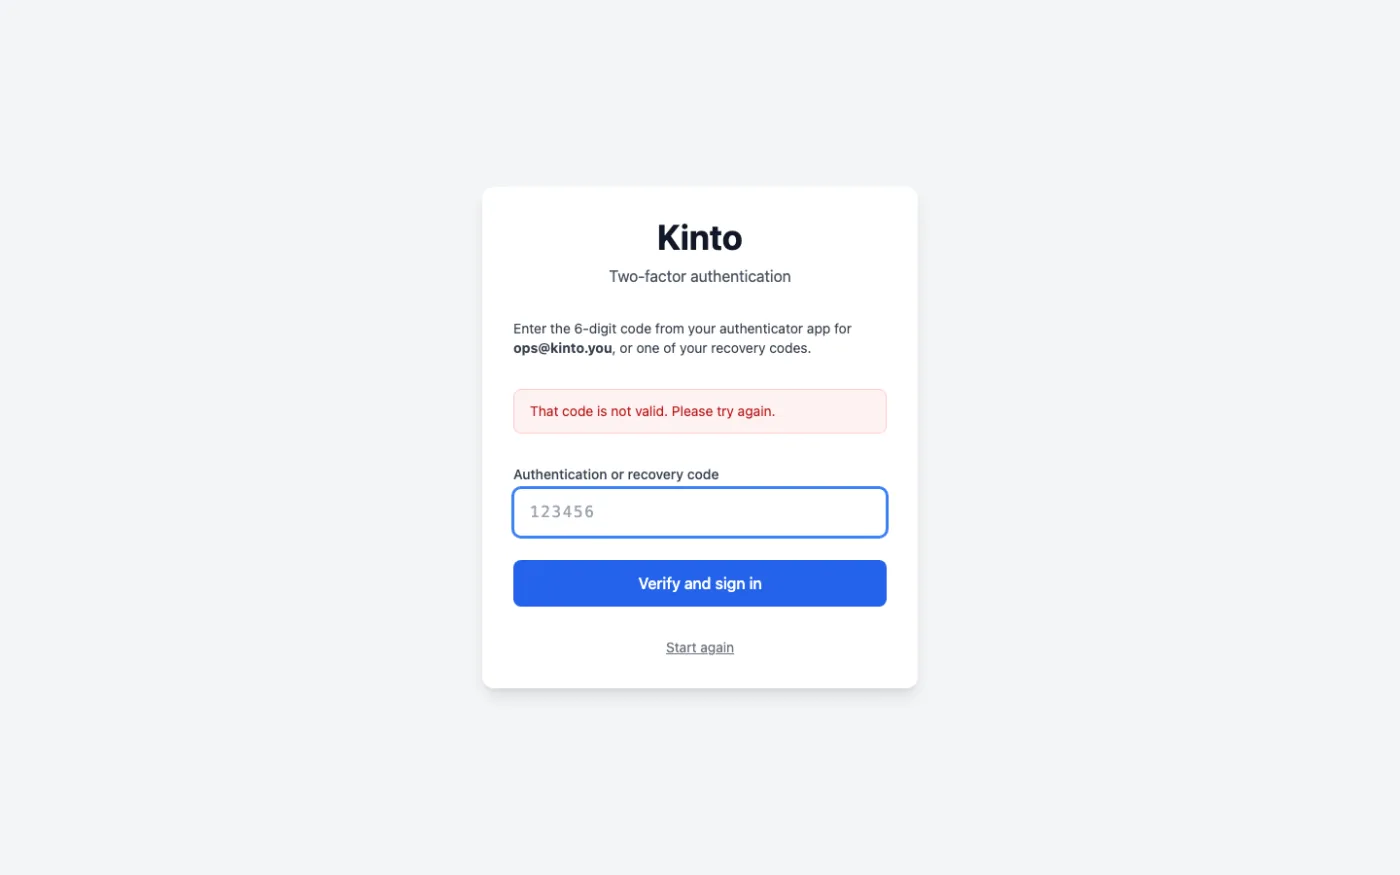
- Check you’re reading the Kinto entry in the app, not another account.
- Wait for a fresh code and type it straight away.
- Make sure your phone’s date and time are set automatically. Codes depend on the clock, so a phone that is a few minutes out will produce codes Kinto won’t accept. On iPhone: Settings → General → Date & Time → Set Automatically. On Android: Settings → System → Date & time → Set time automatically.
- If you’ve lost your phone, select Lost your phone? Use a recovery code. See Lost or new phone.
You have 5 minutes to enter the code after your password is accepted. After that you’ll see That sign-in took too long. Please enter your password again. Just start again.
How long you stay signed in
- You’re signed out automatically after 12 hours without using Kinto, and always after 7 days, even if you’ve been using it.
- When that happens, the next page you open takes you back to the sign-in page. Anything you hadn’t saved is lost, so save observations as you go.
- On a shared computer, always choose Sign out at the bottom of the menu when you finish.
Signing in as someone else
If you reach the code step on the wrong account, select Sign in as someone else under the code boxes to go back to the email and password step.
Setting up two-factor authentication the first time
Accept your invitation, scan the QR code and save your recovery codes.
You join your care home’s Kinto workspace from an email invitation. It takes about five minutes. You’ll need the computer you’ll use Kinto on, and your own smartphone.
Before you start
- Install an authenticator app on your phone from the App Store or Google Play. Any of these work: Google Authenticator, Microsoft Authenticator or 1Password. Ask your manager if your home prefers a particular one.
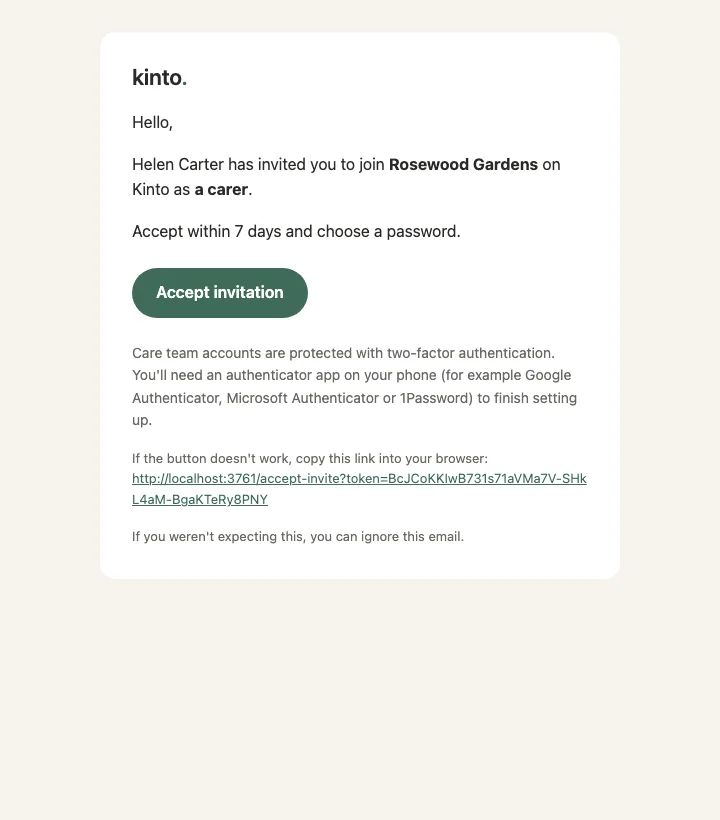
- Find the email from Kinto with the subject “You’re invited to join [your care home] on Kinto”.
- Have a safe place ready for your recovery codes, like a password manager. Your manager may give you a sealed envelope to keep them in.
Accept the invitation
- Open the invitation email and select the link. It opens Join [your care home]. and shows the role you’ve been invited as.
- Type Your name. Your team sees this name.
- Type a password in Choose a password, then again in Confirm password. Use at least 8 characters, and avoid common words and anything based on your name or email.
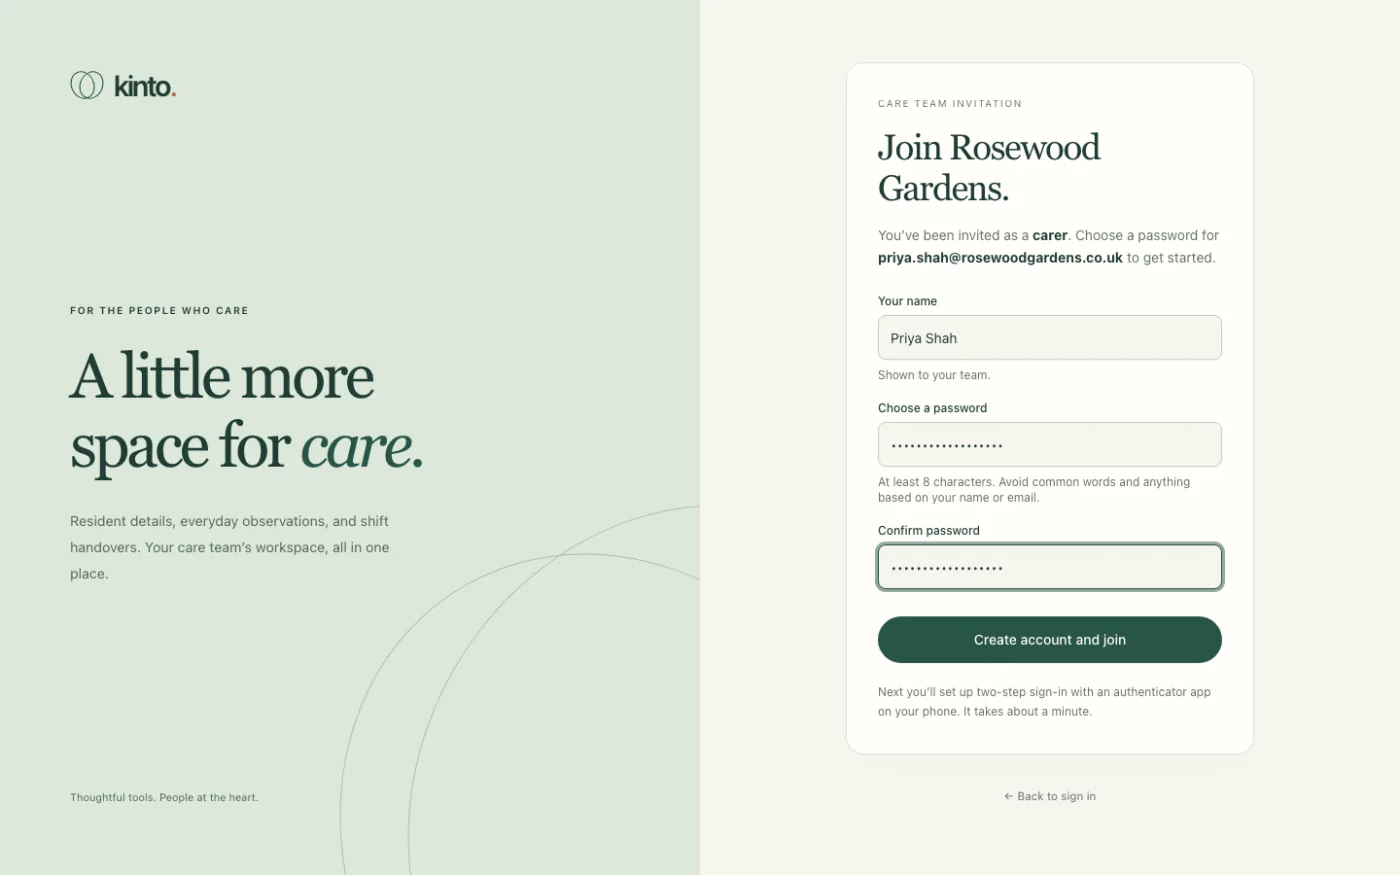
- Select Create account and join.
Step 1 of 2: connect your authenticator app
Owners, admins and carers then see Set up two-factor authentication. You can’t open the dashboard until this is done. Viewers don’t have to set it up, but we recommend it (see Your account and security settings).
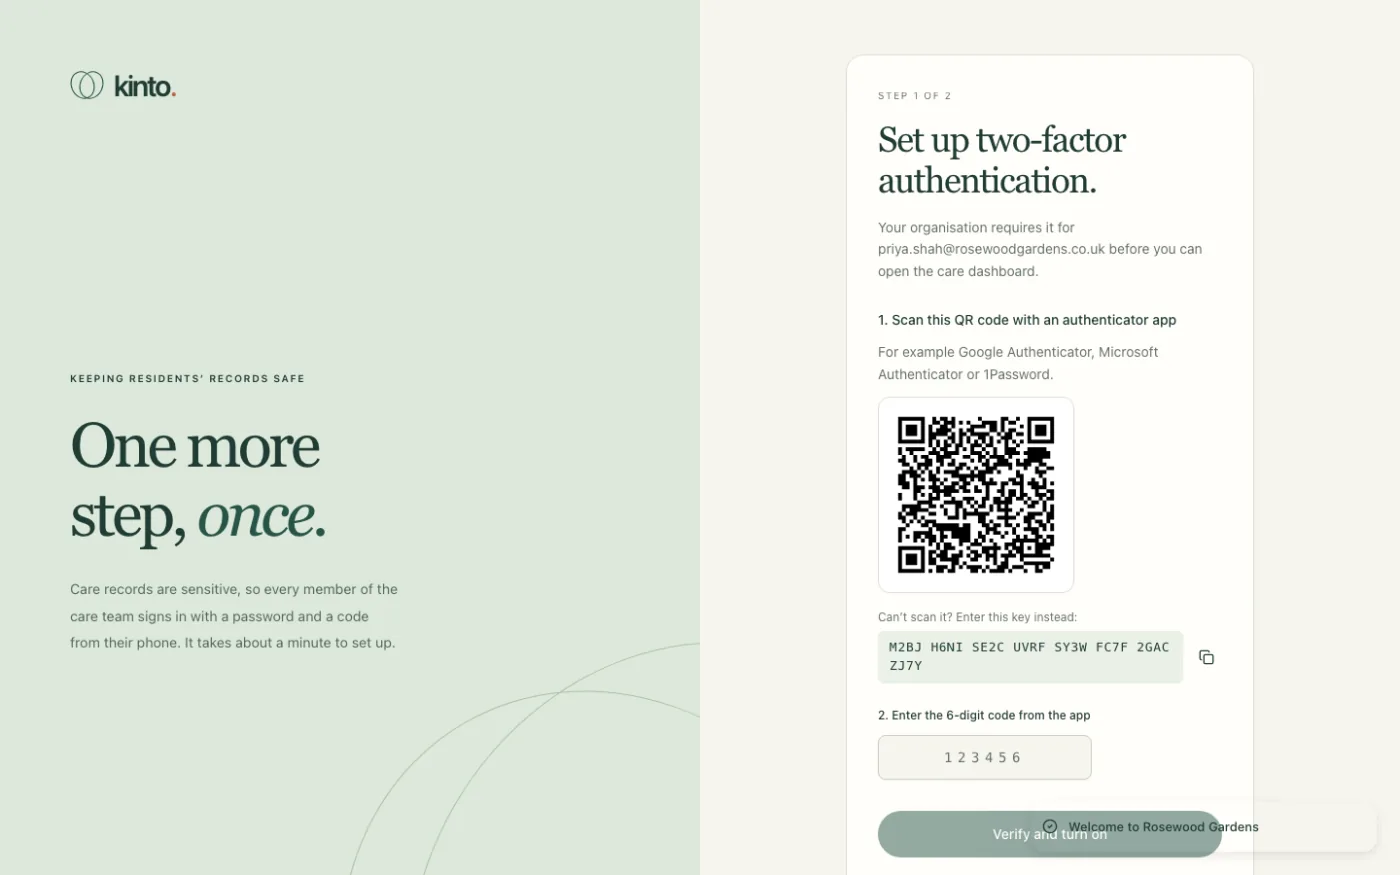
- Open your authenticator app and choose to add an account (often a + button), then Scan a QR code.
- Point your phone’s camera at the QR code on the screen. A Kinto entry appears in the app with a 6-digit code.
- Can’t scan it? Under Can’t scan it? Enter this key instead: use the copy button and type the key into the app by hand.
- Type the 6-digit code from the app into 2. Enter the 6-digit code from the app.
- Select Verify and turn on.
Step 2 of 2: save your recovery codes
Next you’ll see Save your recovery codes. These 10 codes are how you get in if you lose your phone. Each one works once. You won’t see them again, so save them now.
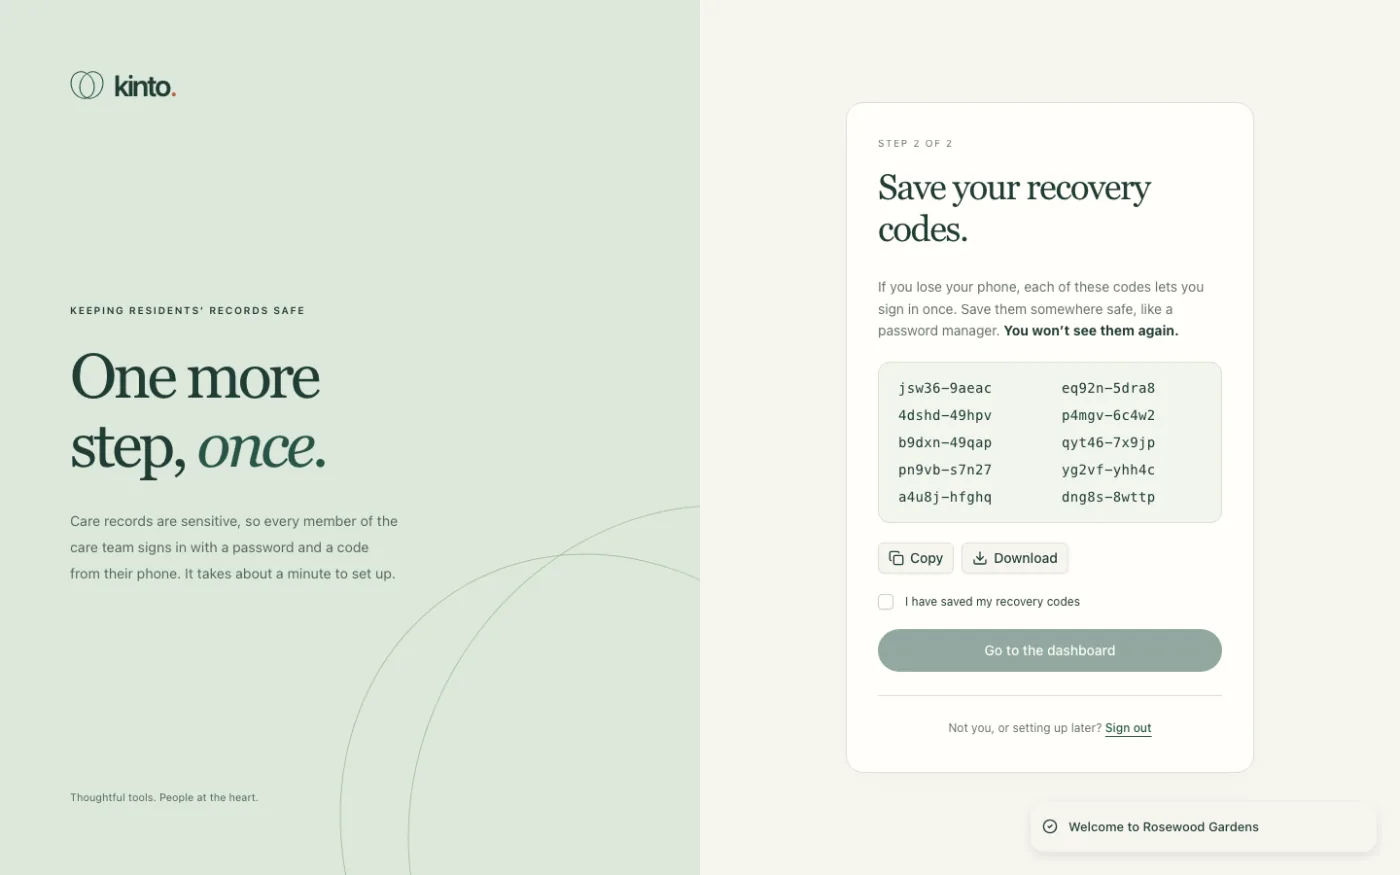
- Select Download to save them as a file (
kinto-recovery-codes.txt), or Copy to paste them into your password manager. You can also write them down. - Keep them somewhere safe and separate from your phone. Don’t keep them on a shared computer or in a shared drive.
- Tick I have saved my recovery codes.
- Select Go to the dashboard. You’ll see Two-factor authentication is on.
If the invitation link doesn’t work
If you see This invitation can’t be used., the link has expired, has already been used, or was replaced when your manager resent it. Ask your manager to send it again from the Team page. Only the newest link works.
Need to stop halfway? Select Sign out under Not you, or setting up later?. Next time you sign in you’ll be taken straight back to the set-up screen.
Lost or new phone, recovery codes and resets
Sign in with a recovery code, move to a new phone, or ask an admin for a reset.
Your authenticator app lives on your phone, so a lost, broken or replaced phone needs a little care. There are three ways back in, depending on what you still have.
| Situation | What to do |
|---|---|
| New phone, old one still works | Move Kinto to the new phone from Settings (below). |
| Phone lost or broken, you have recovery codes | Sign in with a recovery code, then move Kinto to your new phone. |
| No phone and no recovery codes | Ask an owner or admin in your care home to reset your two-factor authentication. |
Sign in with a recovery code
- Sign in with your email and password as usual.
- On Enter your code., select Lost your phone? Use a recovery code.
- Type one of your saved recovery codes, which look like
abcde-12345, into Recovery code.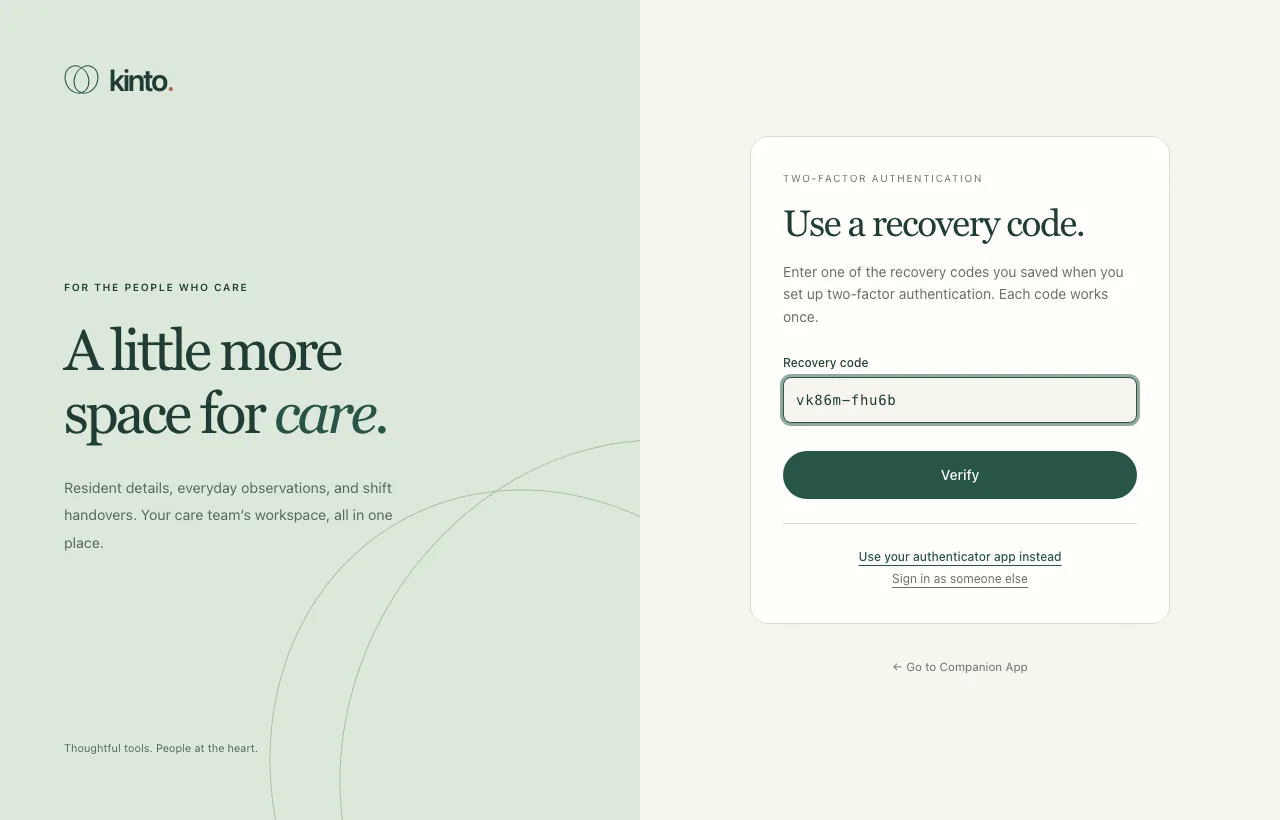
- Select Verify. Cross that code off: it won’t work again.
Move Kinto to a new phone
- Install your authenticator app on the new phone.
- In Kinto, open Settings from the menu on the left.
- In Two-factor authentication, select Move to a new phone.
- Under Current code from your authenticator, or a recovery code, type a code from your old phone, or a recovery code if you don’t have it. Select Continue.
- Scan the new QR code with the new phone, type the 6-digit code it shows and select Verify and turn on.
- Save the new set of recovery codes, tick I have saved my recovery codes and select Done. Your old phone and your old recovery codes stop working.
Running low on recovery codes
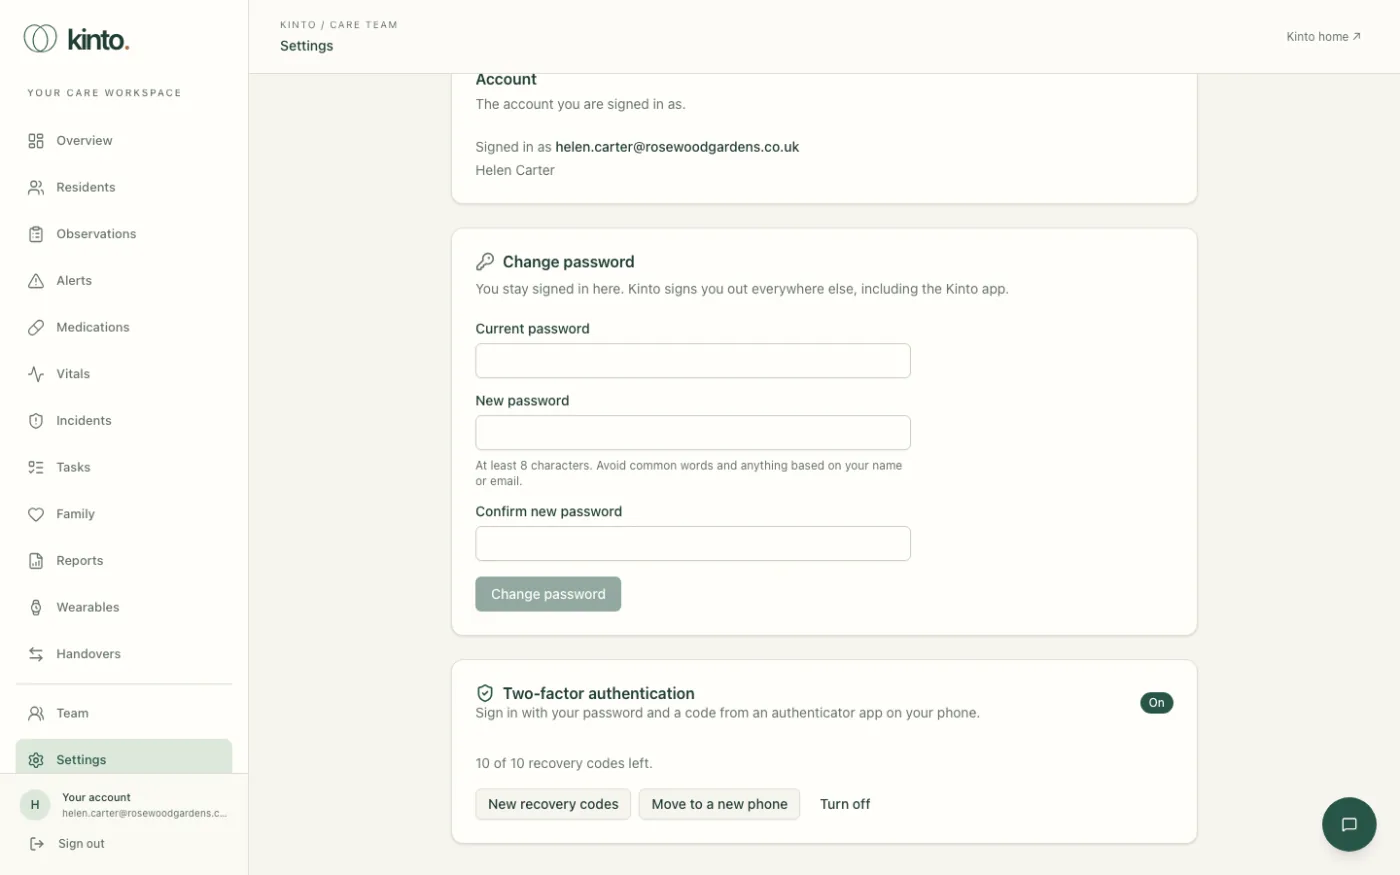
Settings shows how many you have left, for example 7 of 10 recovery codes left. When you’re down to 3 or fewer it adds Generate new ones soon. Select New recovery codes, enter a current code, and save the 10 new codes. The old ones stop working.
Ask for a reset
If you have neither your phone nor a recovery code, speak to an owner or admin at your care home, in person or by phone. They can reset your two-factor authentication from the Team page (see Managing your team). Then:
- Sign in with your email and password.
- You’ll go straight to Set up two-factor authentication. Follow the same steps as the first time: scan the QR code, enter the code and save your new recovery codes.
Finding your way around the dashboard
The menu, the overview page and what each section is for.
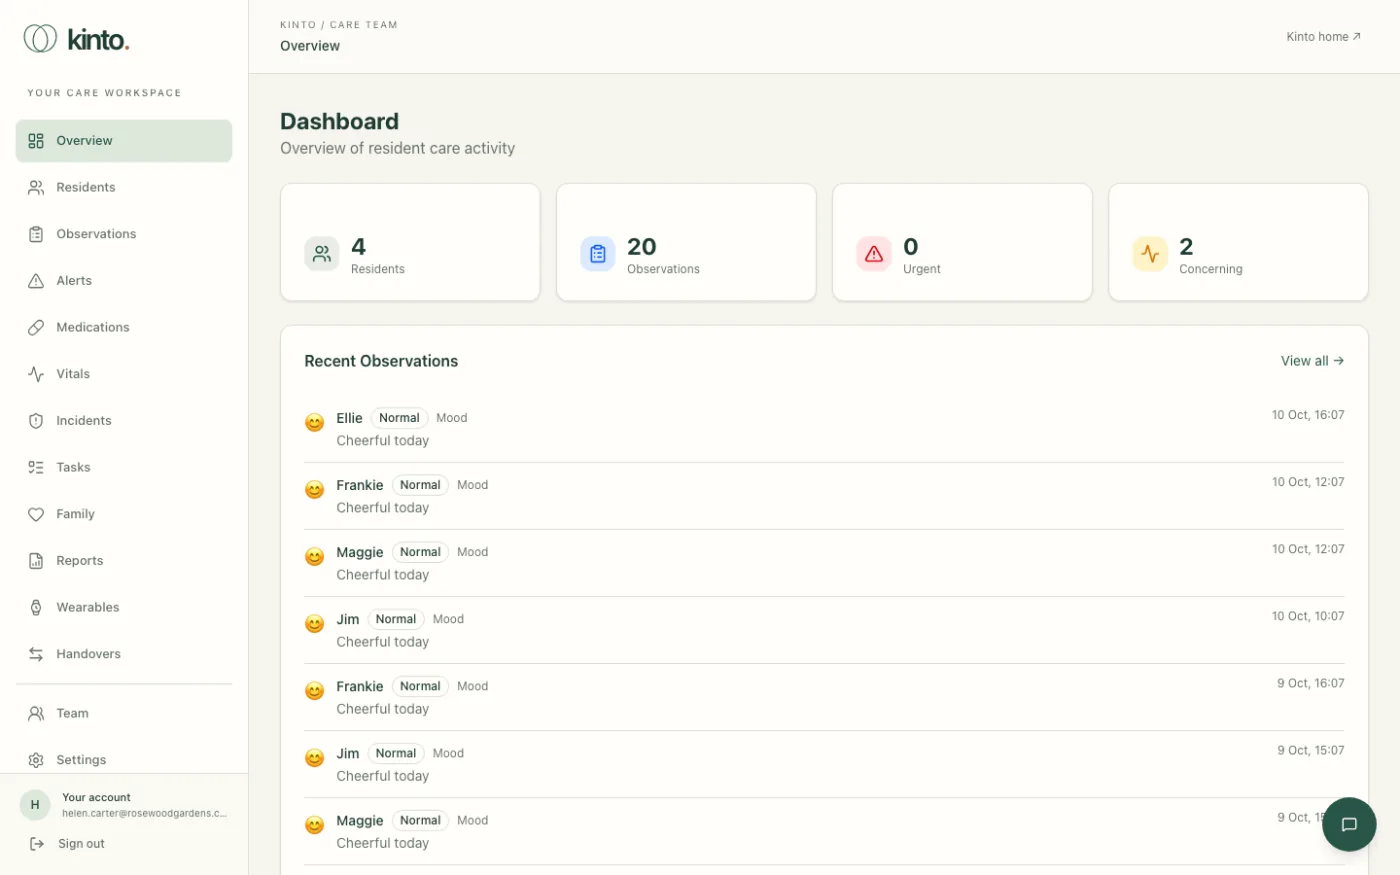
When you sign in you land on Overview. The menu on the left, under Your care workspace, takes you to every part of the dashboard. The page you’re on is highlighted, and its name is shown at the top next to Kinto / Care team.
The Overview page
- Four tiles at the top: Residents, Observations, Urgent and Concerning. The last three count the recent observations shown on the page.
- Recent Observations lists the latest 8 observations across the home. Select a resident’s name to open their profile, or View all → to open Observations.
What’s in the menu
| Menu item | What it’s for |
|---|---|
| Residents | Find a resident and open their profile. More |
| Observations | Every observation across the home, with filters. More |
| Alerts | Changes Kinto has noticed that may need a look. More |
| Medications | Medication schedules and the recent log. More |
| Vitals | The latest vital signs readings. More |
| Incidents | The incident log. More |
| Tasks | Care tasks to do, in progress and done. More |
| Family | Family links, messages from relatives and planned visits. More |
| Reports | Weekly summaries for each resident. More |
| Wearables | Residents’ wearable devices and consent. More |
| Handovers | Shift handover summaries. More |
| Team | Owners and admins only: who can use the workspace. More |
| Settings | Your account, password and two-factor authentication. More |
At the bottom of the menu, Your account shows the email you’re signed in with, and Sign out signs you out. Kinto home ↗ at the top right opens the public Kinto website.
Dates and times are always shown in UK time, day first, for example 10 Oct, 16:14, whatever your computer is set to.
Ask Sarah
The round green chat button in the bottom right corner of every page opens Ask Sarah, the care team assistant. See Ask Sarah.
What your role lets you do
- Owners, admins and carers can read and change care records (residents, medication rounds, observations, incidents, tasks and handovers) and use Ask Sarah.
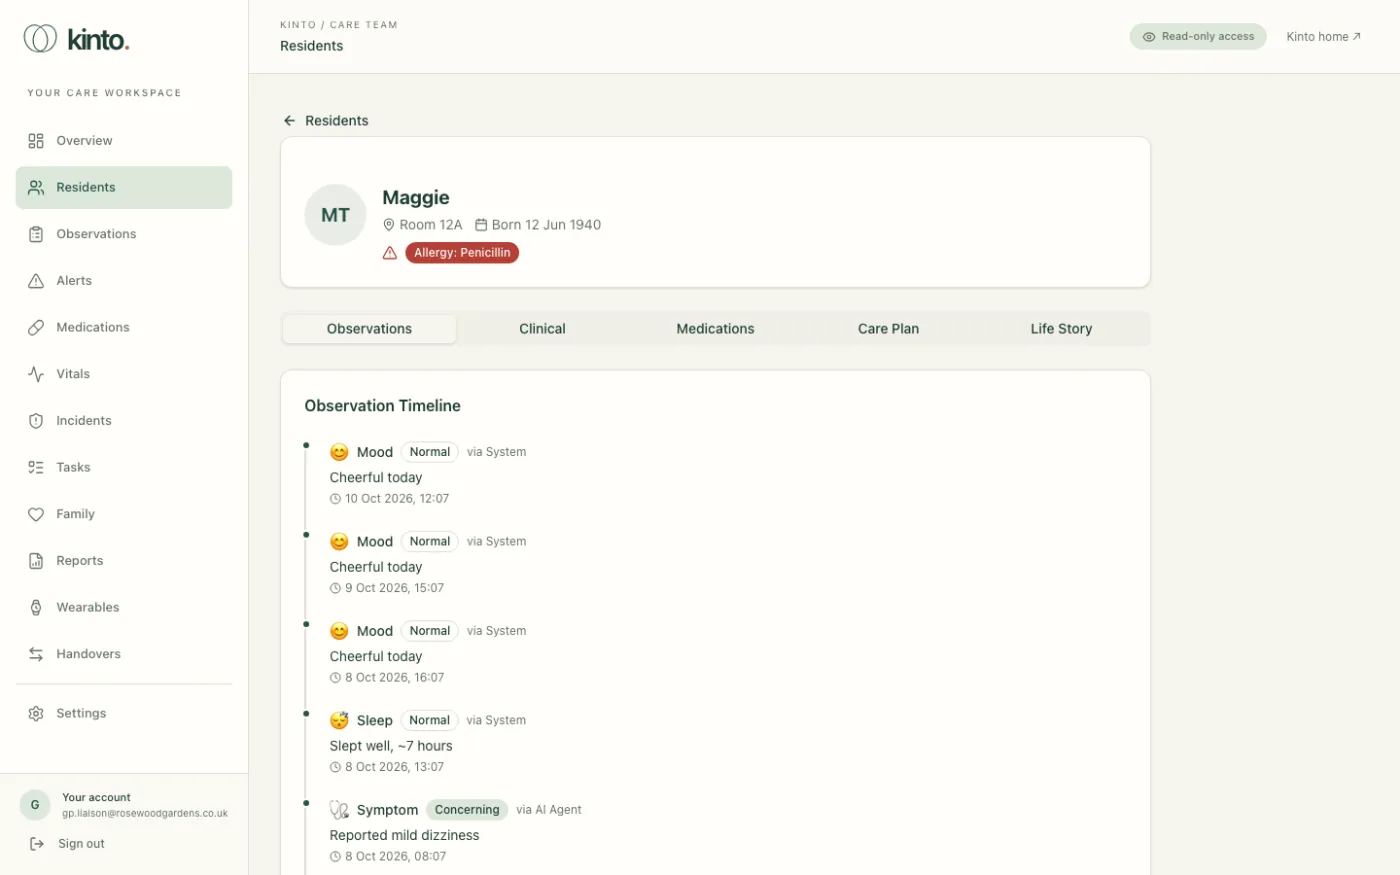
- Viewers see the same pages but can’t change anything. They see Read-only access at the top of every page, buttons such as Add Observation and Ack are hidden or greyed out, and the Ask Sarah button isn’t shown.
- Team and Audit trail only appear in the menu for owners and admins.
On a tablet or phone
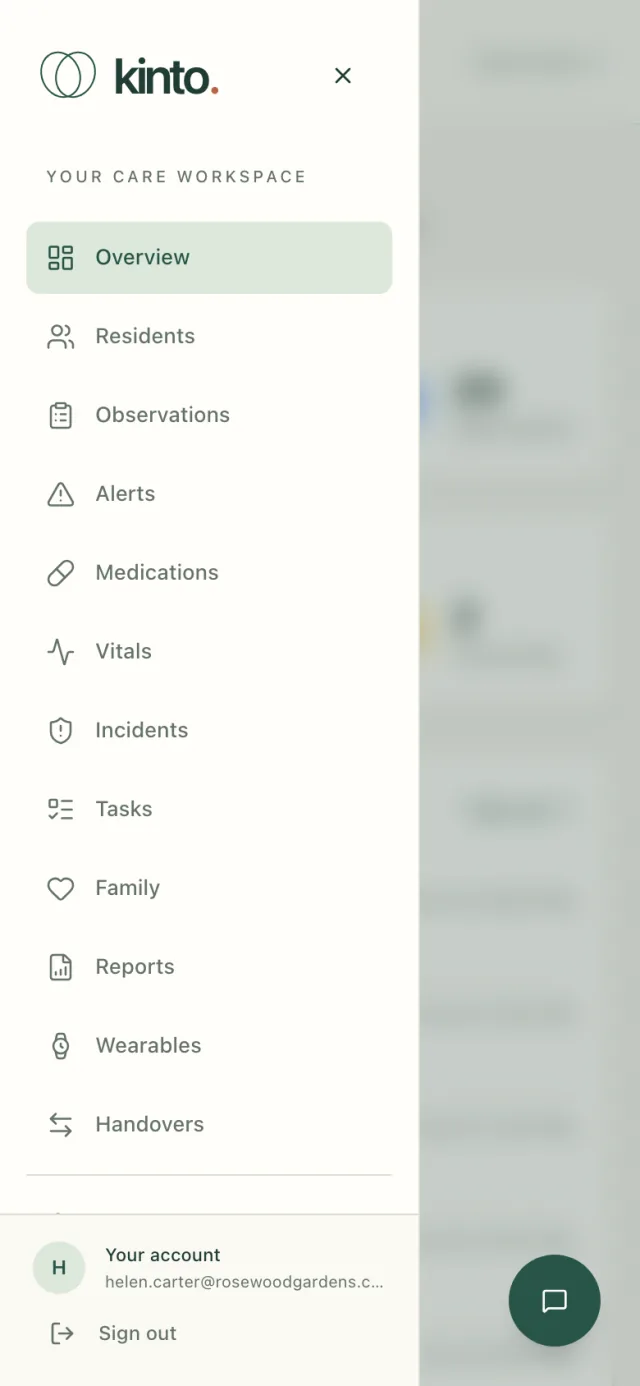
On a narrow screen the menu is hidden. Tap the menu button at the top left (Open navigation) to show it, and the cross (Close navigation) to hide it again.
Residents and the resident profile
Add and edit residents, their allergies, conditions, contacts and preferences, set them up in the Sarah app, and record when they leave.
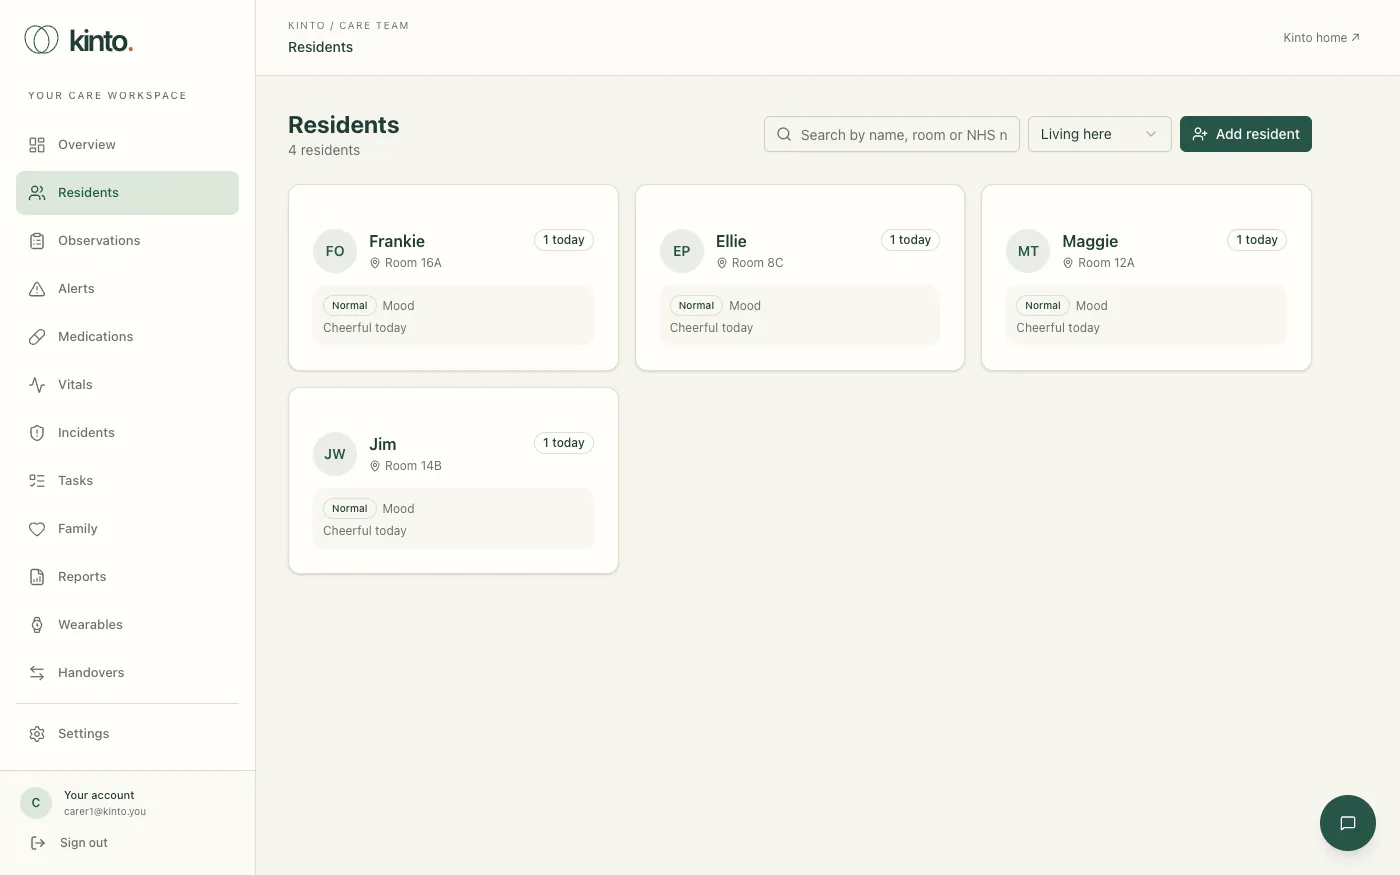
Residents lists everyone living at your home. Each card shows the resident’s initials, the name they like to be called, their room, how many observations were recorded in the last 24 hours (for example 1 today) and their latest observation.
Find a resident
- Select Residents in the menu.
- Type part of their name, room or NHS number in Search by name, room or NHS number…, for example
Maggieor12A. - Select their card to open their profile.
The list shows residents Living here. To find someone who has left, change the filter next to the search box to Discharged, Died or Everyone.
Add a resident
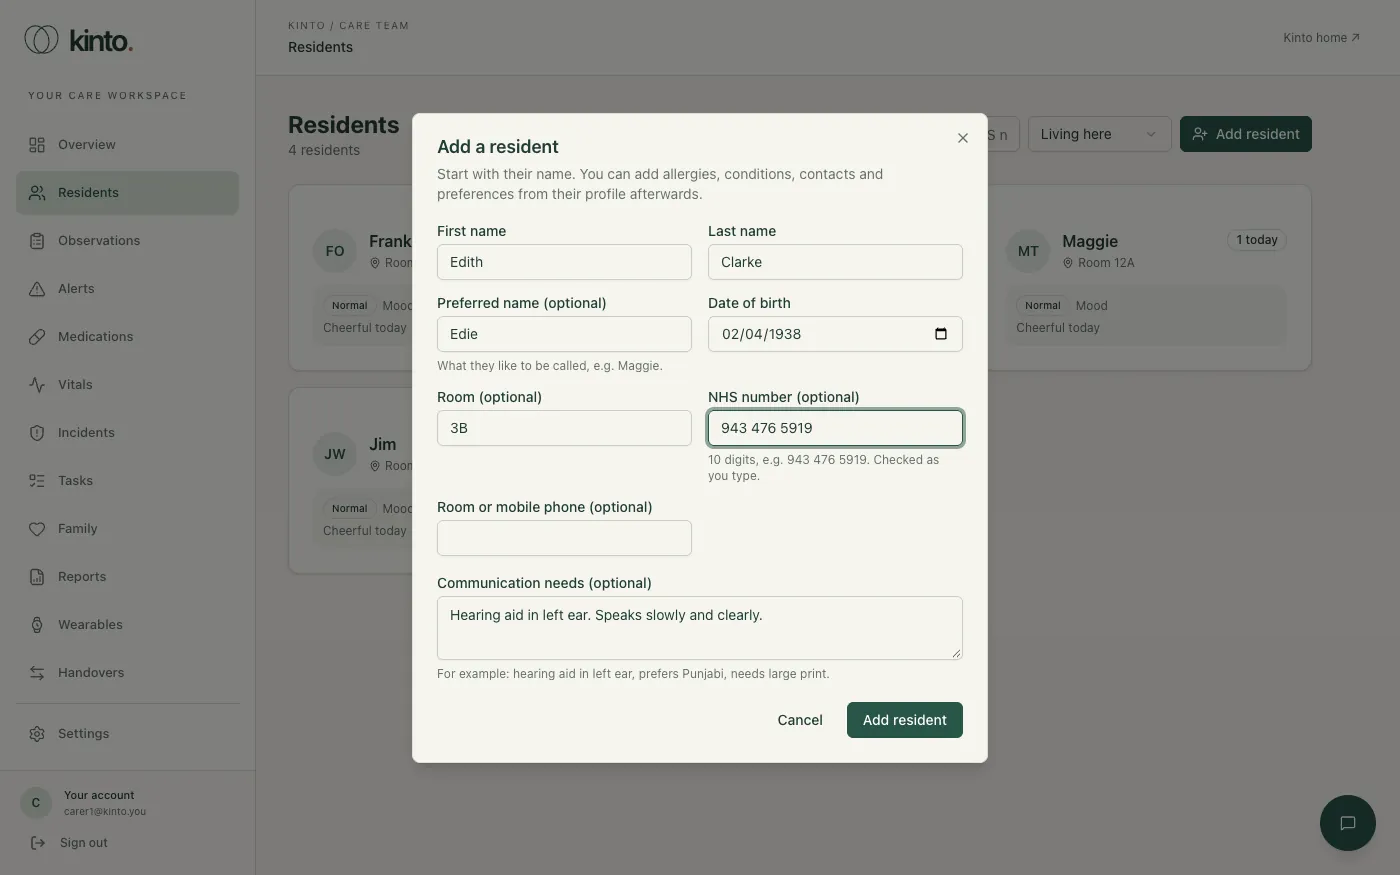
- On Residents, select Add resident.
- Enter their First name and Last name. Add a Preferred name if they like to be called something else: it’s shown everywhere in Kinto.
- Add their Date of birth, Room and, if you have it, their NHS number. Kinto checks the NHS number as you type and says if it fails the check digit, so you can correct a typing slip.
- Add any Communication needs, for example a hearing aid or a preferred language.
- Select Add resident. Their profile opens, ready for you to add allergies, conditions, contacts and preferences.
Photos can’t be added from the dashboard yet; residents show their initials.
The resident profile
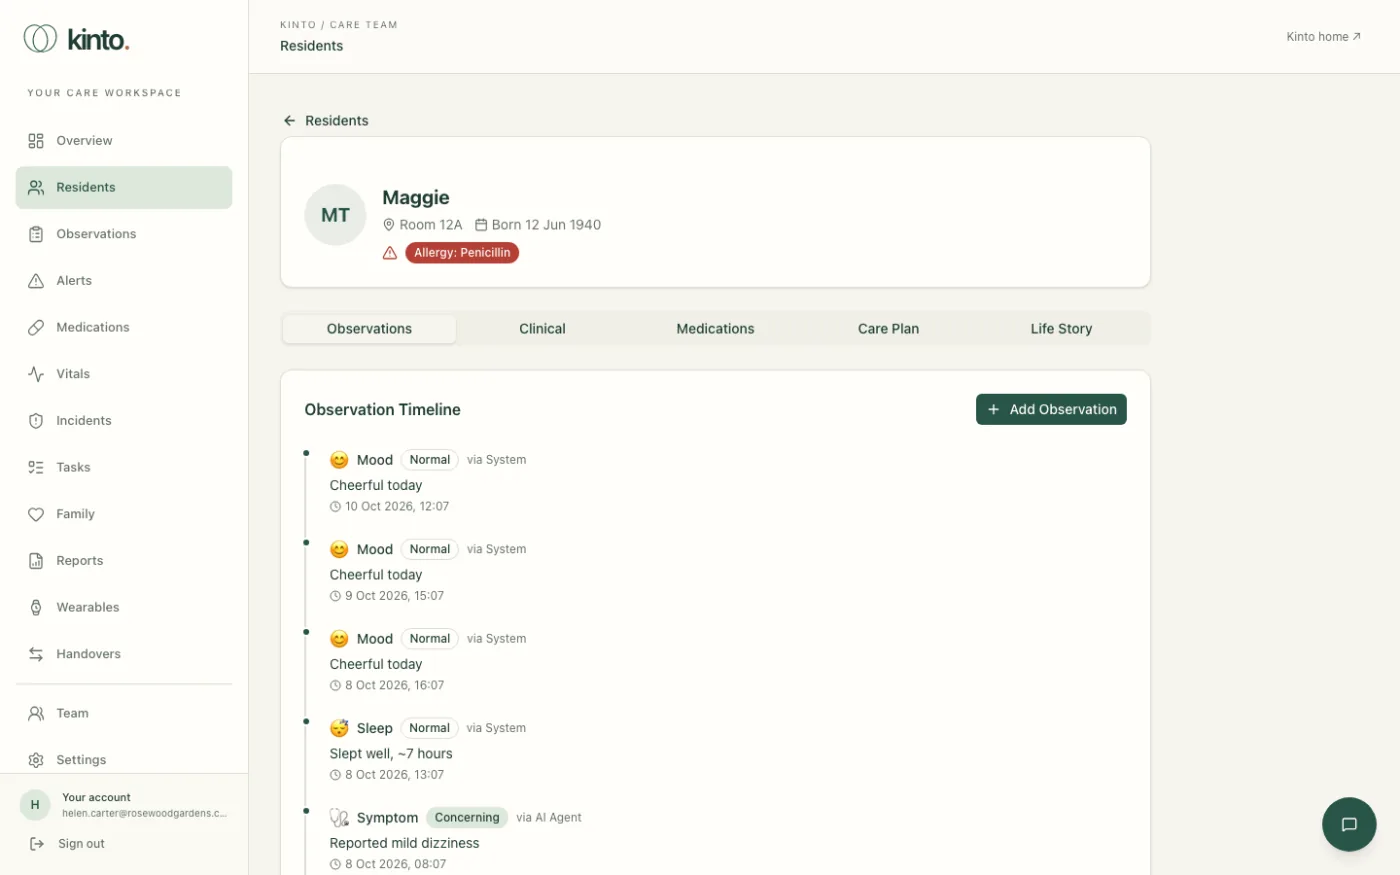
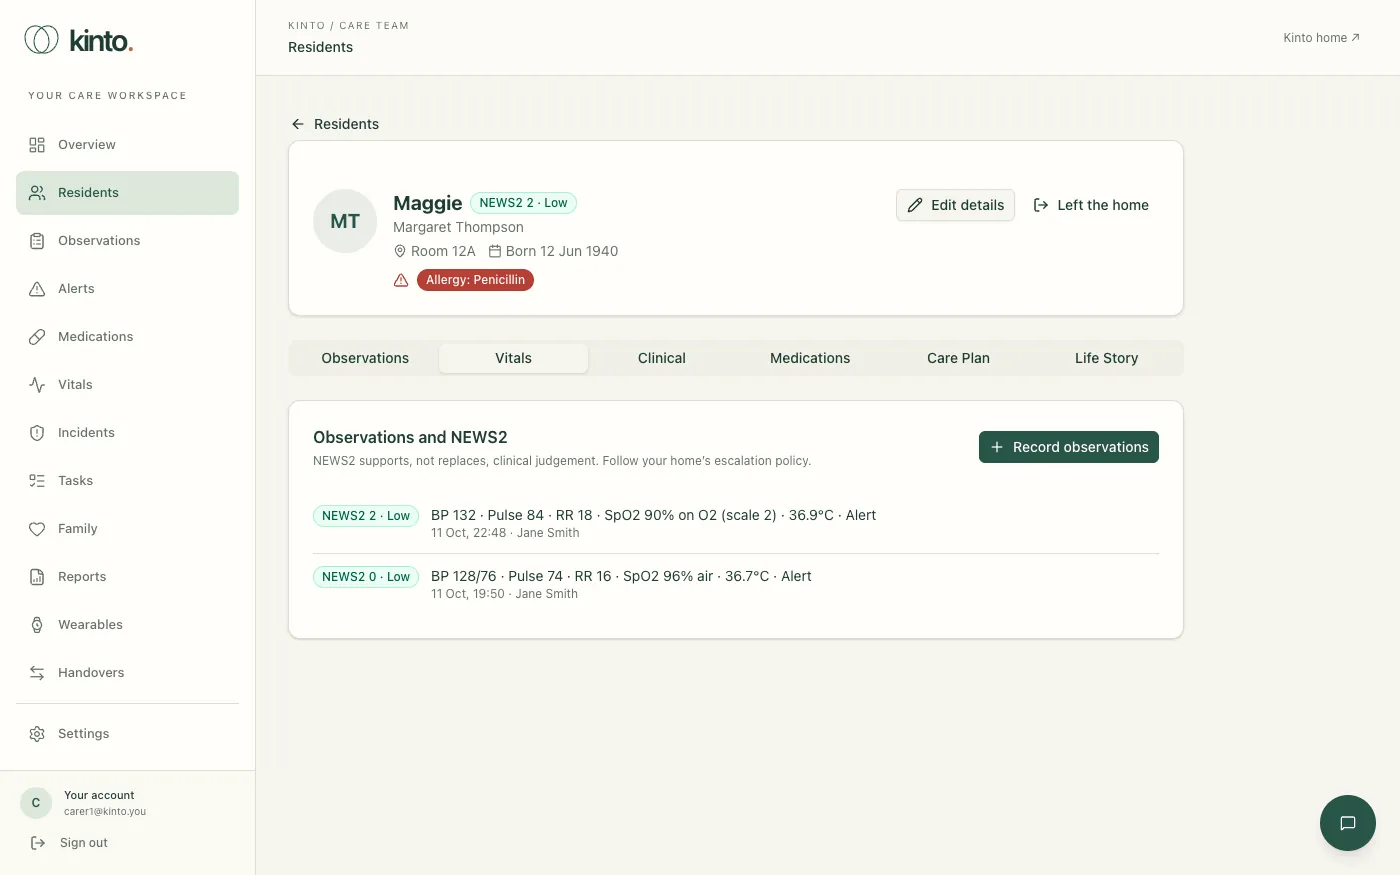
The top of the profile shows the resident’s name, room, date of birth and NHS number, and their latest NEWS2 score. Severe allergies are shown in red, for example Allergy: Penicillin, so they’re seen first. Select Residents above the name to go back to the list.
Below that are six tabs:
| Tab | What it shows |
|---|---|
| Observations | The Observation Timeline, newest first. Care staff can add an observation here. |
| Vitals | Sets of observations with their NEWS2 score. See Vitals and NEWS2. |
| Clinical | Preferences & communication, Medical Conditions, Allergies, Risk assessment and Emergency Contacts. |
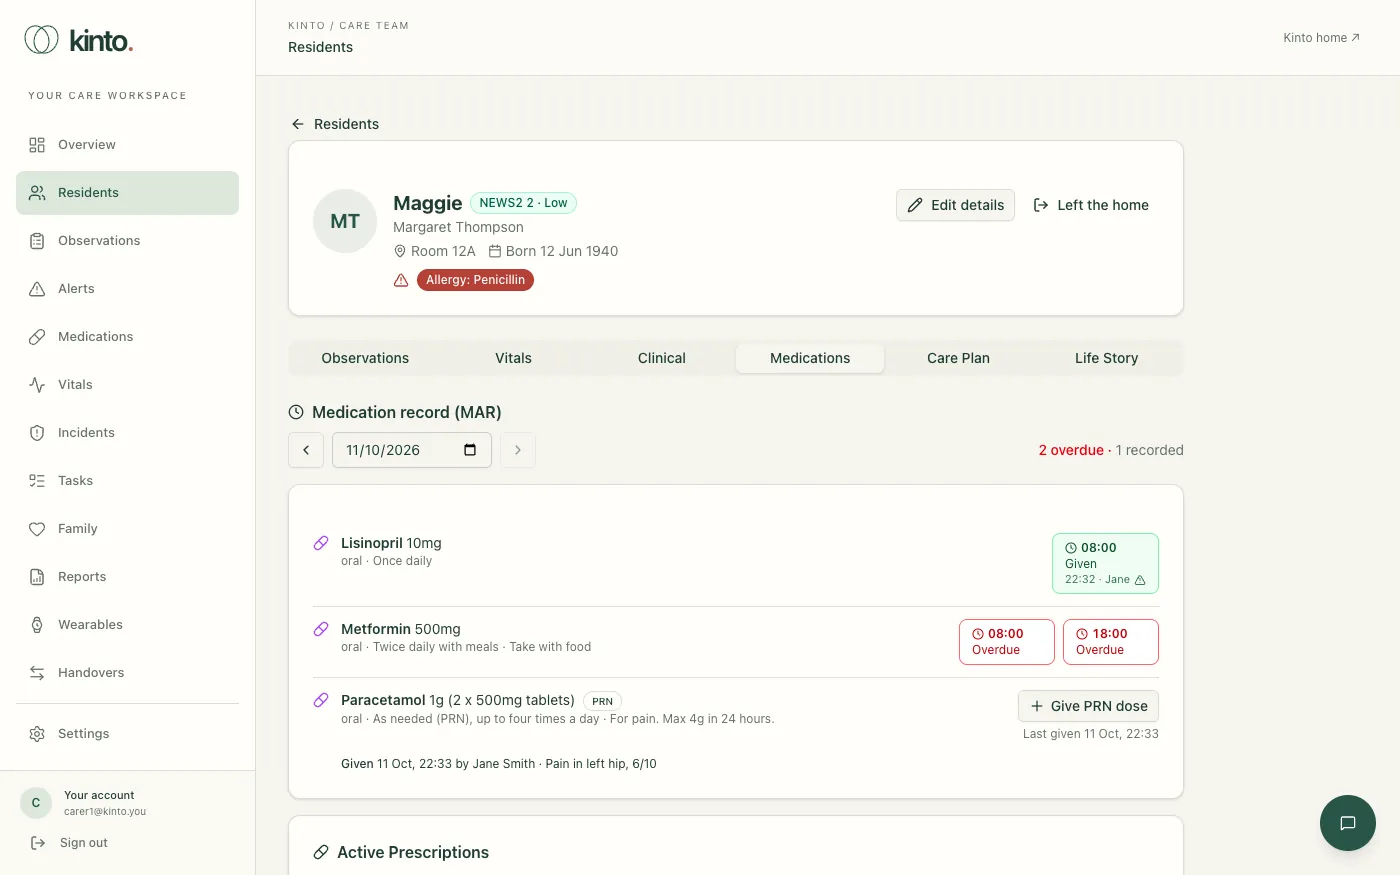
| Medications | The resident’s Medication record (MAR) for the day, their Active Prescriptions and Active Treatments. |
| Care Plan | The care plan summary, when it’s due for review, and its Goals. |
| Life Story | Memories, family, hobbies, music and milestones. |
Edit a resident’s details
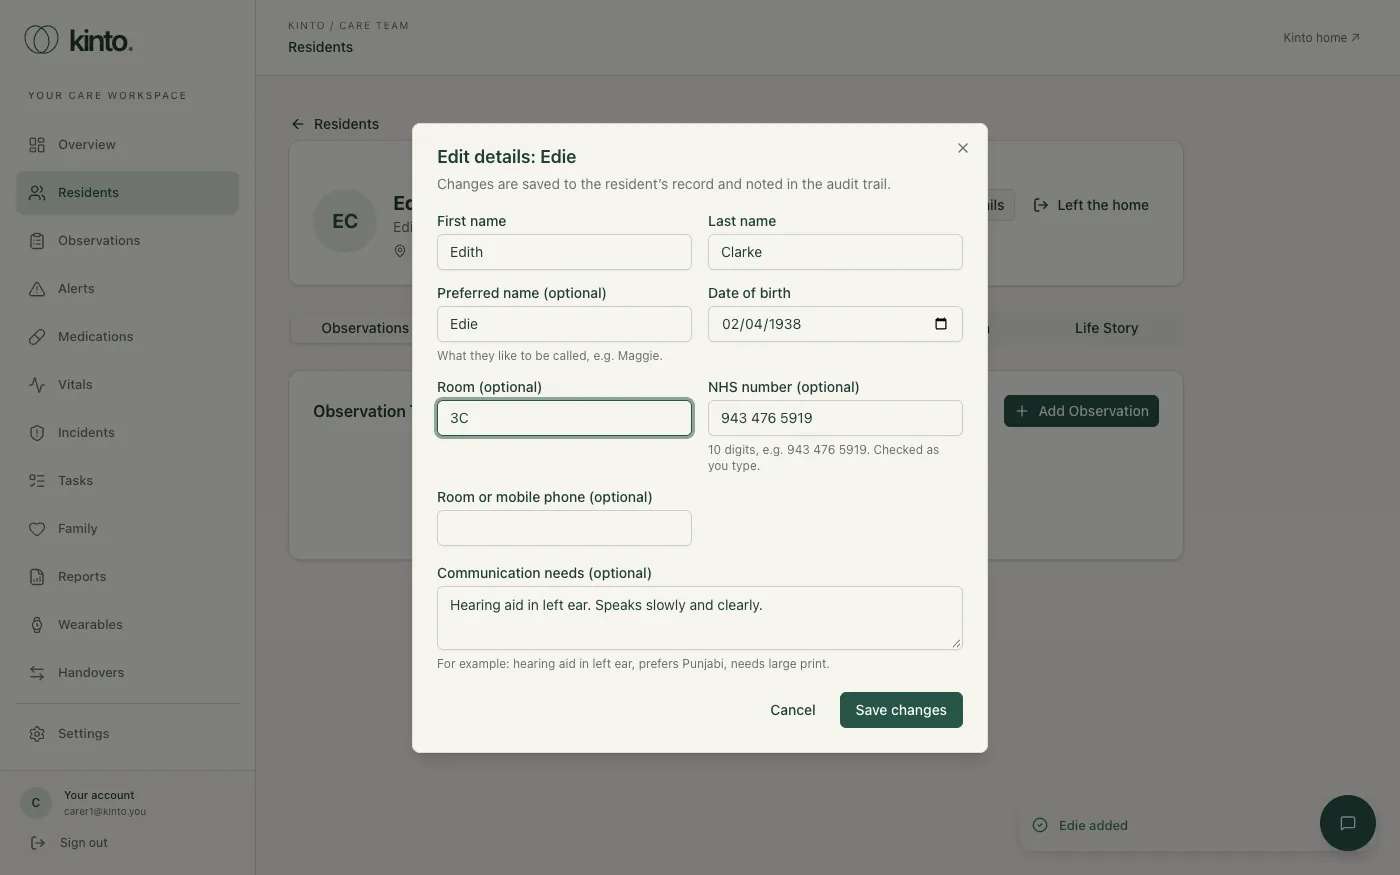
- Open the resident’s profile and select Edit details at the top right.
- Change what you need, for example their room.
- Select Save changes.
Allergies, conditions and emergency contacts
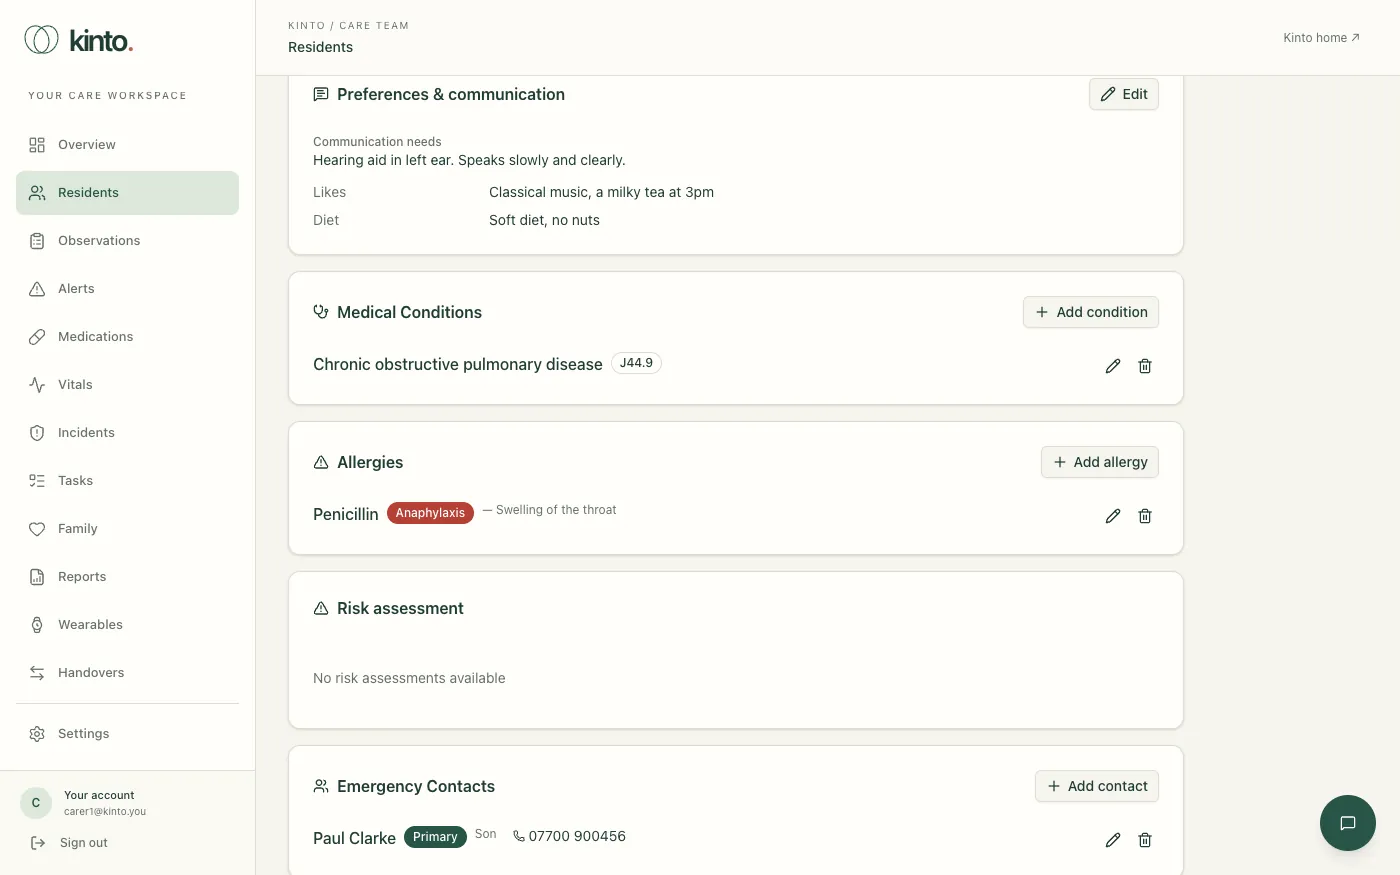
On the Clinical tab, each panel has an Add button, and each entry has a pencil to edit it and a bin to remove it.
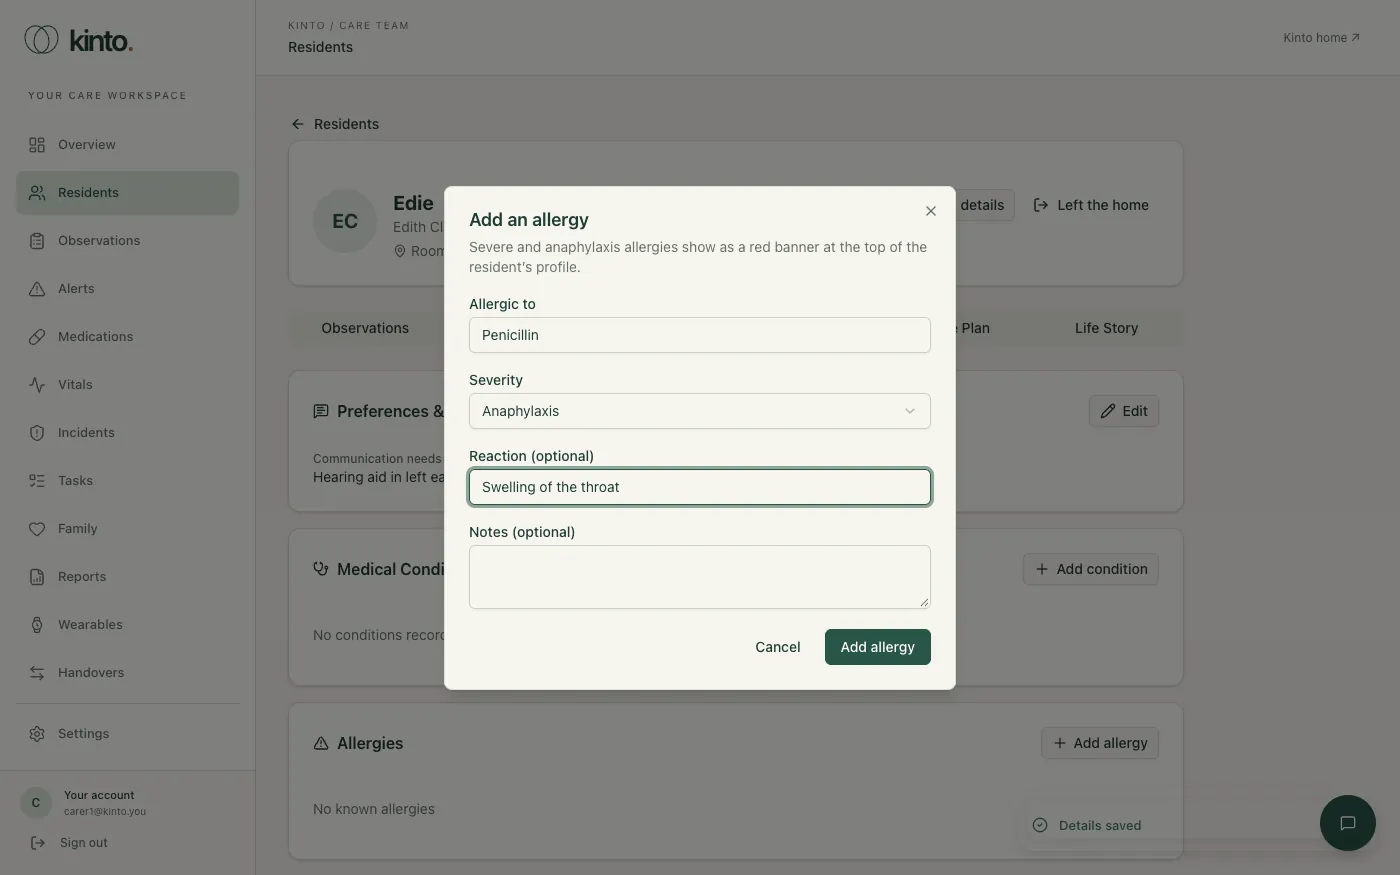
- Select Add allergy, enter what they’re allergic to, choose the severity (Mild, Moderate, Severe or Anaphylaxis) and the reaction, then select Add allergy.
- Select Add condition for a medical condition. The ICD-10 code is optional; if you enter one, Kinto checks its format (for example
E11.9). - Select Add contact for an emergency contact: name, relationship and phone are needed. Tick Main contact (call first) for the person to ring first; only one contact can be the main one.
Preferences and communication needs
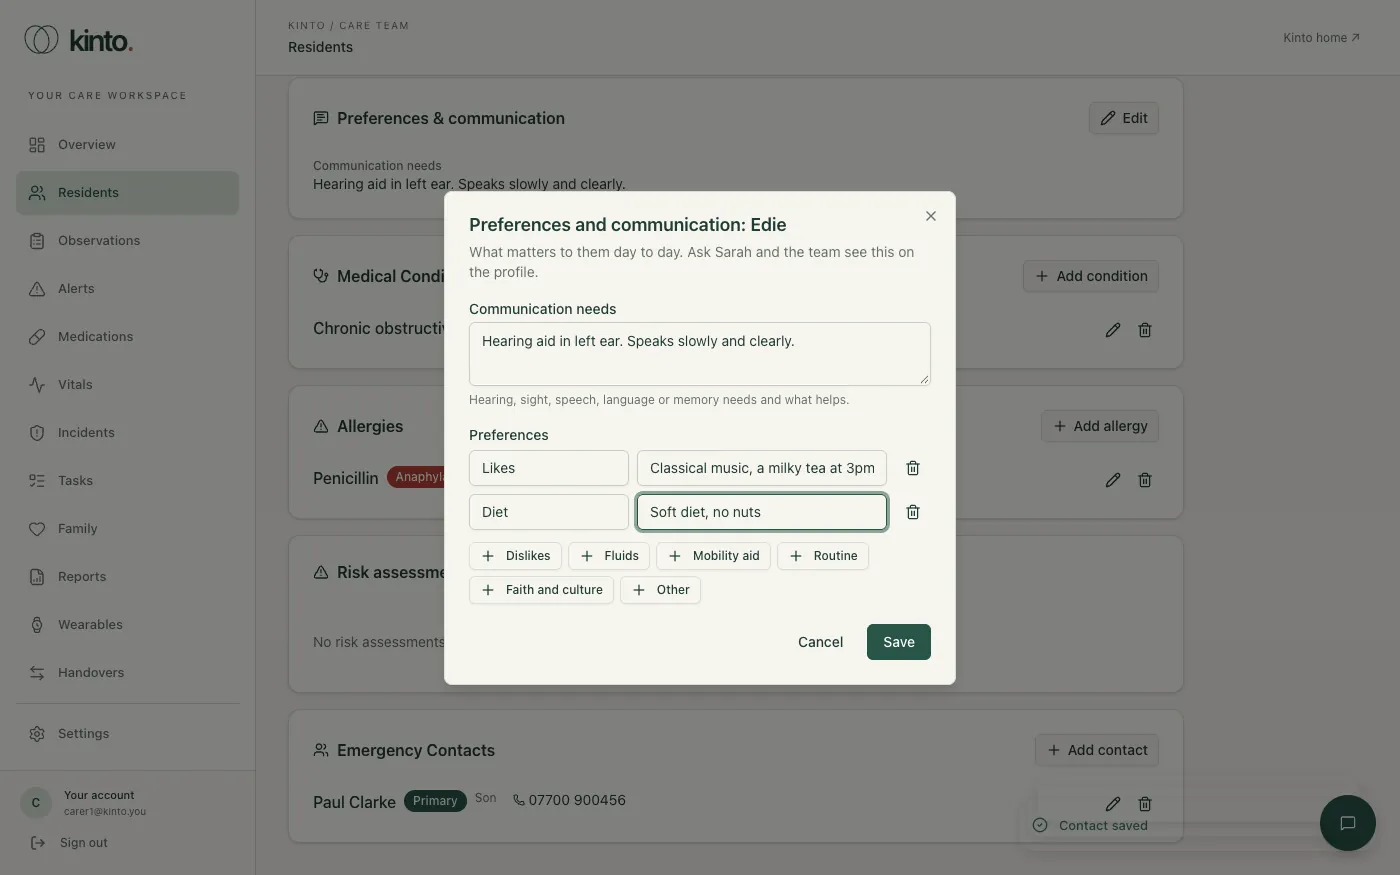
- On the Clinical tab, select Edit on Preferences & communication.
- Describe any Communication needs.
- Use the buttons such as Likes, Diet or Routine (or Other) to add a preference, and type the details next to it.
- Select Save.
Setting a resident up in the Sarah app
Residents can talk to Sarah on the Kinto app without an email address or password. They join with your home’s code, their name and their date of birth, which Kinto checks against their record here.
- Make sure their profile has a Date of birth. Without one they can’t join: add it with Edit details.
- Find the home code in Settings under Sarah app for residents, for example ROSE-7KQ4. Select Print poster for a large-print sheet with the code and the steps.
- Tell the resident: “Open Kinto, tap I live at a care home, enter this code, then say your name and date of birth.”
The Sarah app card on their profile shows whether they’ve joined and when they were last seen. Their first device joins straight away. For a new or second device, select Allow a new device: they then have 30 minutes to join on it. Turn off app access signs them out everywhere until someone allows a new device.
When a resident leaves the home
A resident’s record is never deleted when they leave: it has to be kept.
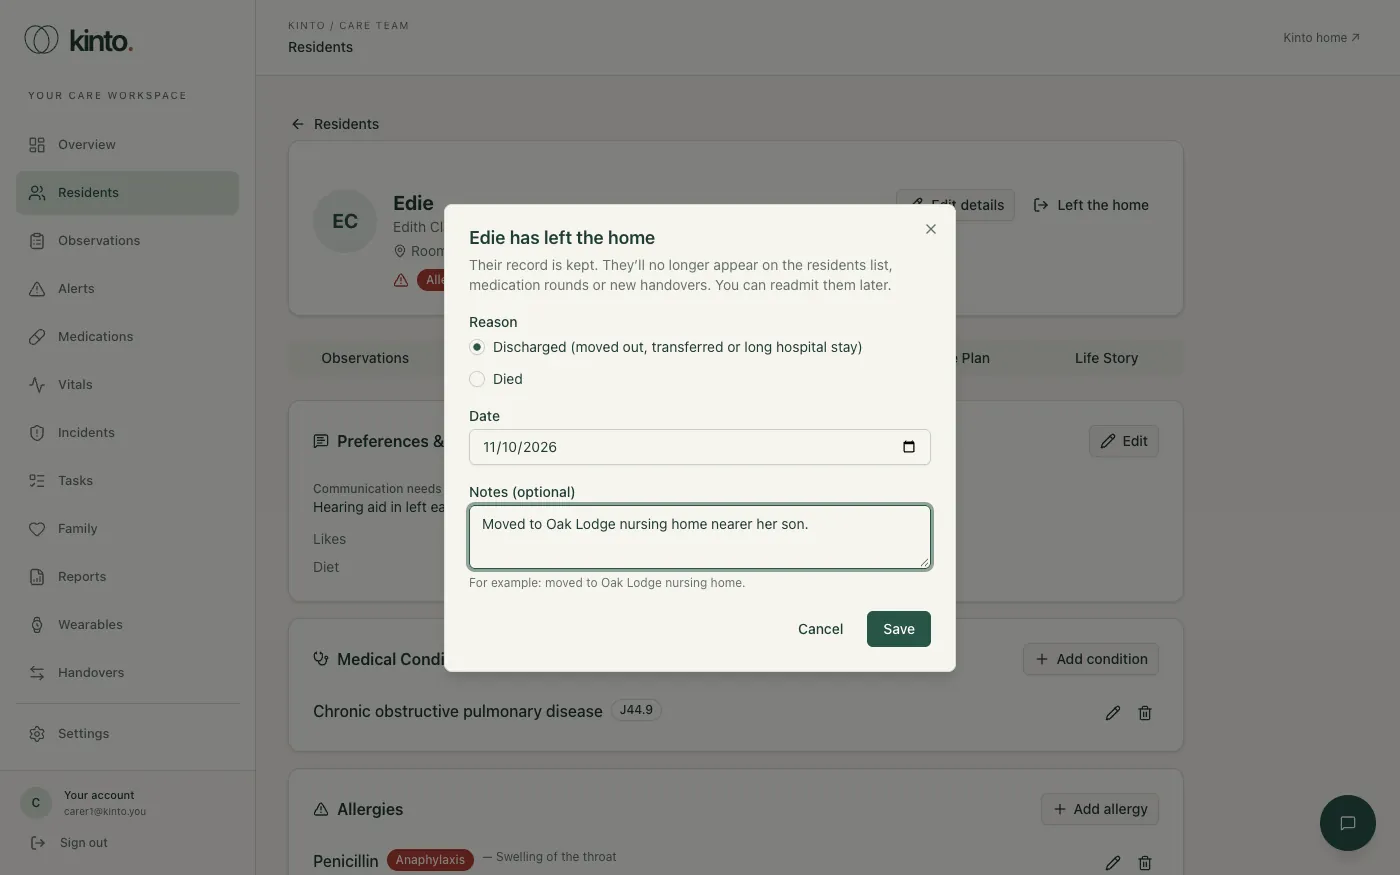
- Open their profile and select Left the home.
- Choose Discharged (moved out, transferred or a long hospital stay) or Died, check the date and add a note if useful.
- Select Save. They no longer appear on the residents list, medication rounds or new handovers.
If they come back, open their profile (filter the list to Discharged) and select Readmit. Only owners and admins can delete a resident’s record entirely.
Recording and reviewing observations
Log what you notice, by typing or dictating, and review observations across the home.
An observation is a short note about what you noticed: mood, sleep, eating, a symptom, an activity. Observations build the picture of how each resident is doing, feed into alerts, handovers and weekly reports, and help Sarah understand the person she talks to.
Record an observation
You add observations from the resident’s profile.
- Open Residents and select the resident.
- On the Observations tab, select Add Observation. The Log Observation box opens with the resident’s name.
- Choose a Type: Mood, Symptom, Sleep, Medication, Wellness, Activity, Nutrition or Social.
- Choose a Severity:
- Normal: as expected for this person.
- Concerning: different from usual and worth keeping an eye on.
- Urgent: needs attention now. Recording it in Kinto doesn’t replace telling the nurse in charge.
- Type what you saw in Description, or select Dictate and speak (see below).
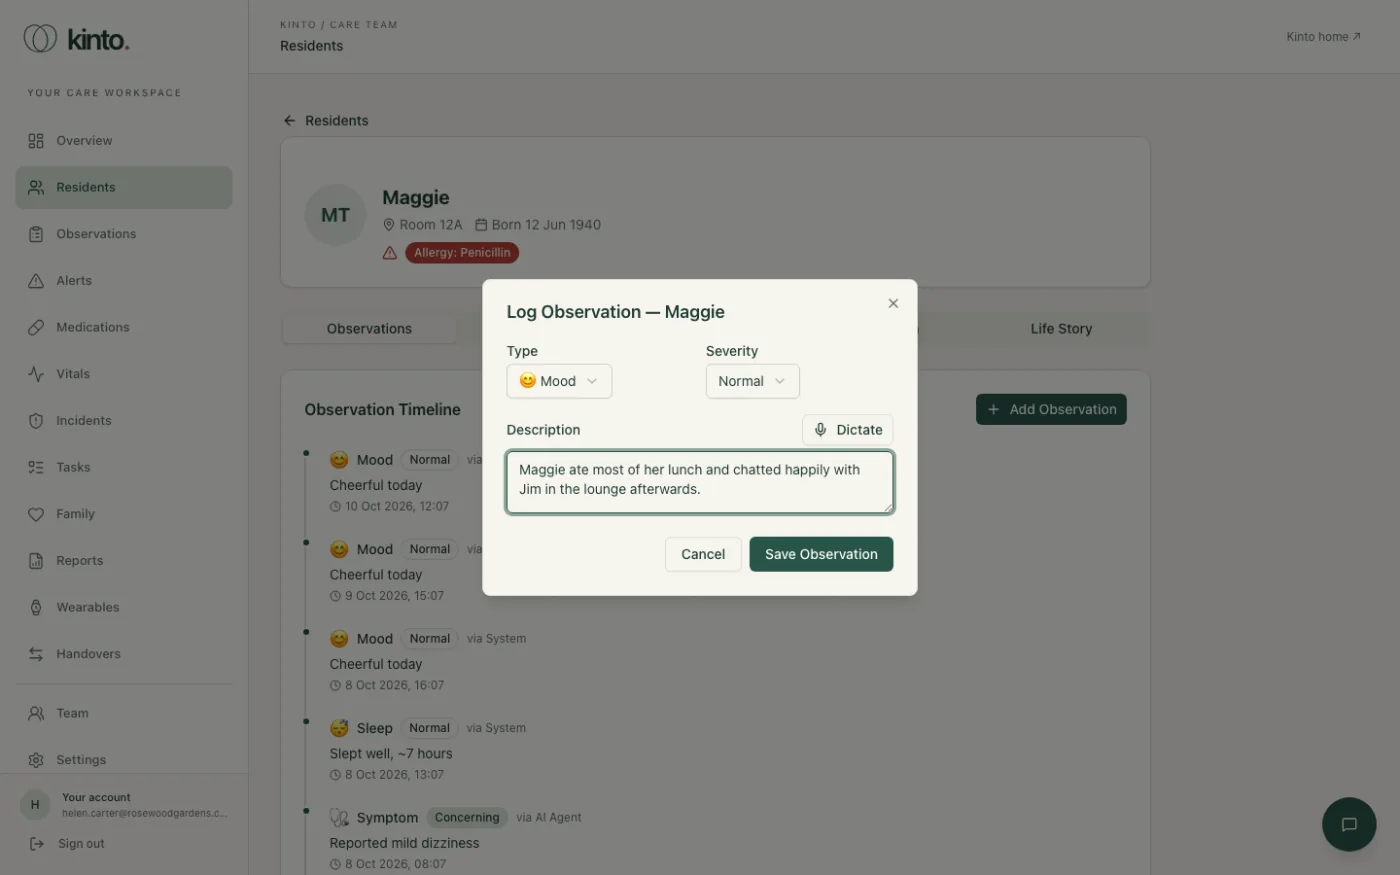
- Select Save Observation. The box closes and your observation appears at the top of the timeline, marked via Carer.
If you forget the description you’ll see Please enter a description. The time is recorded as the moment you save, so record observations as you go rather than at the end of the shift.
Dictating instead of typing
- Select Dictate above the description box. The first time, your browser asks to use the microphone: choose Allow.
- Speak clearly. You’ll see Listening... and your words appear as you talk.
- Select Stop when you’ve finished, then read the text back and correct anything misheard before saving.
Write observations that help
- Say what you saw or heard, not just a judgement: “Ate half her lunch, said she wasn’t hungry” is more useful than “Poor appetite”.
- Include when it changed and what you did about it.
- Keep to what’s needed for care. Don’t include other residents’ details.
Review observations across the home
- Select Observations in the menu. You’ll see Care observations across all residents, newest first.
- Use the filters to narrow the list: All types to pick a type, and All severities to show only Normal, Concerning or Urgent.
- Select a resident’s name to open their profile.
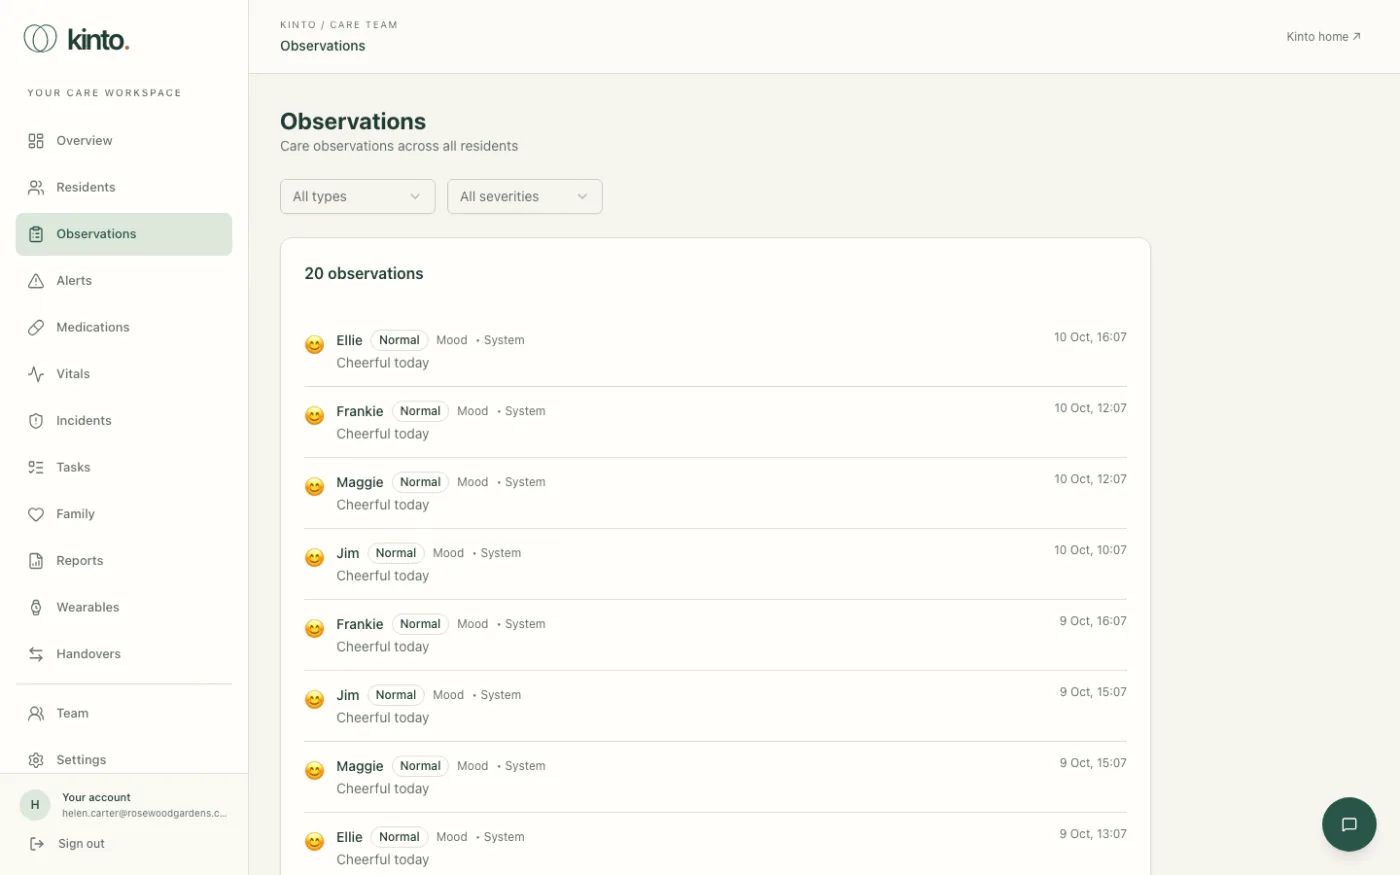
Some observations are added automatically: via AI Agent means Sarah noted something during a conversation with the resident, such as them mentioning dizziness. Treat these like a colleague’s note: check with the resident and use your judgement.
Alerts
What raises an alert, and how to acknowledge or dismiss one.
Alerts are changes Kinto has noticed that may need a look, for example a resident’s mood being lower than their usual pattern for several days, disrupted sleep, a late medicine, or a rising fall-risk score. They help you spot things early. They are not an emergency alarm.
Reading an alert
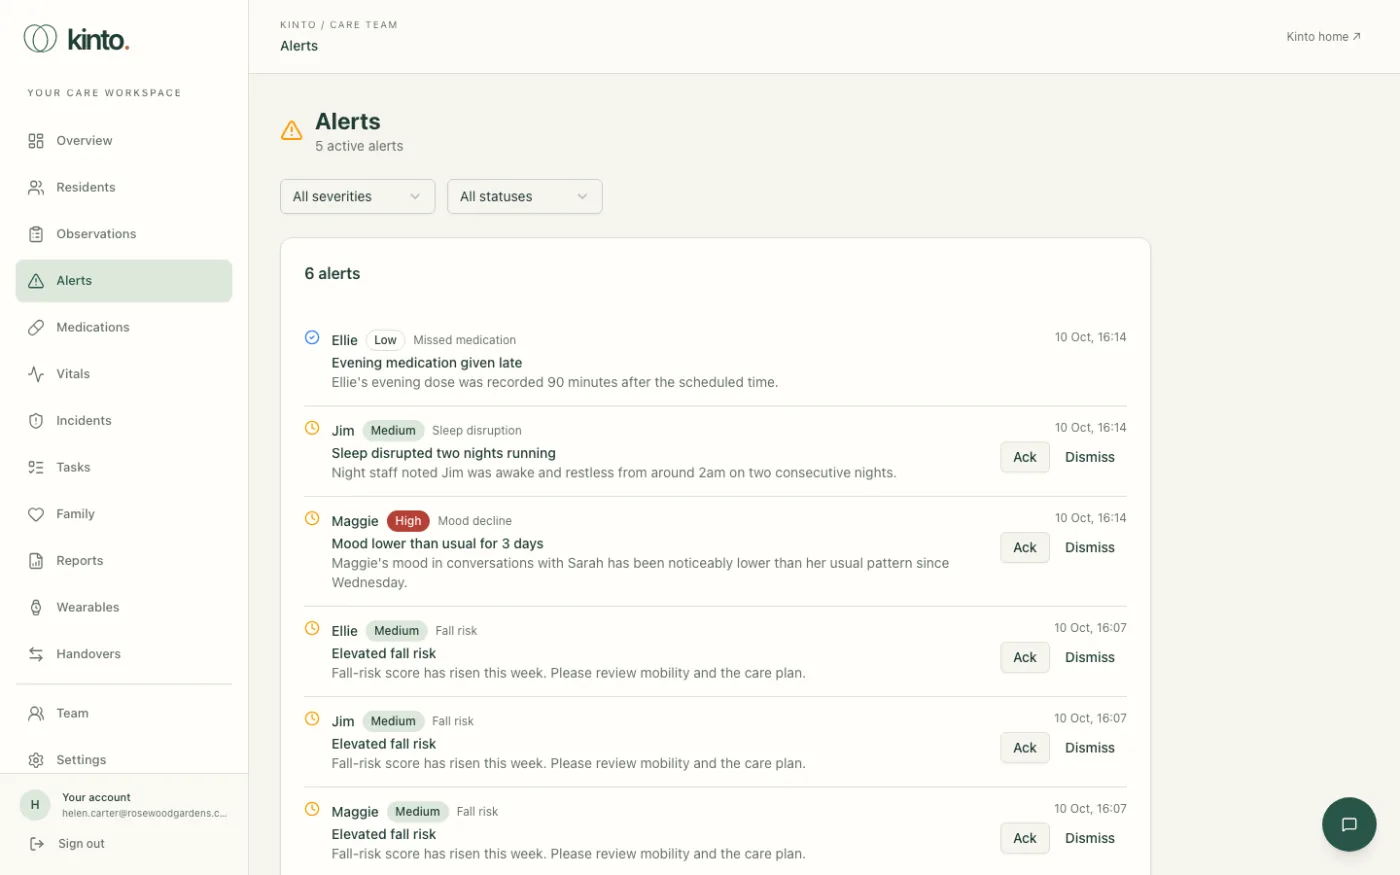
- The icon shows its status: a clock for active, a blue tick for acknowledged, a grey cross for dismissed.
- Next to the resident’s name is the severity (Low, Medium, High or Critical) and the kind of alert, for example Fall risk, Mood decline, Missed dose or Early warning (NEWS2).
- Then a title, such as Mood lower than usual for 3 days, and a short explanation.
The number under the heading, for example 5 active alerts, counts the alerts nobody has dealt with yet, including the ones Kinto raises automatically (fall risk, early warning, missed doses and other predictions).
Filter the list
Use All severities to show only Low, Medium, High or Critical alerts, and All statuses to show only Active, Acknowledged or Dismissed ones.
Acknowledge an alert
Acknowledging tells the team “I’ve seen this and I’m dealing with it”.
- Read the alert and check on the resident, following your usual practice.
- Select Ack on the alert. You’ll see Alert acknowledged and the icon turns into a blue tick.
- Record what you found and did as an observation on the resident’s profile.
Dismiss an alert
Dismiss an alert when it isn’t a concern, for example the change has an explanation you already know about.
- Select Dismiss. The Dismiss this alert? box opens, showing the resident and the alert.
- Type a short reason in Reason for dismissing, for example “Family visit cancelled, mood already discussed with Maggie”.
- Select Dismiss alert. You’ll see Alert dismissed. The reason is shown on the alert for the rest of the team.
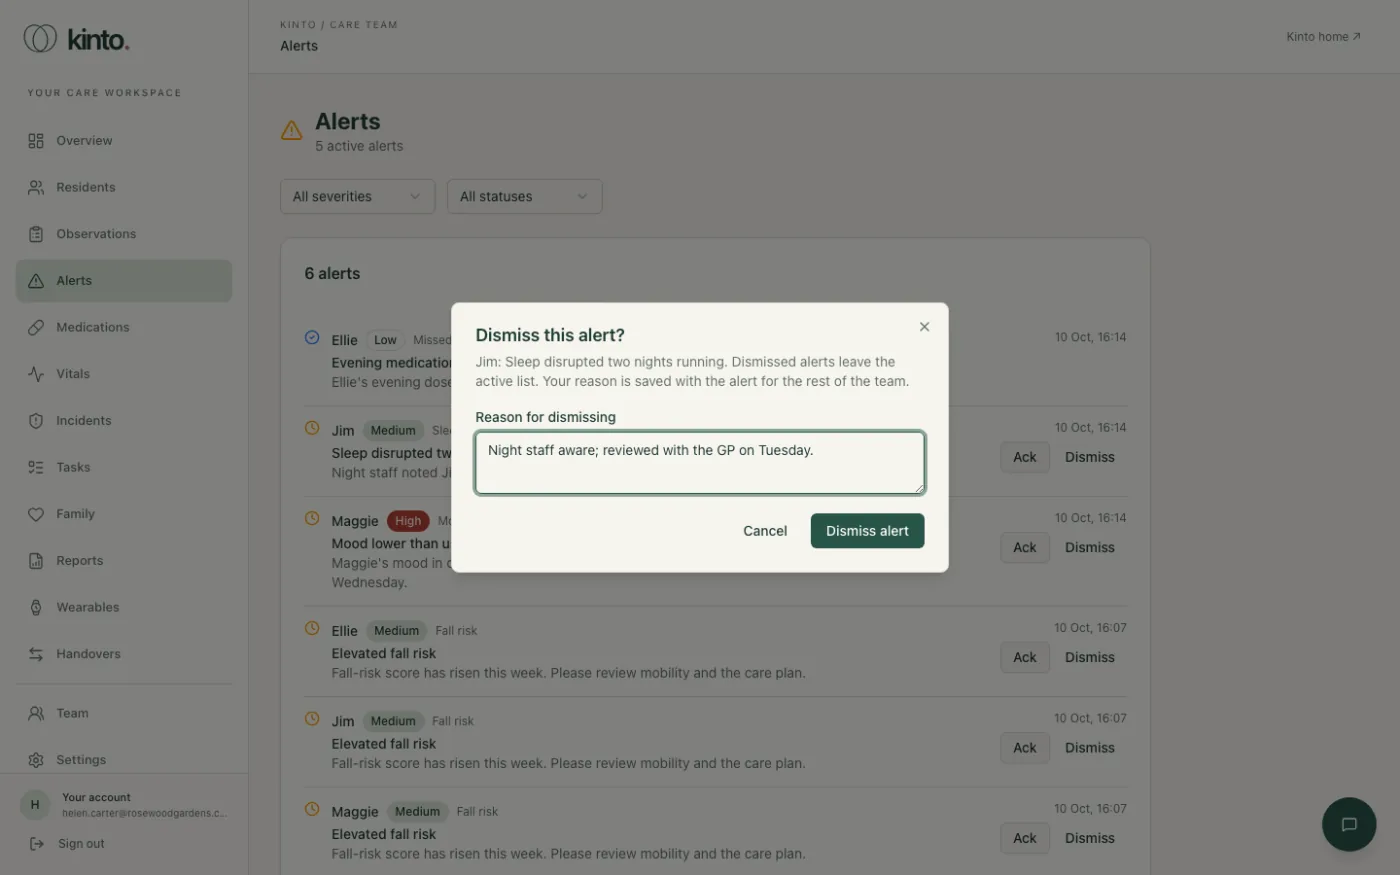
Dismiss alert stays greyed out until you type a reason. Cancel closes the box without changing anything.
Medications
Record each dose on the medication round: given, refused, withheld, PRN and more.
Medications is where you record each dose on the medication administration record (MAR). Under the heading, Today’s adherence shows how many of today’s expected doses (UK time) were recorded as given or self-administered.
The medication round
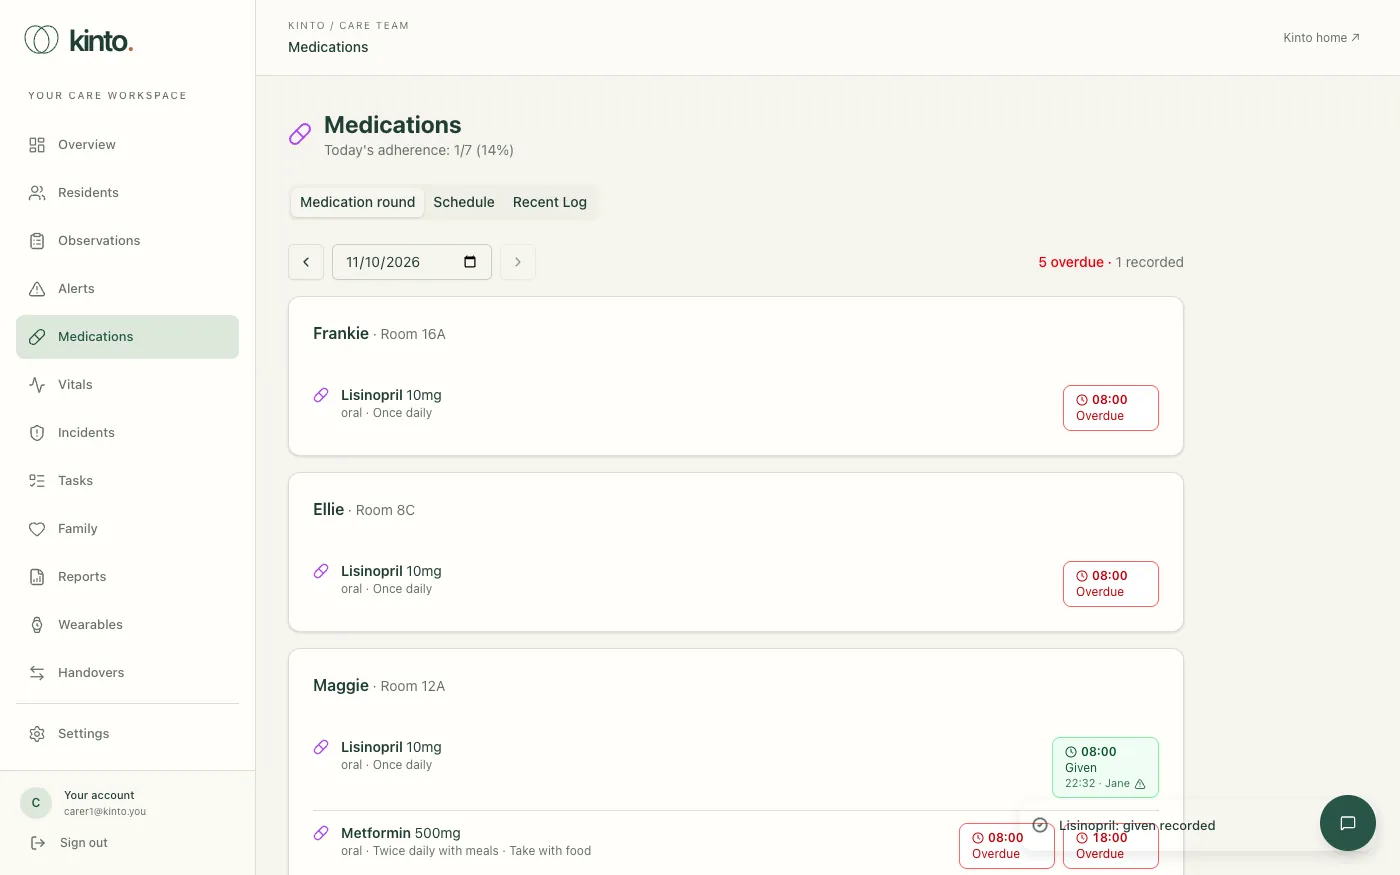
The Medication round tab opens first. It lists each resident living at the home with their current prescriptions. Every scheduled dose is a button showing its time and state:
- Later (grey): not due yet. You can record it from an hour before it’s due.
- Due now (amber): within an hour either side of its time.
- Overdue (red outline): more than an hour late with nothing recorded.
- Recorded: green for given or self-administered, red for refused, not available or not given, grey for withheld. It shows the time and who recorded it, and a warning sign if it was given or recorded late.
Use the arrows or the date box to look at another day; Today brings you back.
Record a dose
- Check the resident, the medicine and the prescription against your home’s medicines policy.
- Select the dose’s button, for example 08:00 Due now.
- Choose the outcome:
- Given: you gave the dose.
- Self-administered: the resident took it themselves, as assessed.
- Refused: offered and declined.
- Withheld (clinical reason): held back on purpose, for example pulse too low or on GP advice.
- Not available: out of stock or not delivered.
- Not given (other reason): asleep, unwell, away, unable to swallow and so on.
- For a dose that was given, check the Time given and Dose given. For any other outcome, choose the Reason.
- Add a note if needed. A note is required for Withheld (the clinical reason and who decided) and for the reason Other.
- Select Record. The button turns green or red and shows your name.
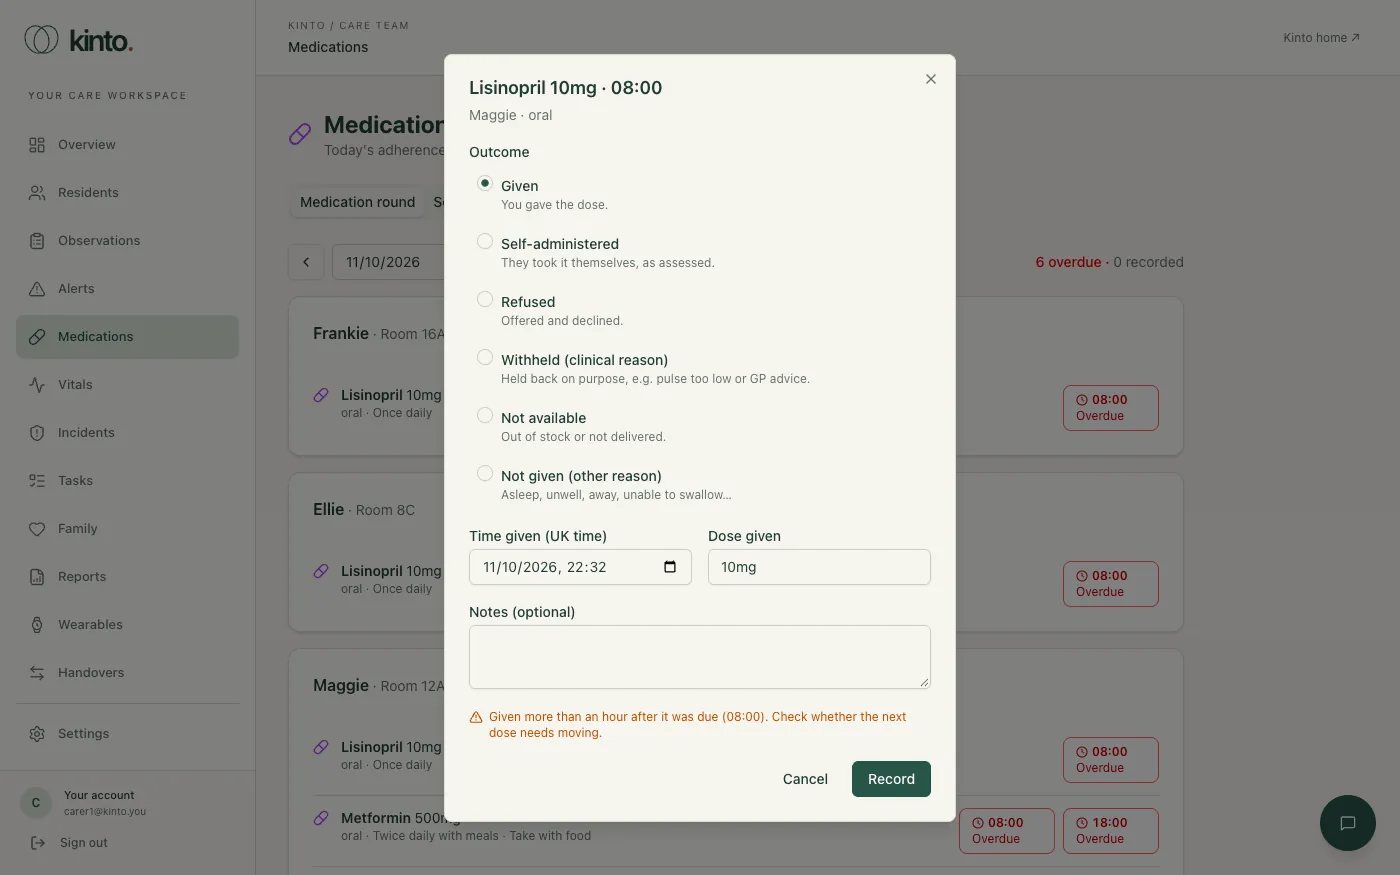
If you record a dose more than an hour after it was due, or more than an hour after you gave it, Kinto tells you and flags it as late. Recording a dose clears any missed-dose alert for it.
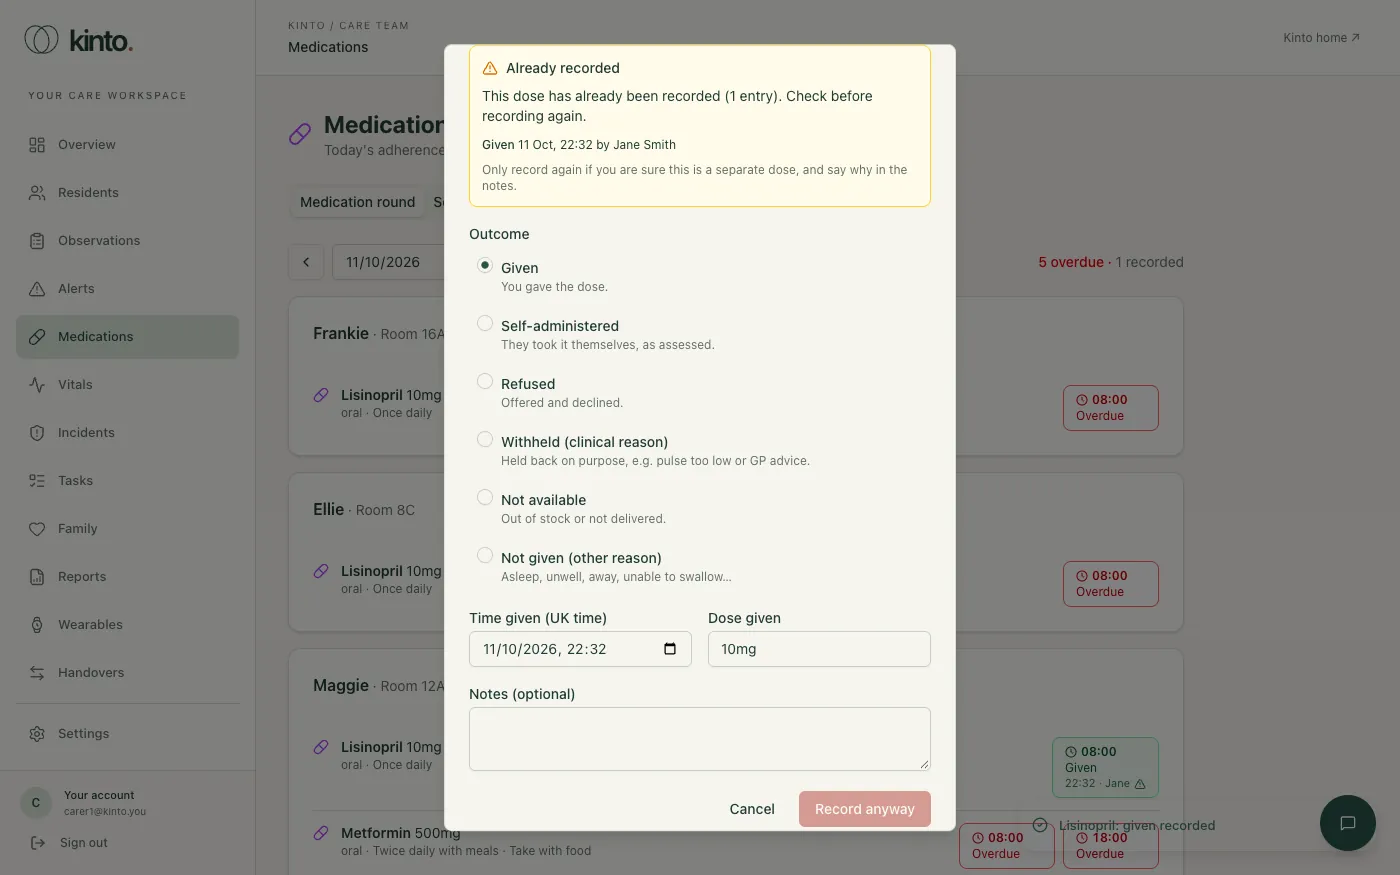
If a dose has already been recorded
Selecting a dose that already has an entry shows what was recorded and by whom. If you try to record it again, Kinto stops and shows the existing entry. Only select Record anyway if you’re sure it’s a separate dose or you’re correcting a mistake, and say why in the notes. Entries can’t be edited or deleted by care staff: correct a mistake with a new entry and a note. Owners and admins can amend an entry, which is audited.
As-needed (PRN) medicines
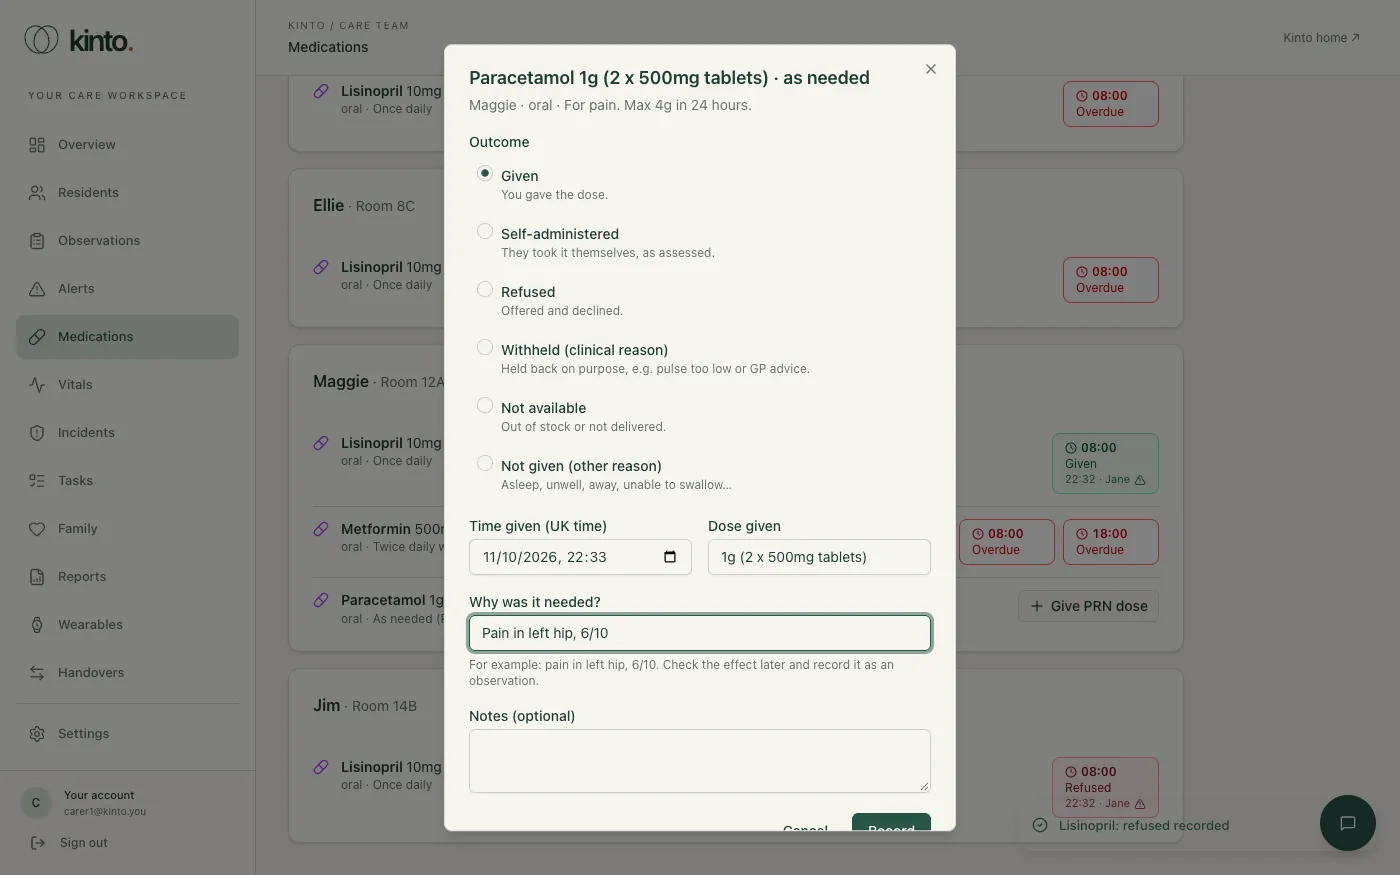
- Find the medicine marked PRN and select Give PRN dose.
- Check the time and dose, and say why it was needed, for example
Pain in left hip, 6/10. - Select Record.
If it’s sooner than the prescription’s minimum gap since the last dose, Kinto warns you and shows the last dose. Below the medicine you’ll see each PRN dose given that day and when it was last given.
Schedule and Recent Log
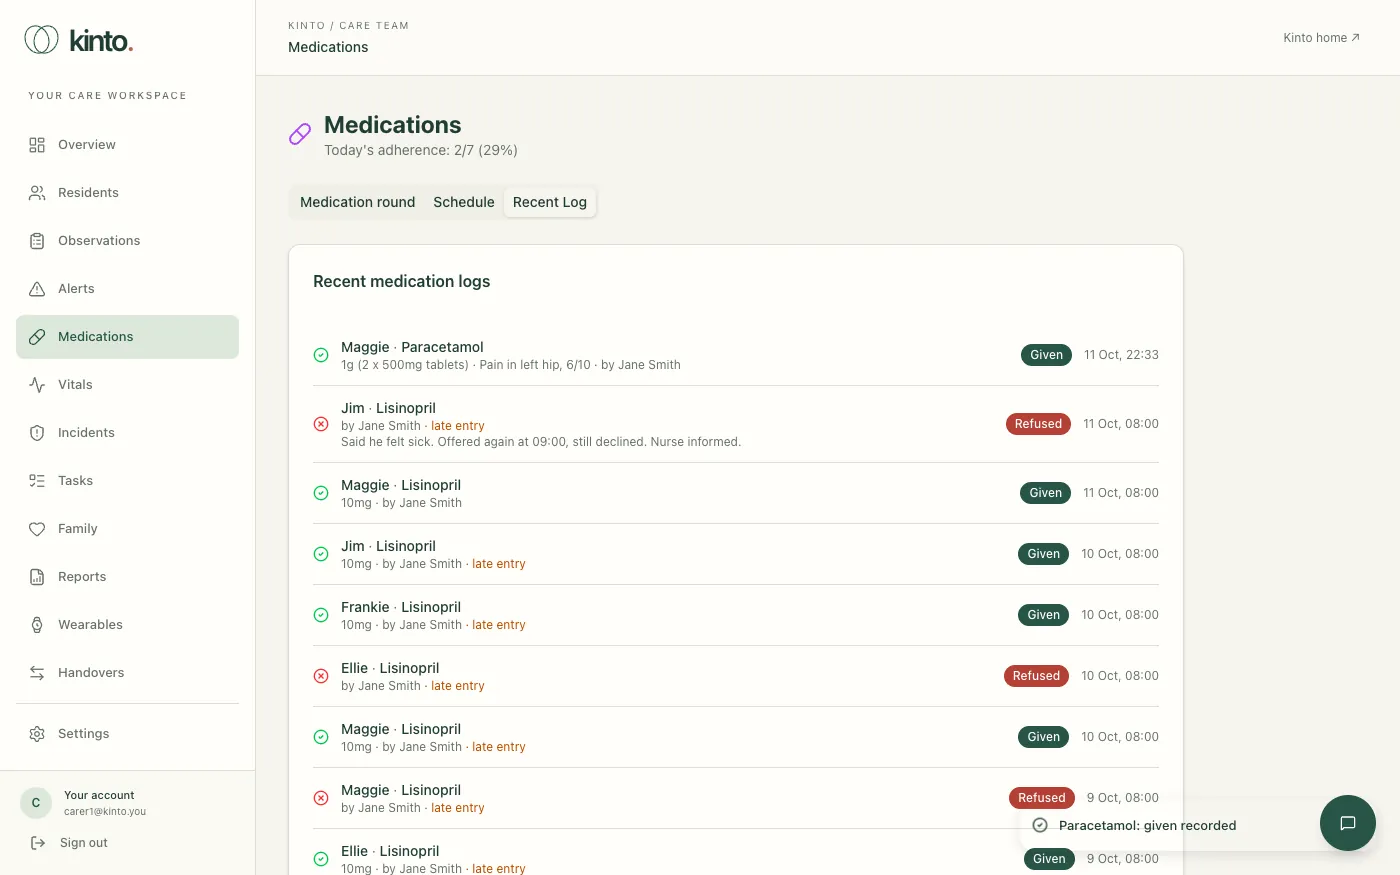
The Schedule tab lists each medicine with its dose, how often, times due and today’s doses recorded. The Recent Log tab lists recent entries with their outcome, the dose, who recorded them and whether it was a late entry.
To see one resident’s record, open their profile and choose the Medications tab: it shows the same medication record for them, with their prescriptions and treatments underneath.
Vitals and NEWS2
Record a set of observations and act on its NEWS2 score.
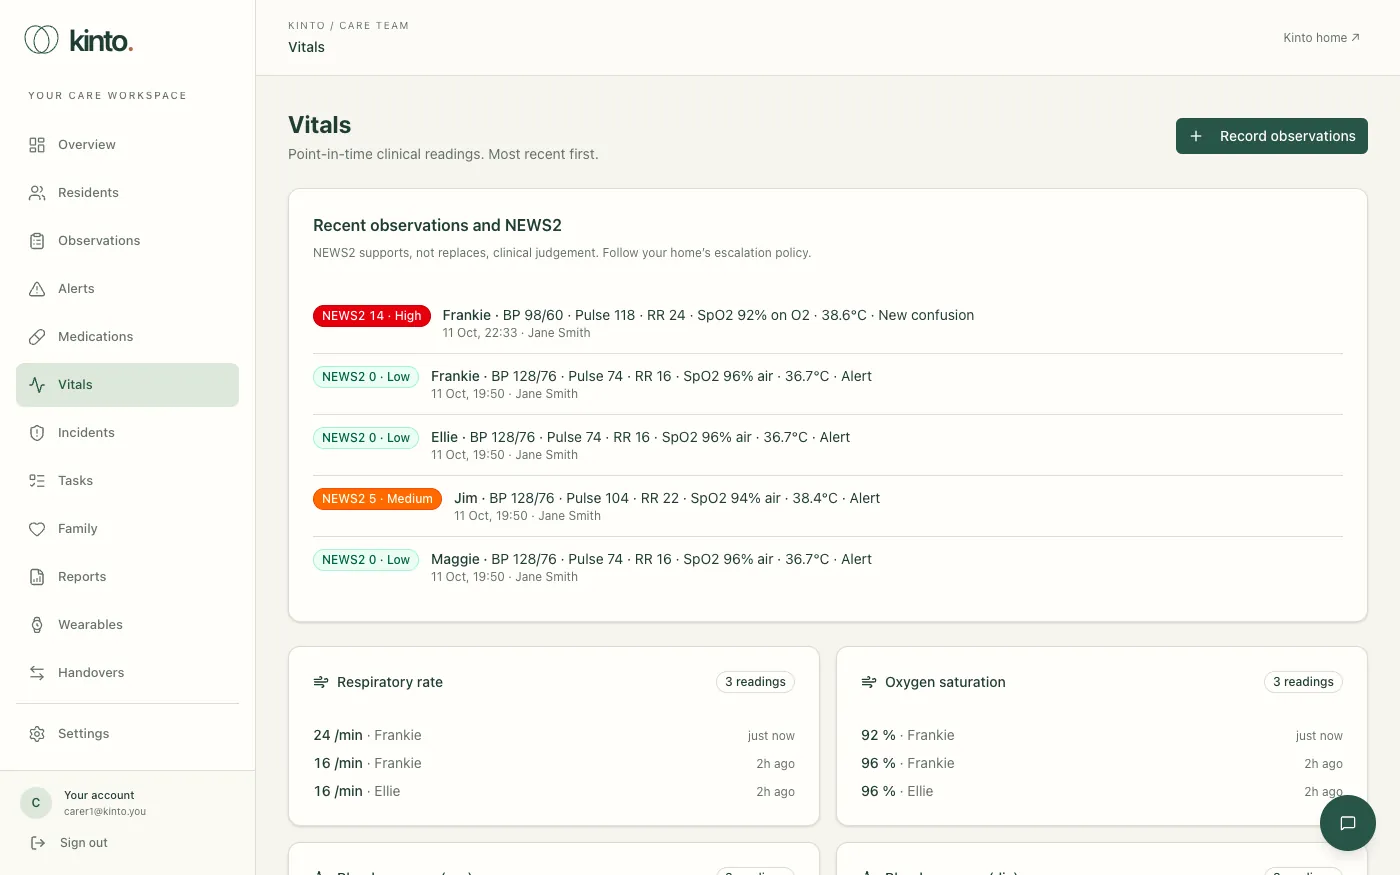
Vitals is where you record a set of observations and see its NEWS2 score. At the top, Recent observations and NEWS2 lists the latest sets with their score; below it is one card per kind of reading with the latest five readings.
Record a set of observations
- Select Record observations on the Vitals page, or on the resident’s Vitals tab.
- Choose the resident (if you started from the Vitals page) and check Taken at.
- Enter what you measured: respiration rate, SpO2, blood pressure, pulse and temperature, and optionally blood glucose and weight. Kinto checks each value is in a believable range, so a slip such as 375 for 37.5 is caught.
- Choose Air or On oxygen, and the resident’s consciousness (ACVPU). These are never filled in for you.
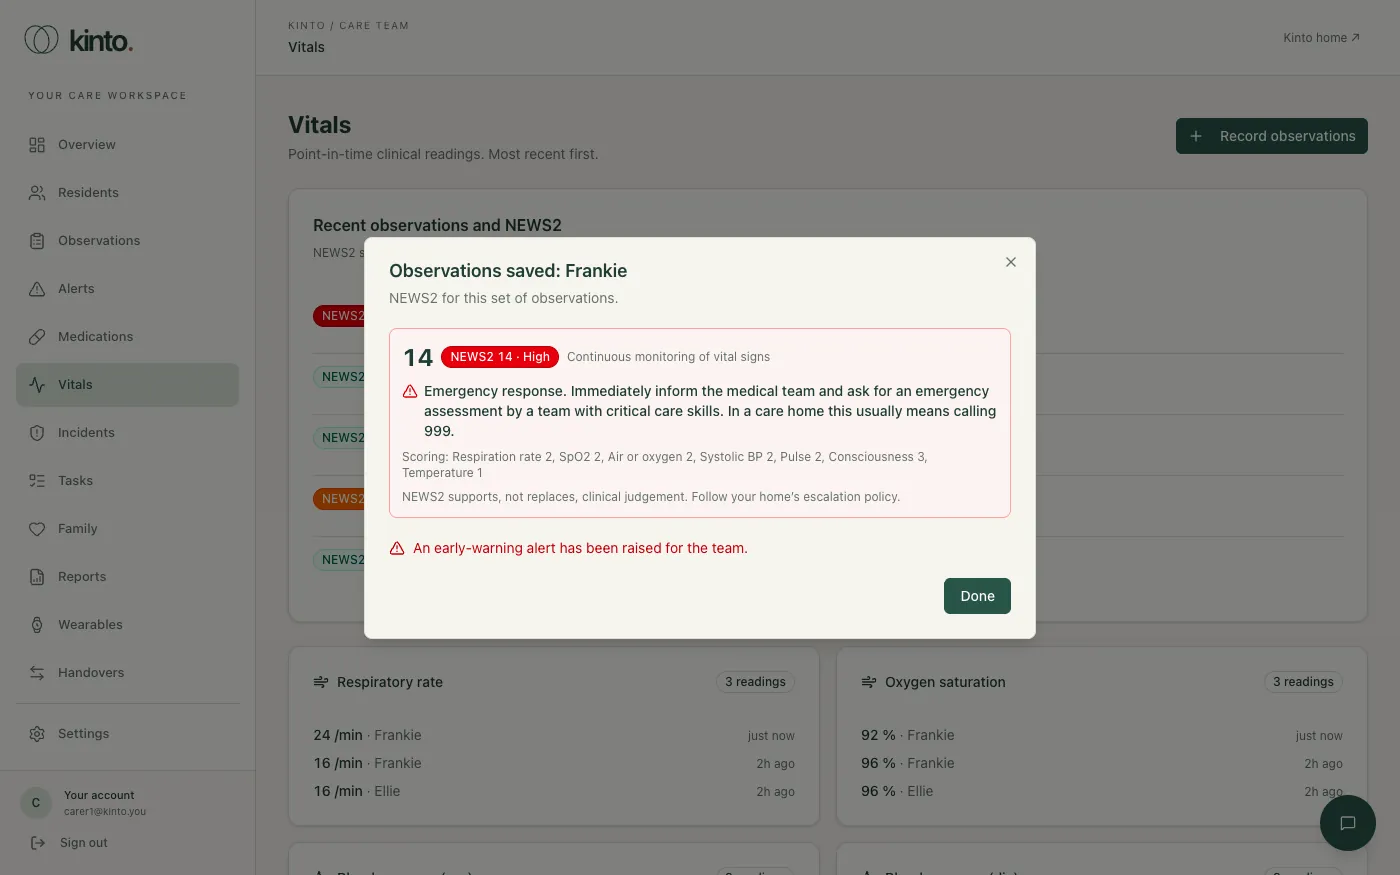
- Watch the NEWS2 panel at the bottom: the score, band and what to do update as you type.
- Select Save observations.
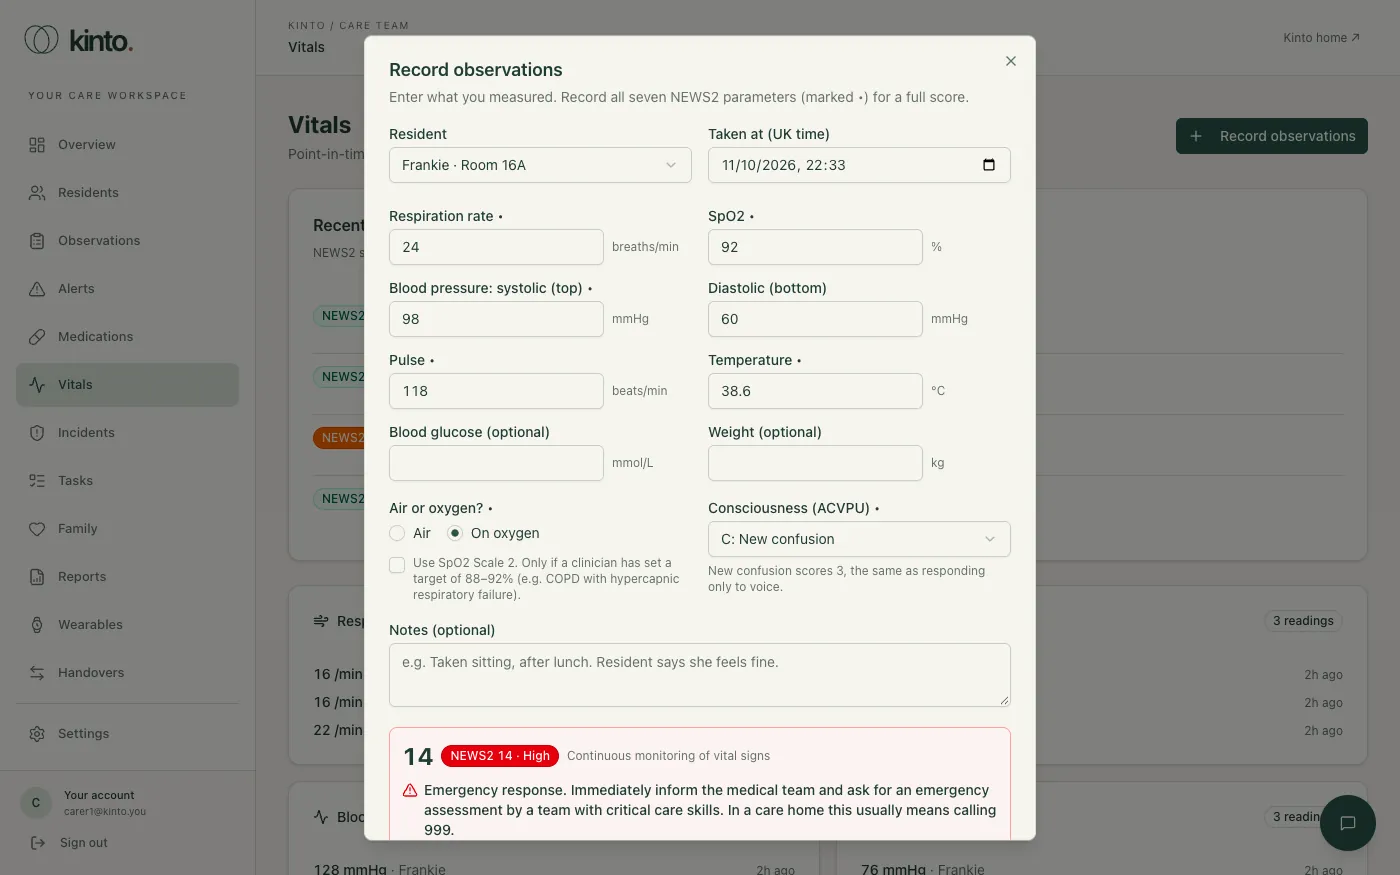
For a full score record all seven parameters marked •. If some are missing, Kinto shows the score with a + and lists what’s missing: the full score could be higher.
SpO2 Scale 2
Tick Use SpO2 Scale 2 only if a clinician has set a target saturation of 88–92% for the resident (for example COPD with hypercapnic respiratory failure). Kinto remembers it for that resident’s next set.
NEWS2 bands and what to do
| Score | Band | Monitoring and response |
|---|---|---|
| 0 | Low | Minimum every 12 hours. Continue routine NEWS2 monitoring. |
| 1–4 | Low | Minimum every 4–6 hours. Inform the registered nurse, who must assess the resident. |
| 3 in one parameter | Low–medium | Minimum every hour. The registered nurse informs the medical team (for example the GP or out-of-hours service). |
| 5–6 | Medium | Urgent response: inform the medical team immediately and ask for an urgent assessment. |
| 7 or more | High | Emergency response: continuous monitoring and an emergency assessment; in a care home this usually means calling 999. |
New confusion scores 3, the same as responding only to voice, pain or being unresponsive.
After you save, Kinto shows the result. A medium or high score raises an Early warning alert on the Alerts page for the whole team (no more than once every 12 hours at the same level, but a rise to high always alerts).
Incidents
Report an incident, then review, refer and close it with a full history.
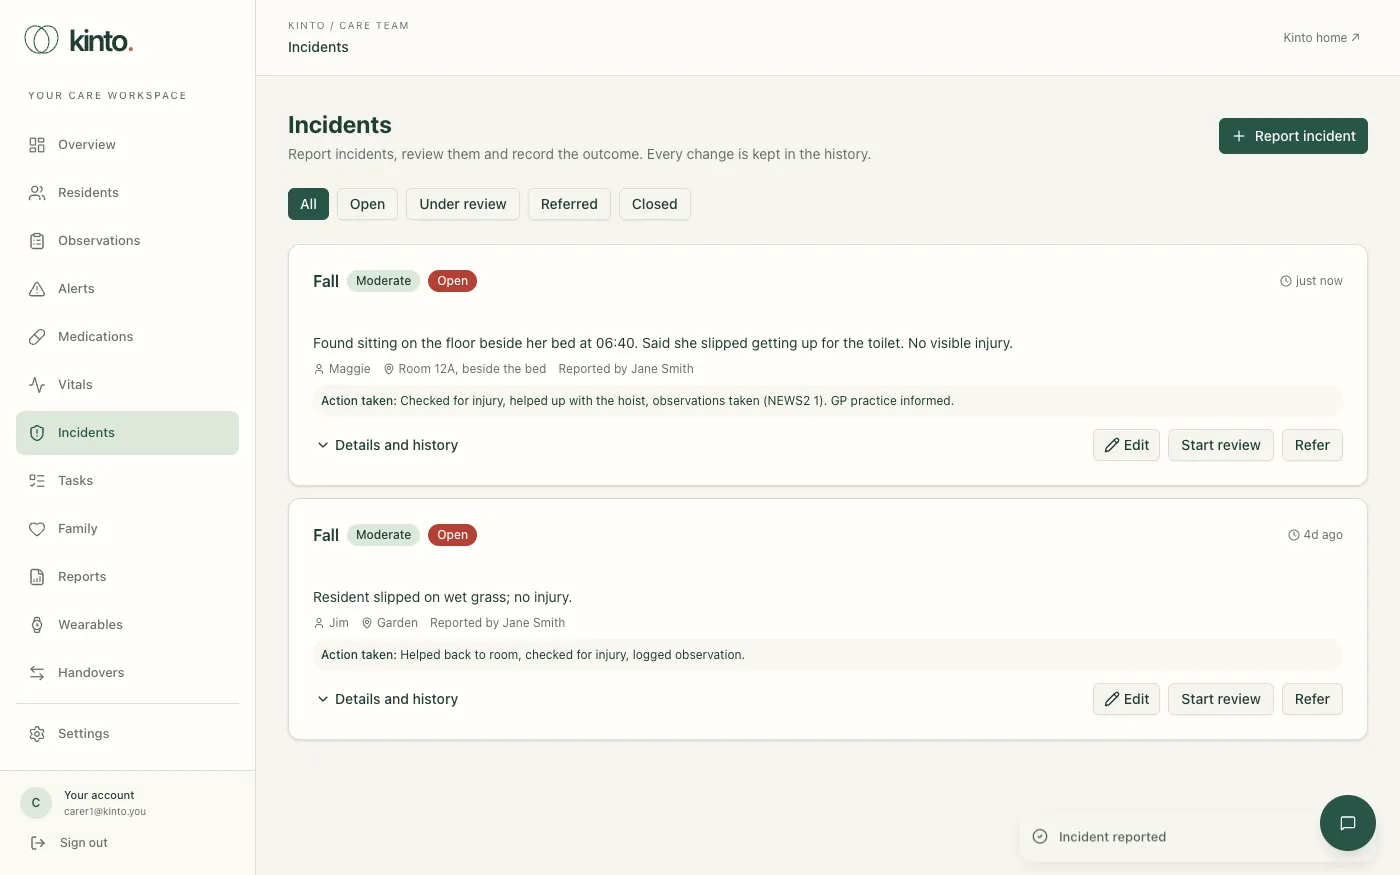
Incidents is where you report incidents and where managers review and close them: falls, medication errors, safeguarding concerns, behaviour, accidents or injuries, pressure sores, near misses and others. Every change is kept in the incident’s history.
Report an incident
- Select Report incident.
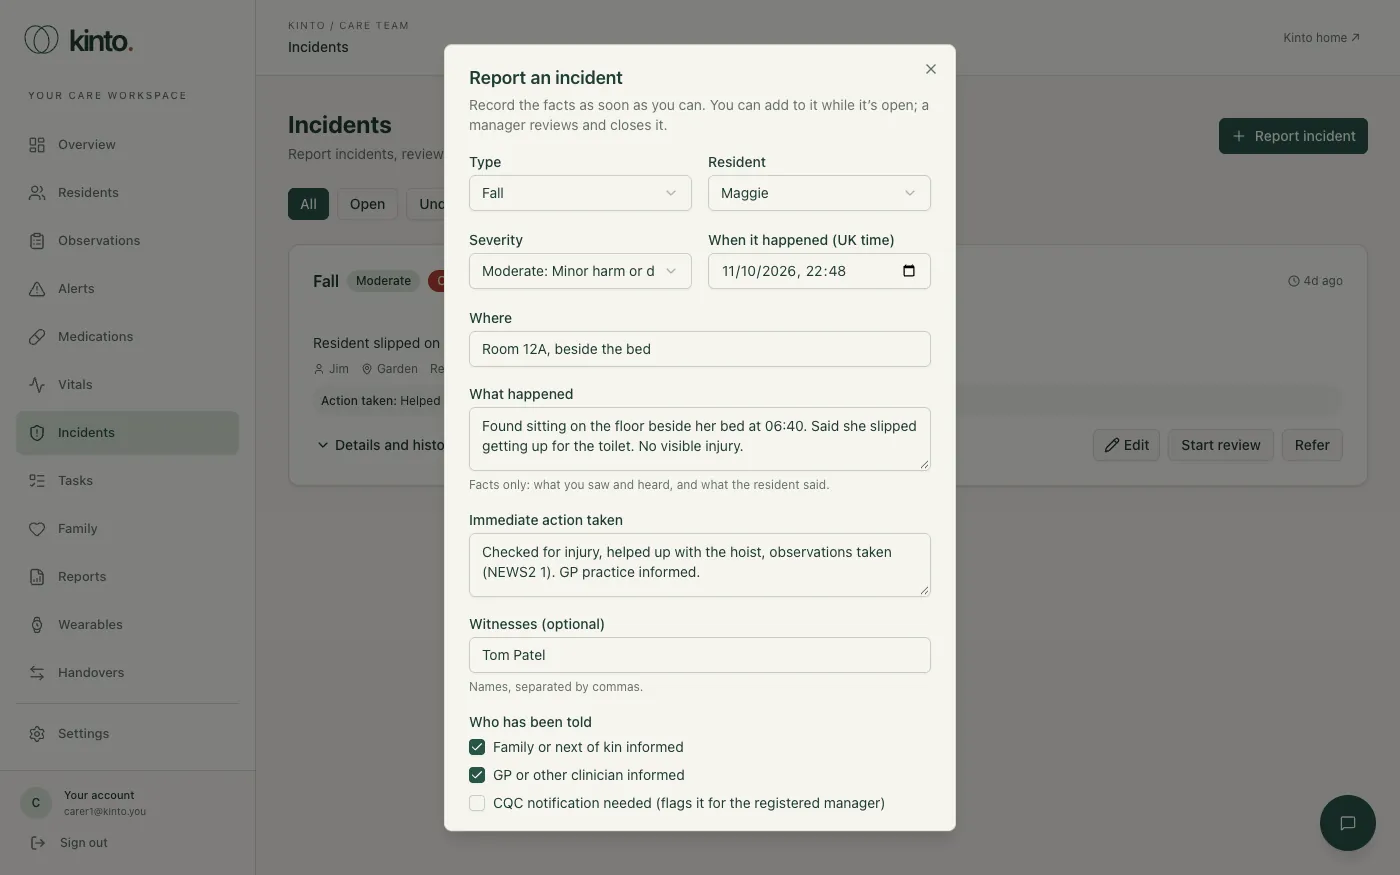
- Choose the Type and the Resident. A resident is needed for falls, pressure sores, behaviour, safeguarding and medication errors; for an accident, near miss or other incident you can choose No resident involved.
- Choose the Severity, check When it happened and say Where.
- Under What happened, write the facts: what you saw and heard, and what the resident said.
- Add the Immediate action taken and any Witnesses.
- Tick who has been told: family, the GP or other clinician, and whether a CQC notification is needed.
- Select Report incident. It appears at the top of the list as Open.
For serious injuries and safeguarding concerns Kinto reminds you that a CQC notification is usually needed. Ticking CQC notification needed flags the incident for the registered manager; Kinto doesn’t notify CQC.
Review, refer and close
Each incident shows the next steps it can take, following open → under review → closed:
- Start review moves it to Under review. Add a note if useful.
- Refer records that it was referred to an outside body, such as the local authority safeguarding team. A note saying who is required.
- Close needs the Outcome (what was found and done) and can include Lessons learned. An open incident is reviewed before it can be closed.
- Reopen on a closed incident needs a note saying why.
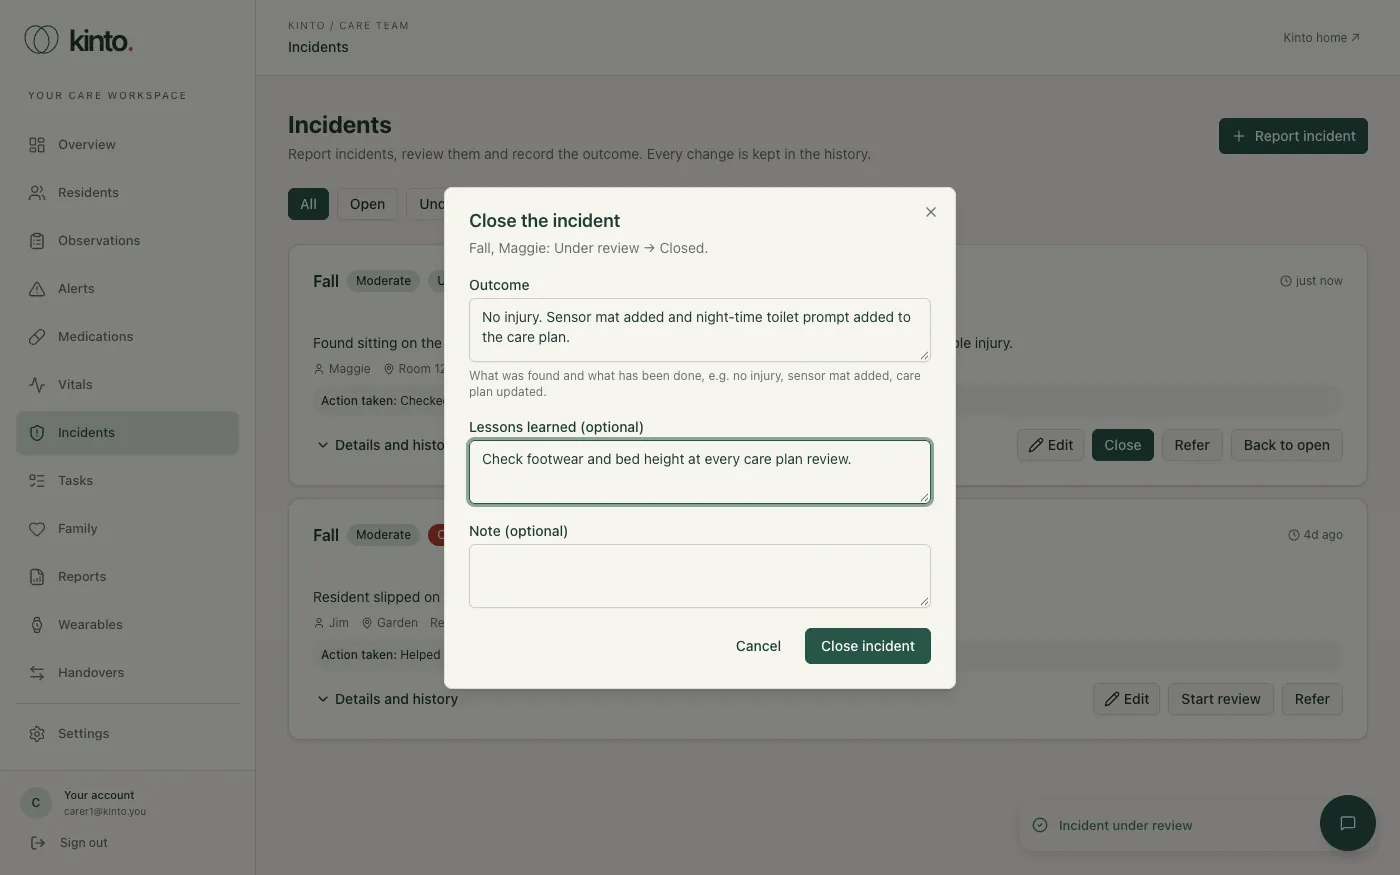
Use Edit to add to an incident while it’s open or under review. A closed incident can’t be edited until it’s reopened, and only owners and admins can delete an incident.
Details and history
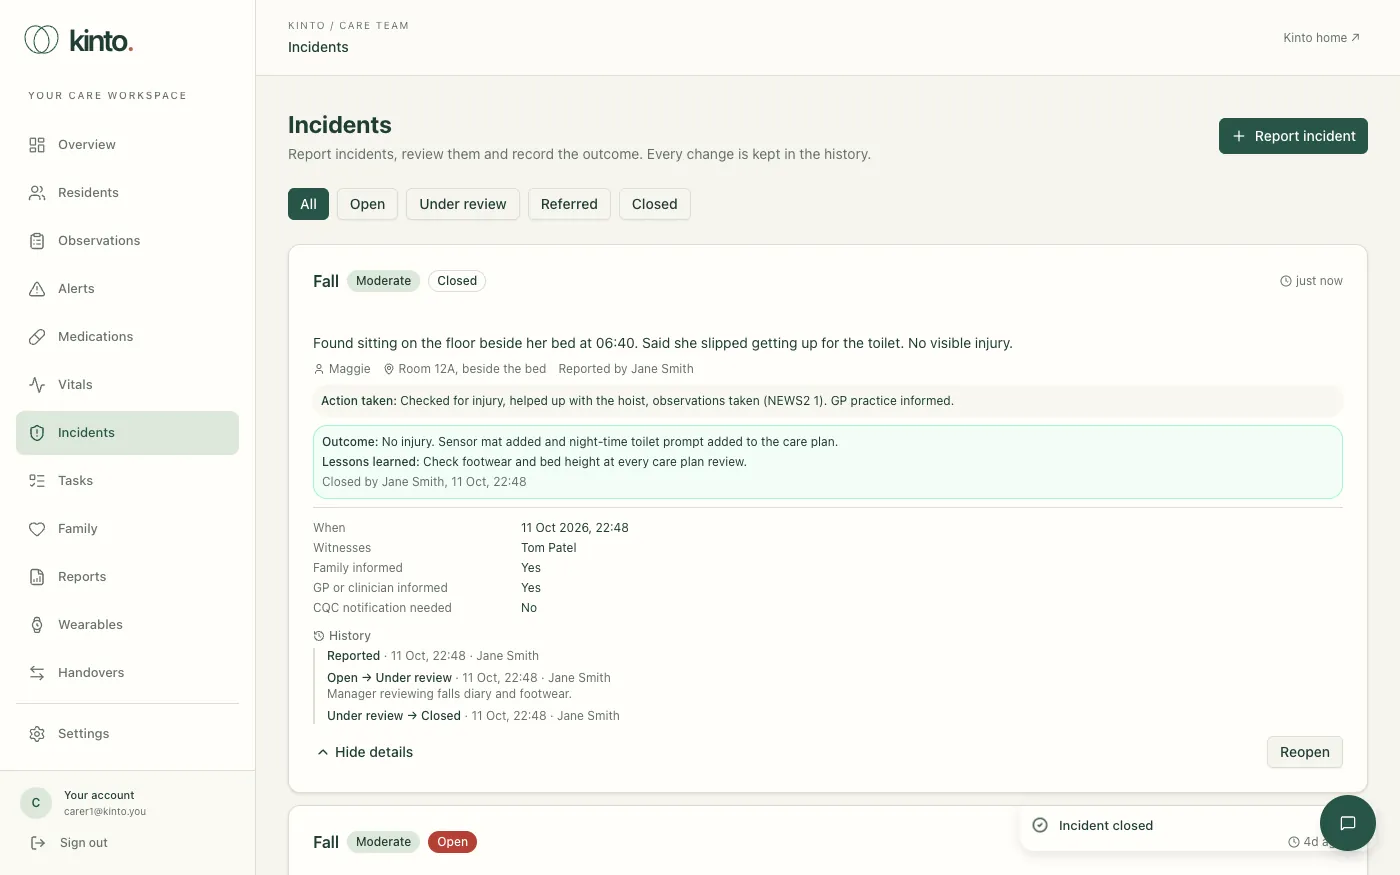
Select Details and history on an incident to see the witnesses, who was told, the CQC flag and every status change with who made it, when, and their note.
Filter by status
Use the buttons above the list: All, Open, Under review, Referred or Closed. For example, choose Open at the start of a shift to see what still needs following up.
Care tasks
Create, assign, complete, cancel and reopen care tasks.
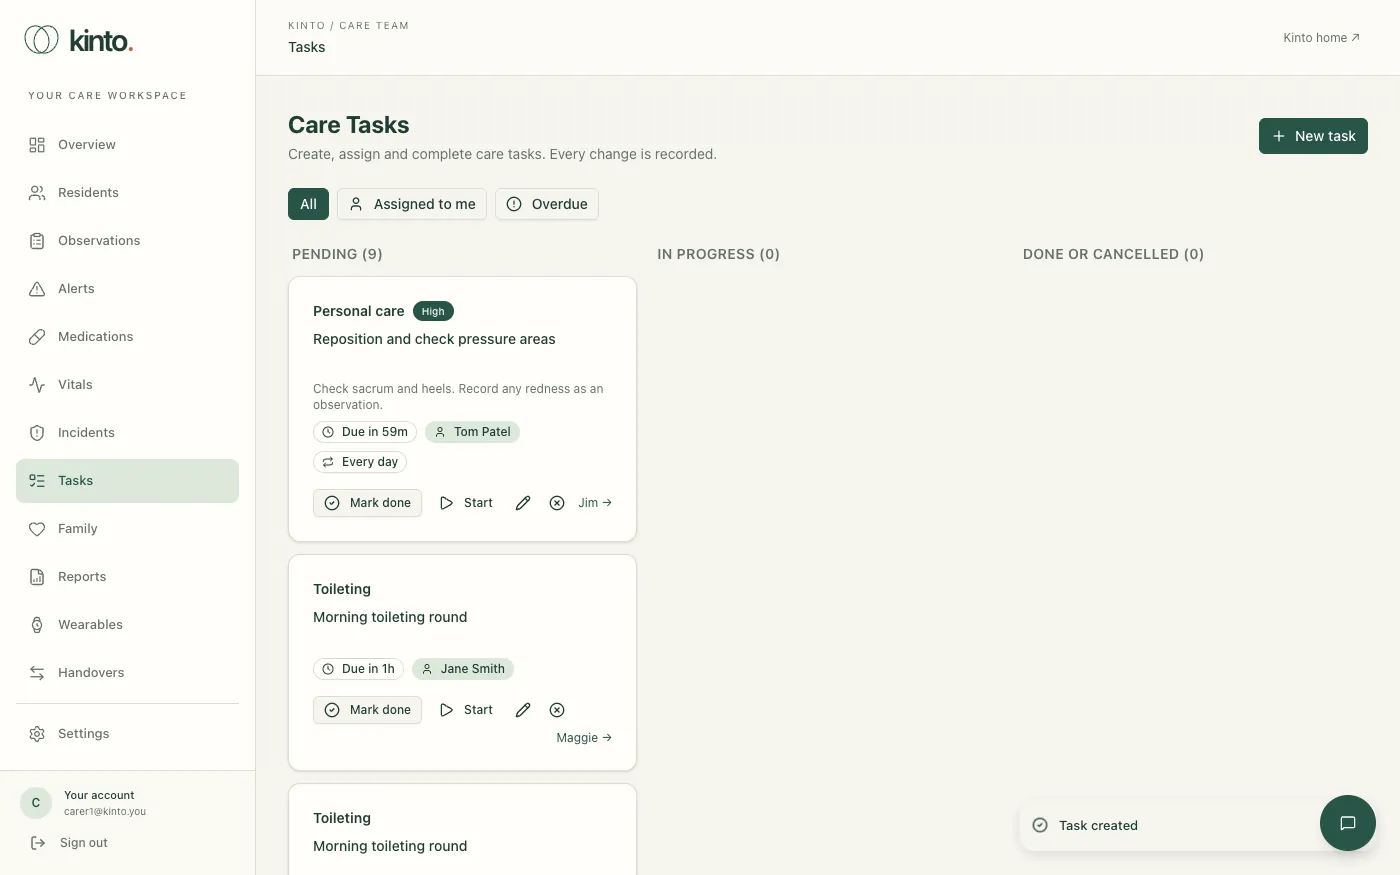
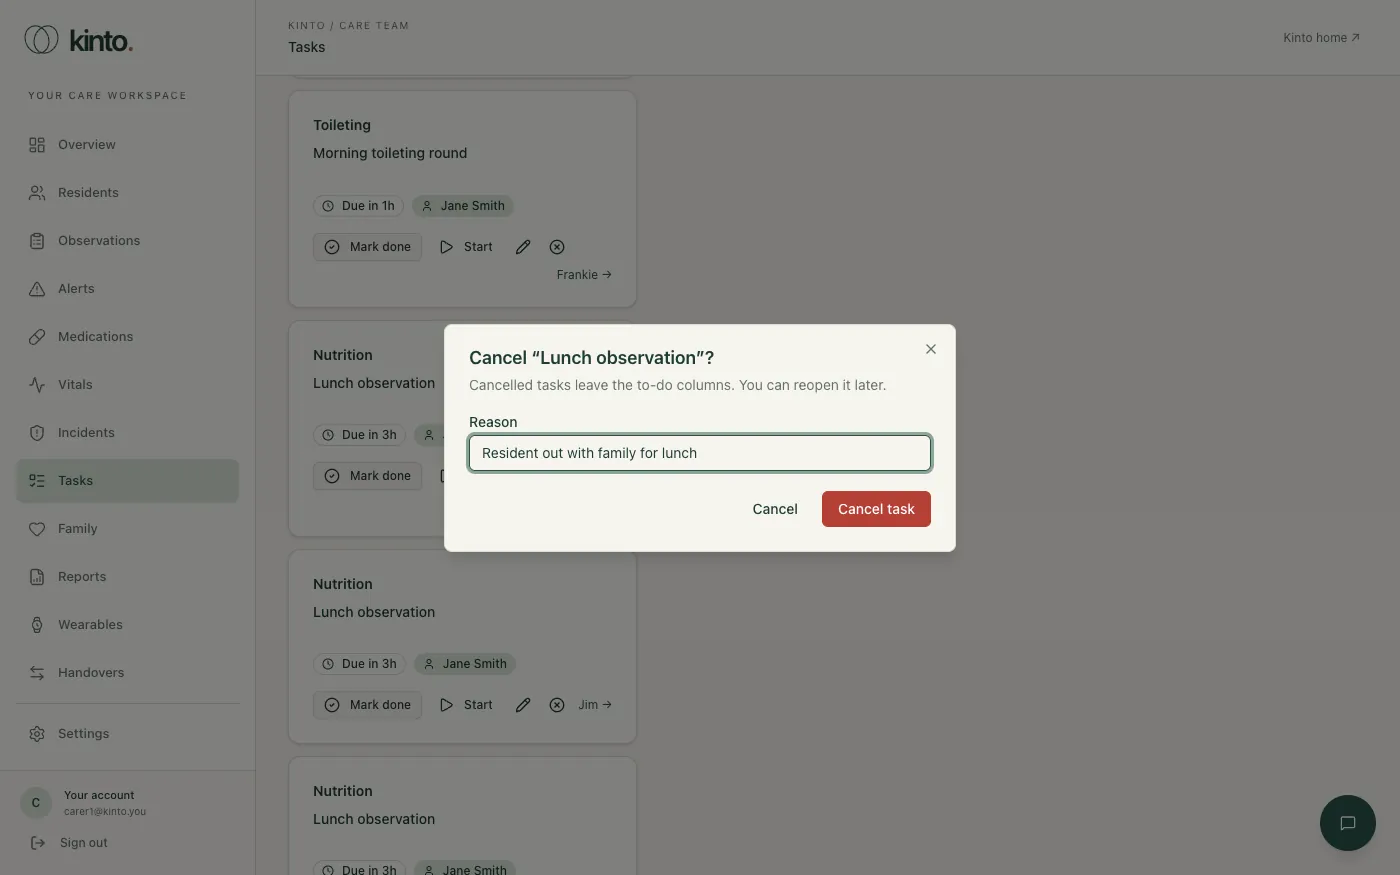
Tasks (Care Tasks) shows care tasks in three columns: Pending, In progress and Done or cancelled. The number in brackets is how many tasks are in each.
Create a task
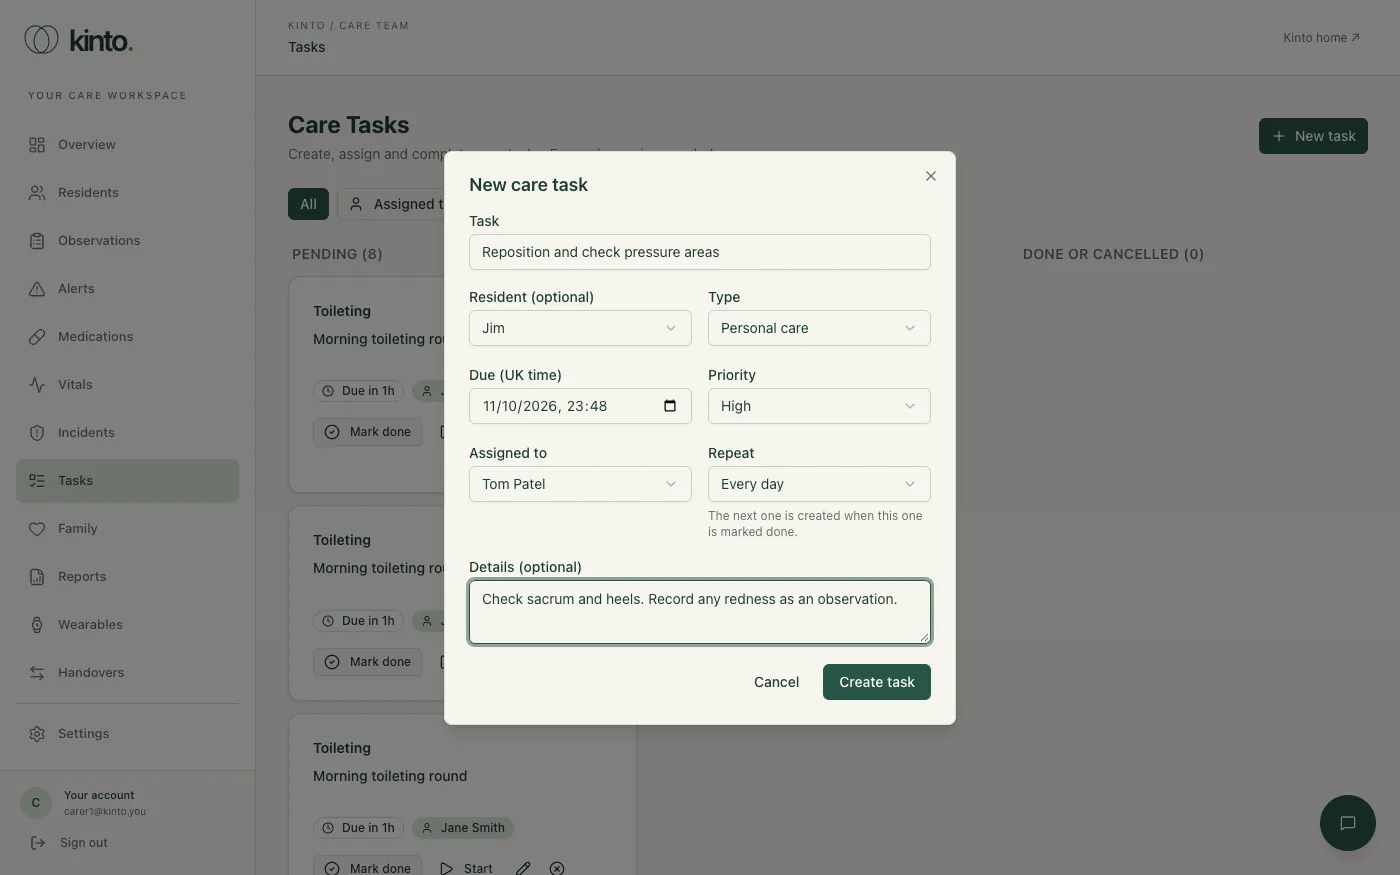
- Select New task.
- Describe the Task, for example
Reposition and check pressure areas. - Choose the resident, or Not for one resident for a task for the whole home.
- Choose the type, when it’s Due, the Priority (Low, Normal, High or Urgent) and who it’s Assigned to. Only the care team (owners, admins and carers) can be assigned.
- Choose Repeat if it happens Every day or Every week. The next one is created when this one is marked done.
- Select Create task.
Reading a task card
- The kind of task and, if it isn’t normal, its priority.
- The task and any details.
- When it’s due, for example Due in 1h or Due 3h ago, who it’s assigned to, and whether it repeats.
- The resident (select their name to open their profile), or Whole home.
Work through a task
- Start moves it to In progress.
- Mark done moves it to Done or cancelled with your name and the time.
- The pencil edits the task or reassigns it to someone else.
- The cross cancels it: give a reason, for example
Resident in hospital. - Reopen on a done or cancelled task puts it back in Pending.
Overdue tasks and your tasks
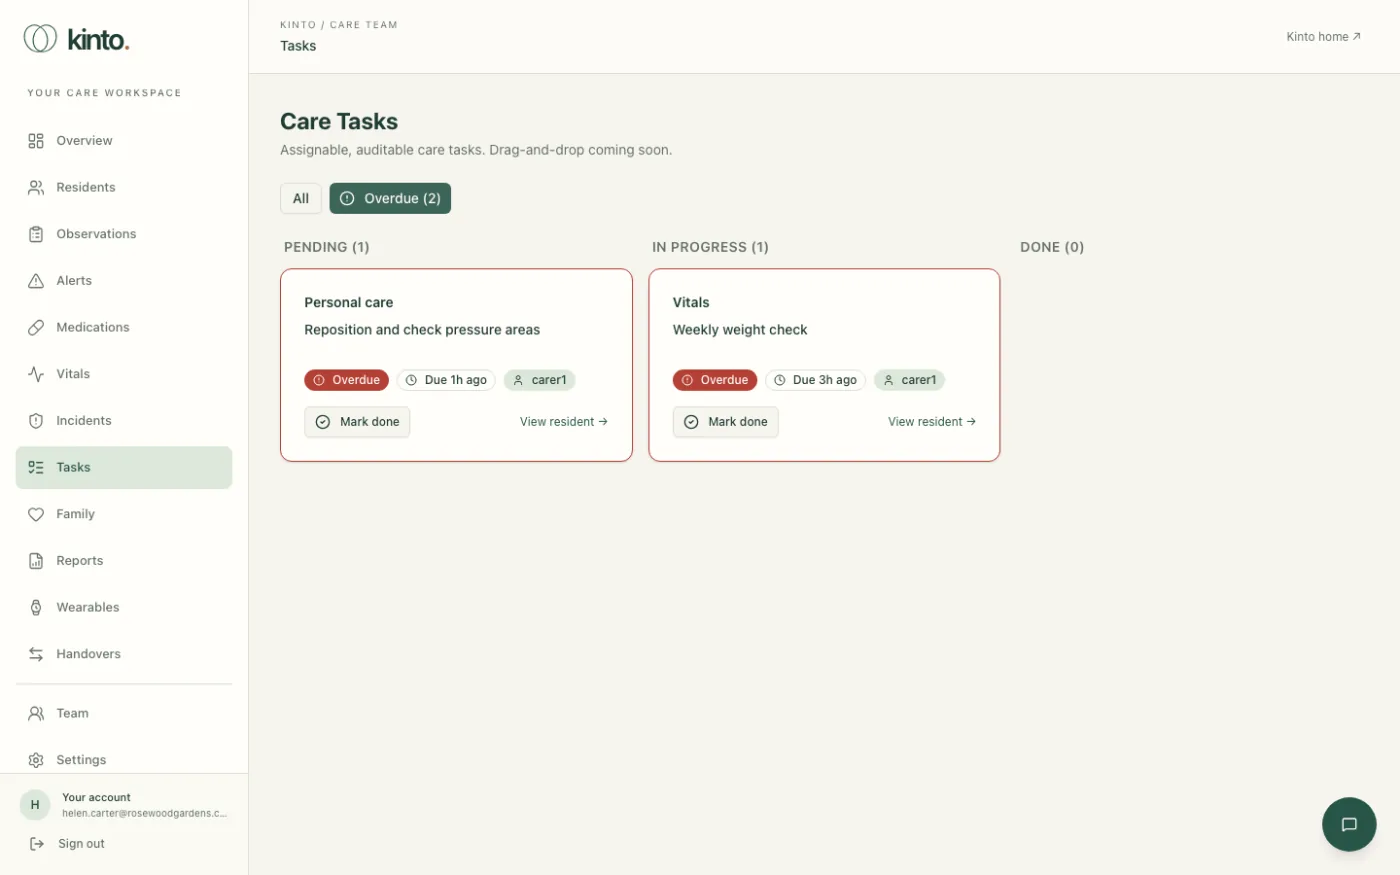
A task that’s past its due time and not done has a red border and a red Overdue badge, and sits at the top of its column. Select Overdue above the board to see only those, or Assigned to me to see your own. Select All to see everything again.
Shift handovers
Draft the handover, edit it, and sign it off as the outgoing and incoming shift.
Handovers (Shift Handovers) is where you prepare the handover at the end of a shift. Kinto drafts it from what was recorded; you check and edit it; then someone from the outgoing shift and someone from the incoming shift sign it off.
Start a handover
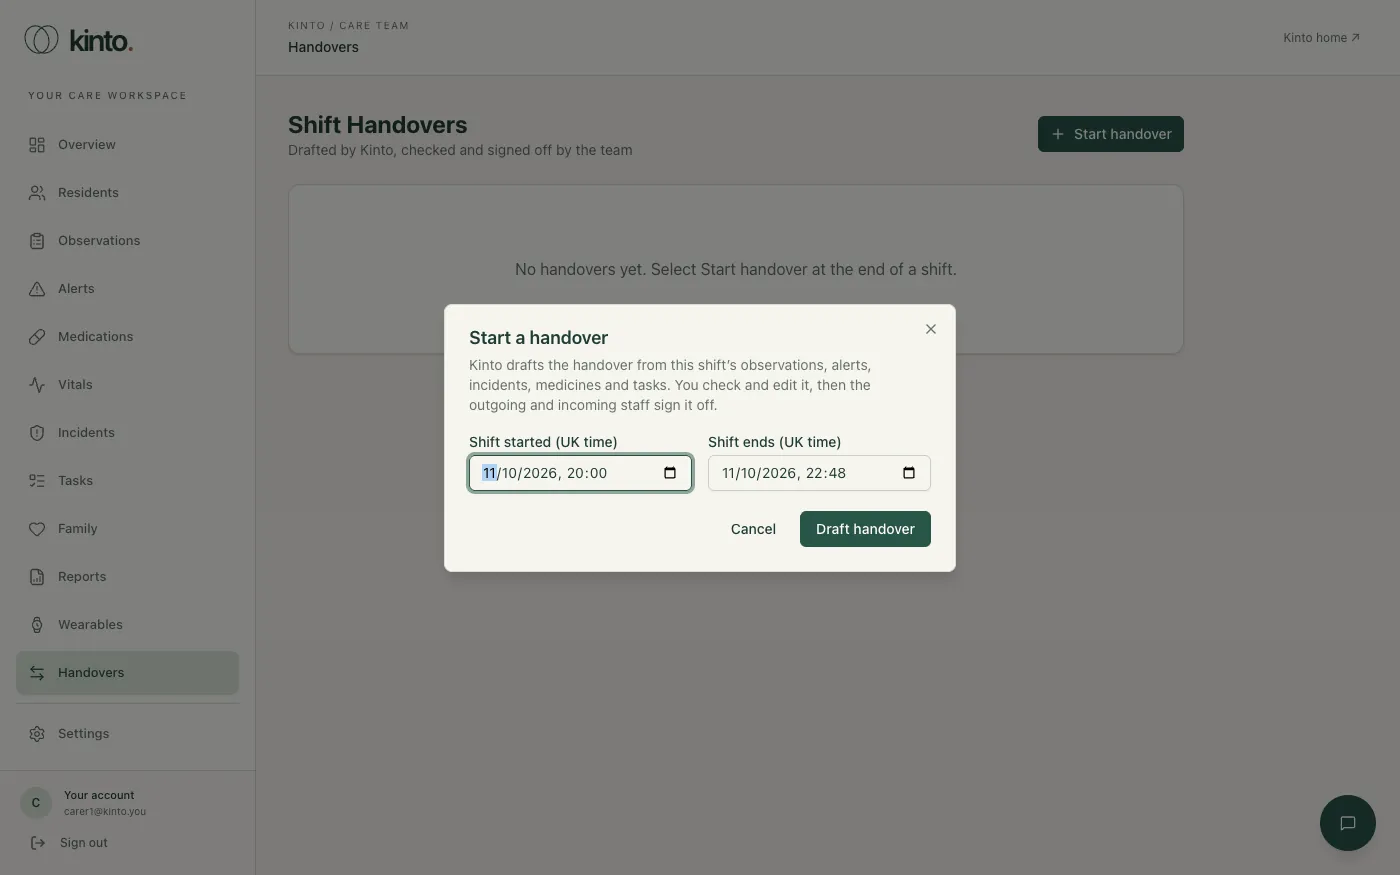
- Near the end of your shift, select Start handover.
- Check when the shift started and ends (UK time). Kinto suggests the 08:00–20:00 or 20:00–08:00 shift.
- Select Draft handover. The draft opens for you to check.
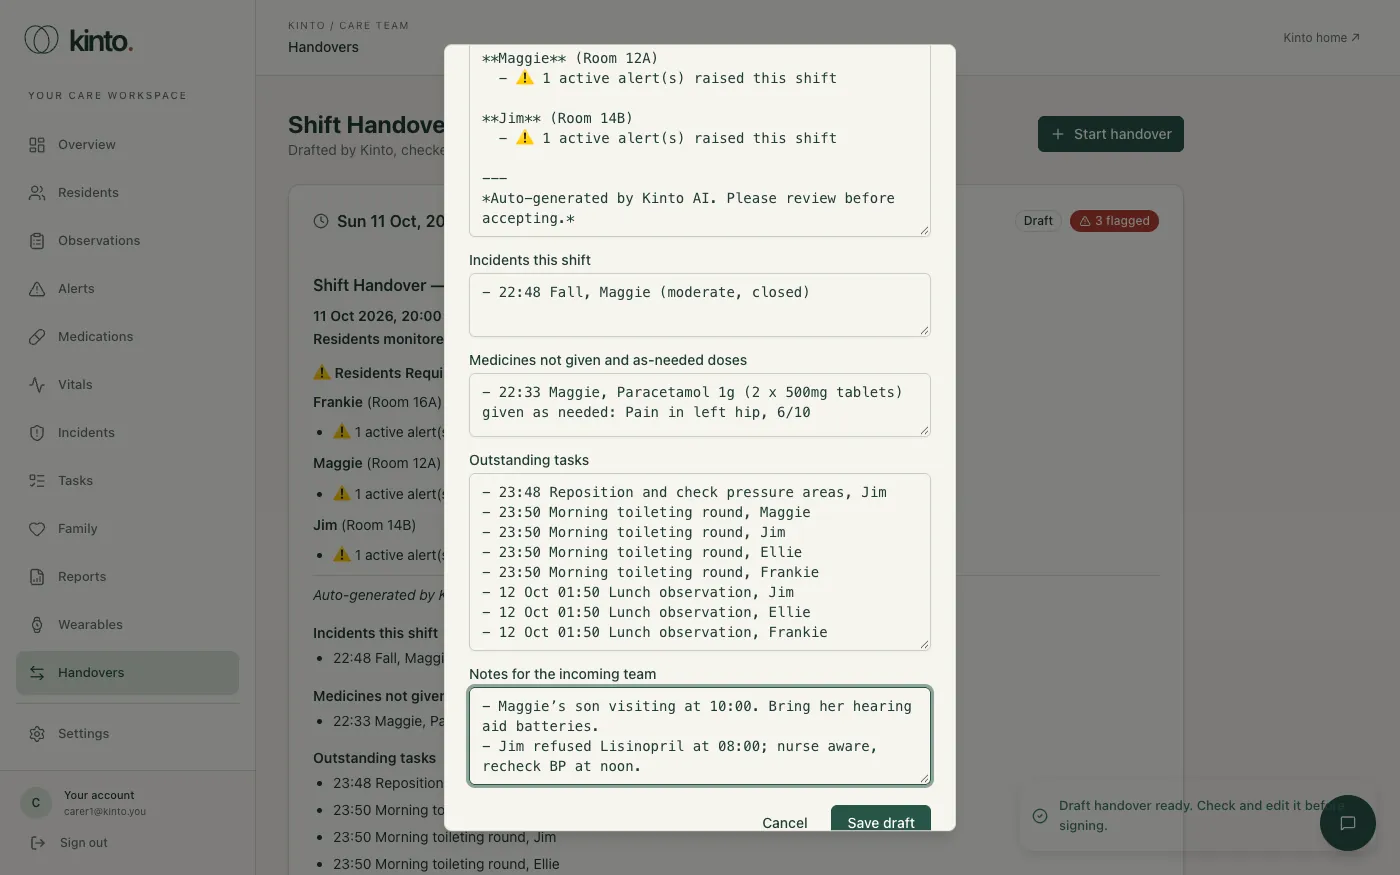
The draft has five sections:
- Shift summary: residents who need attention (urgent or concerning observations, low mood, missed doses, alerts) and key events.
- Incidents this shift.
- Medicines not given and as-needed doses, from the medication round.
- Outstanding tasks due now or in the next 12 hours.
- Notes for the incoming team, which you write.
Edit the draft
- Read every section against what happened on the shift. The draft only knows what was recorded in Kinto.
- Correct anything, and add what it missed under Notes for the incoming team: a resident who seemed unwell, a family call, a GP visit. Start each list line with “- ”.
- Select Save draft. You can come back with Edit draft until someone signs it.
If you drafted one by mistake, select Discard while nobody has signed it.
Sign off
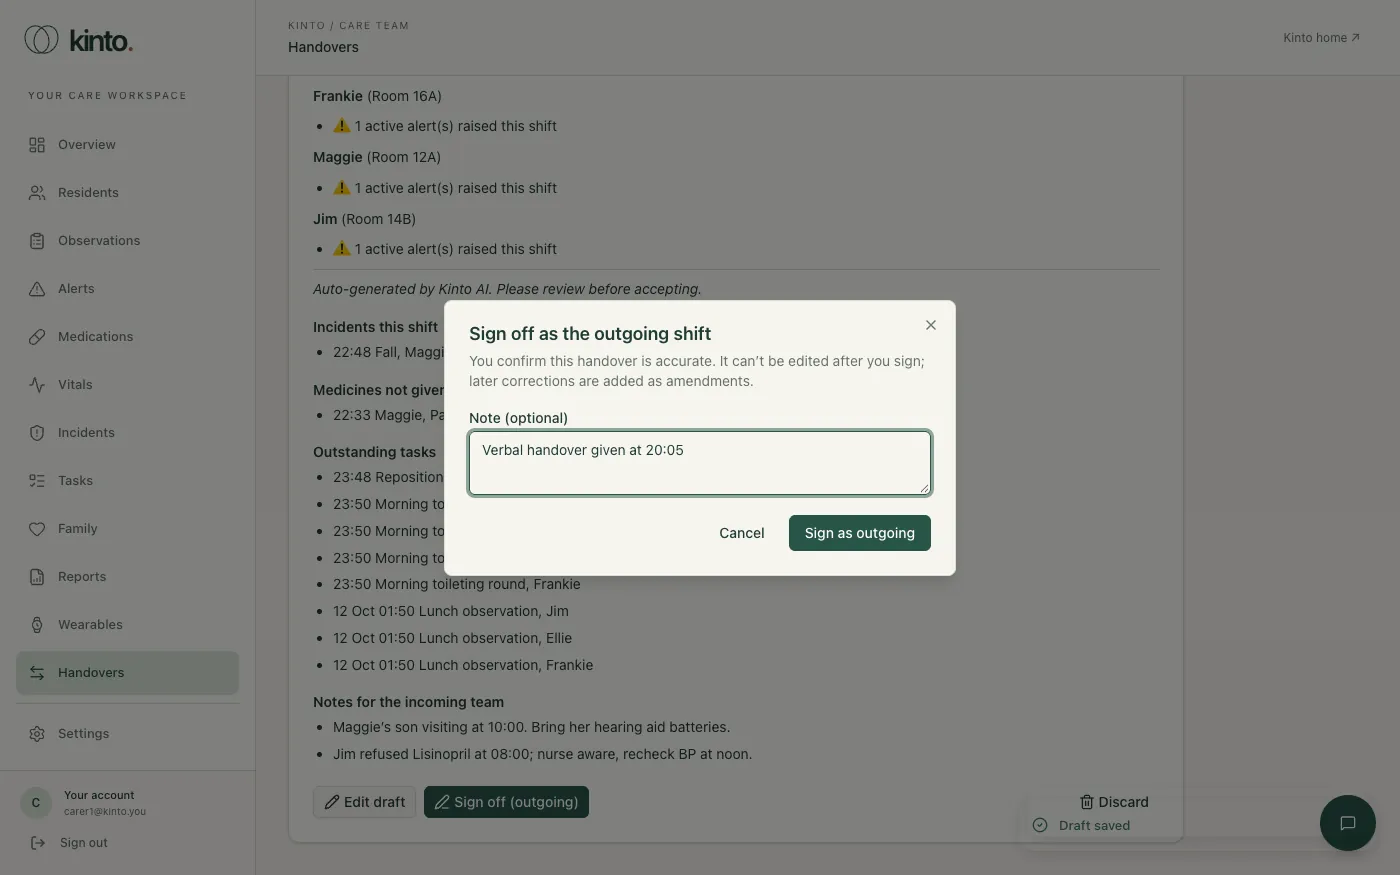
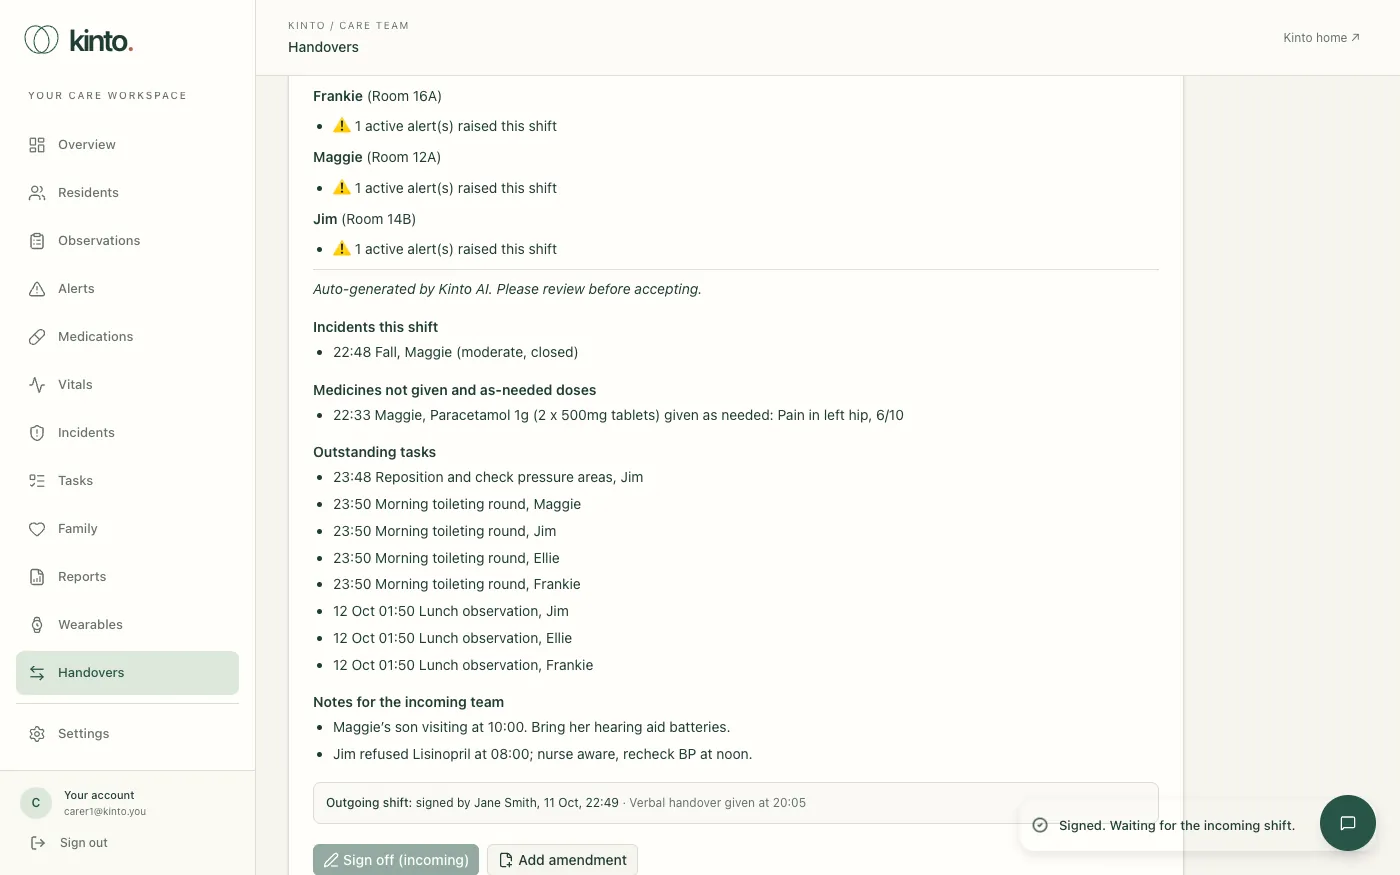
- The outgoing shift signs first: select Sign off (outgoing), add a note if useful and select Sign as outgoing. The handover can’t be edited after this, and shows Awaiting incoming sign-off.
- Someone from the incoming shift, signed in as themselves, reads it and selects Sign off (incoming), then Sign as incoming. The person who signed for the outgoing shift can’t also sign for the incoming shift.
- The handover shows Signed, with both names and times.
Corrections after sign-off
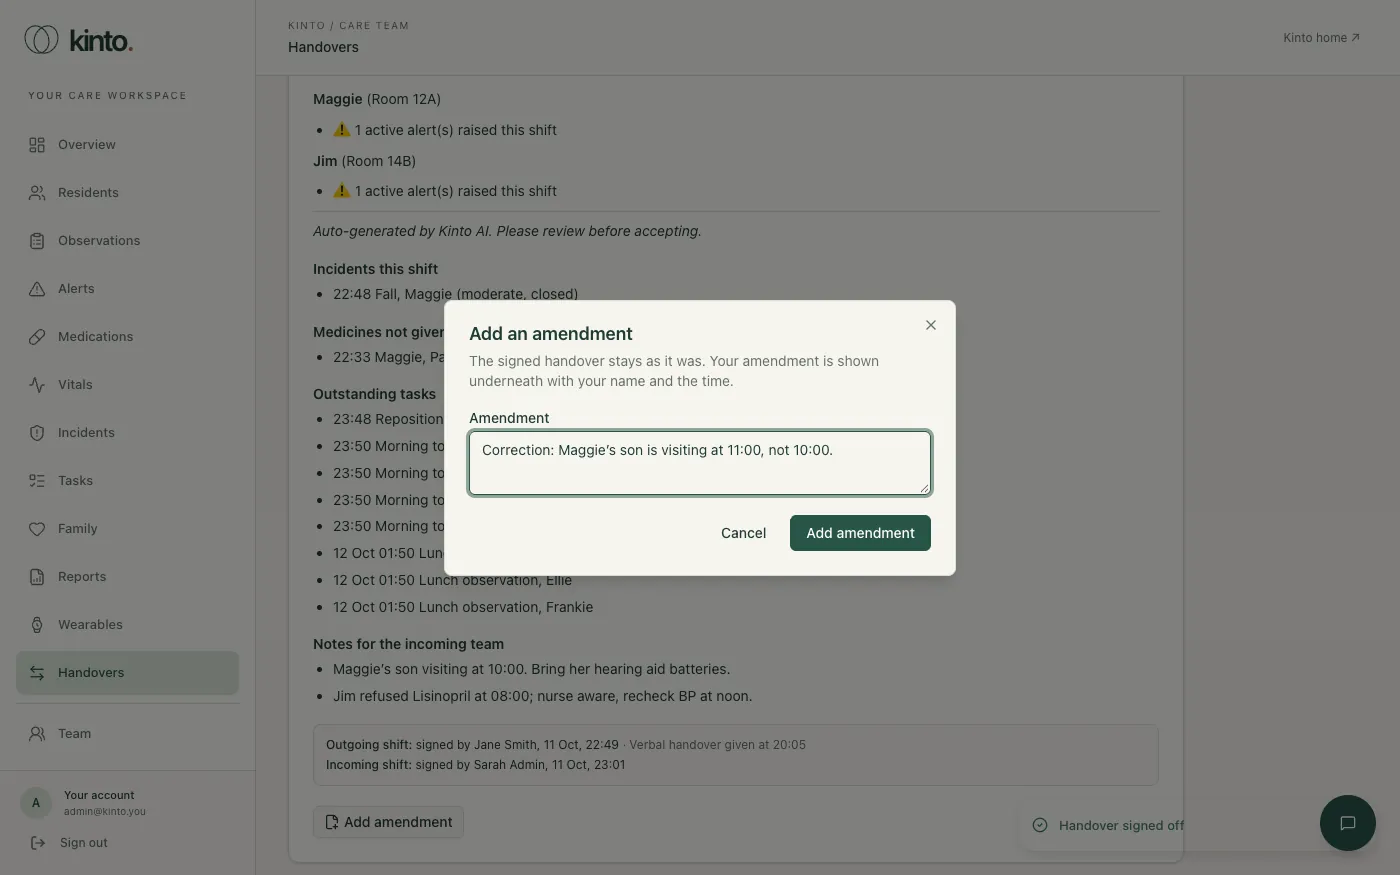
A signed handover stays as it was signed. To correct or add something, select Add amendment, write it and select Add amendment. It appears under the handover with your name and the time.
Ask Sarah for a summary
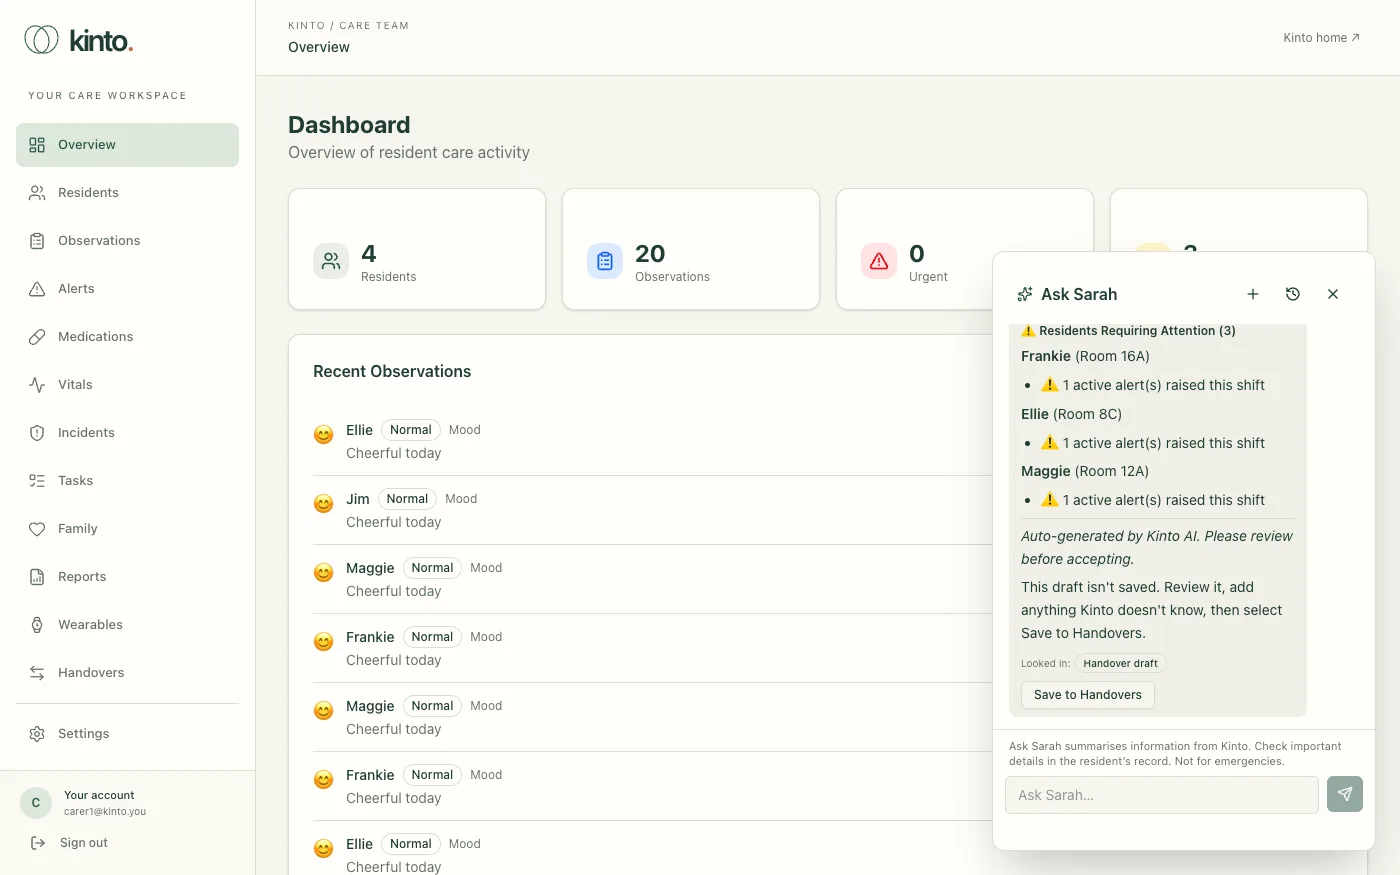
You can also ask Sarah: open Ask Sarah and choose Summarise today for handover. Sarah shows a draft that isn’t saved yet. Select Save to Handovers under it to save it as a draft handover, then check, edit and sign it off the same way.
Weekly reports
Generate a weekly summary for every resident.
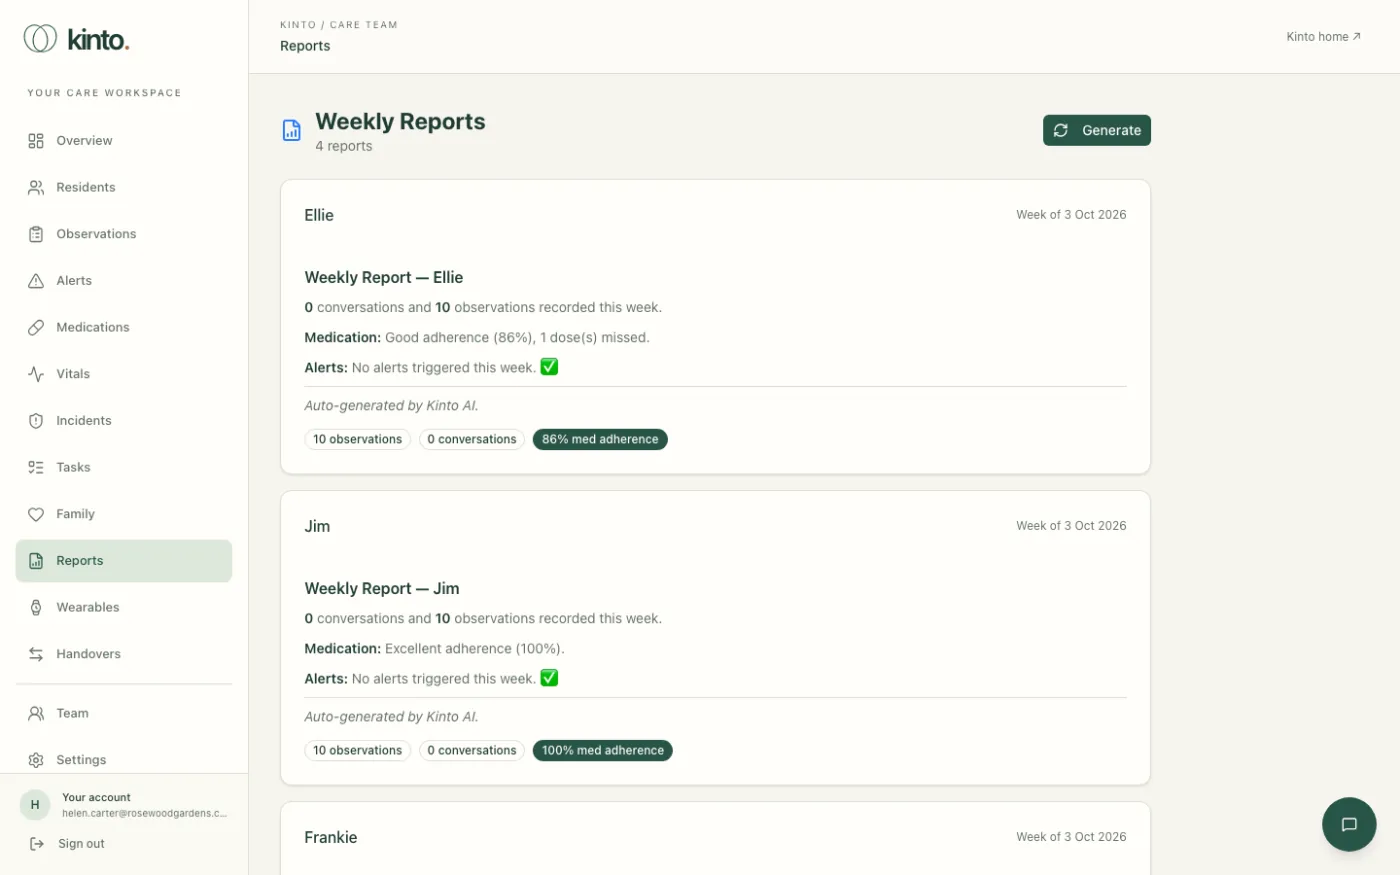
Reports (Weekly Reports) gives each resident a short summary of the last 7 days: how many conversations they had with Sarah, how many observations were recorded, how well medicines were taken and any alerts.
Create this week’s reports
- Select Reports in the menu.
- Select Generate at the top right.
- You’ll see Reports generated, and a card for each resident appears, headed Week of ….
Selecting Generate again later in the week updates the reports for the same period.
Reading a report
- The summary is written automatically and ends Auto-generated by Kinto AI.
- Badges show the number of observations and conversations, the percentage of medicines given, and how many alerts there were at each severity. Adherence below 80% is shown in red.
- Select the resident’s name to open their profile.
The family portal
Approve family links, reply to messages from relatives and see planned visits.
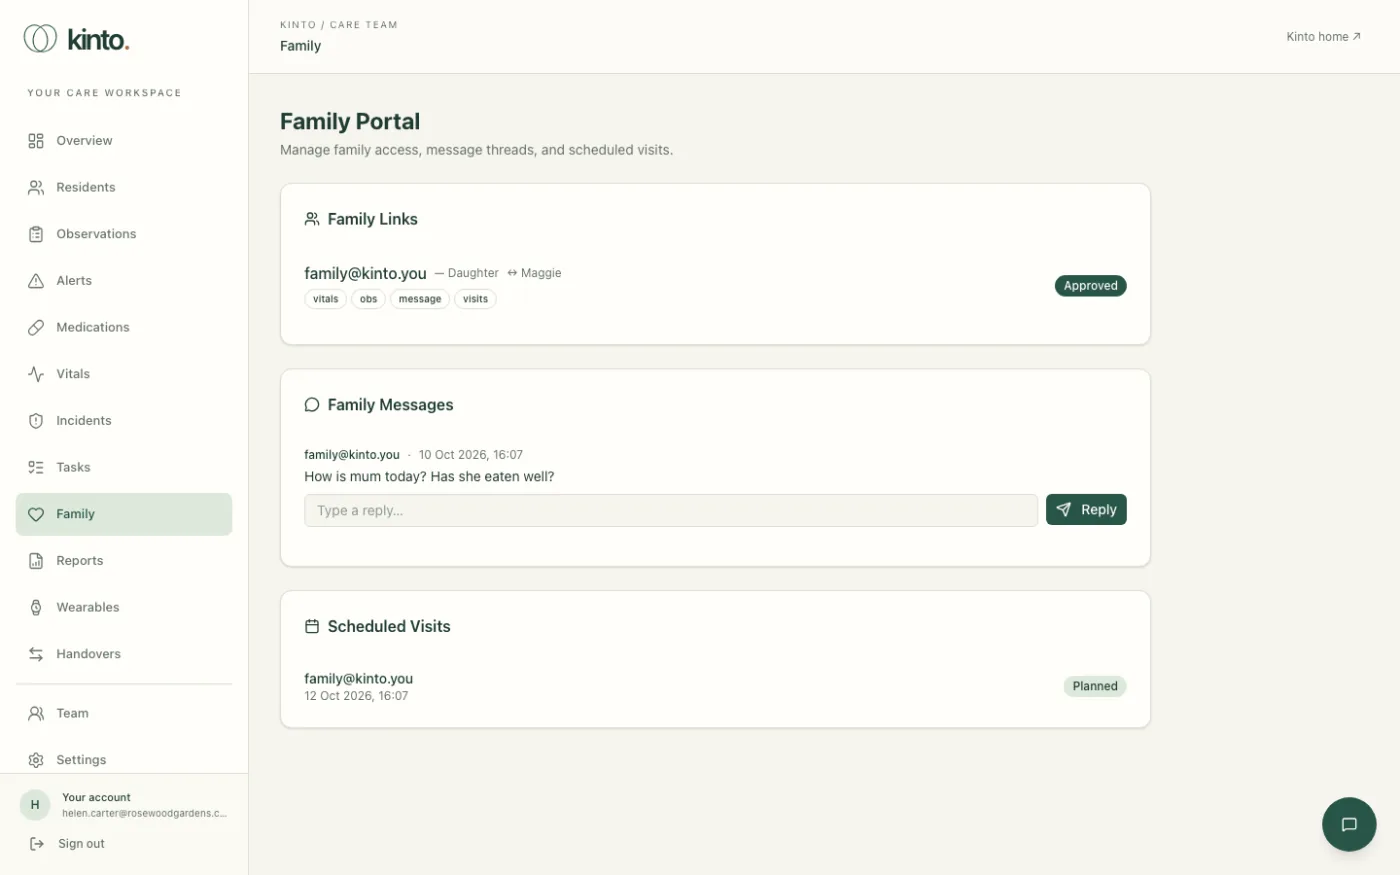
Family in the menu opens the Family Portal, where the care team manages relatives’ access, replies to messages from family and sees planned visits. It’s a page for staff: relatives don’t see it.
Family Links
Each link shows the relative’s email, their relationship (for example Daughter) and which resident they are linked to. Small badges show what the link allows: vitals, obs (observations), message and visits.
- Check the relative and the resident are right, and that the resident (or the person who can decide for them) agrees to the link.
- Select Approve. The link shows Approved.
Reply to a family message
- Under Family Messages, read the message.
- Type your answer in Type a reply….
- Select Reply. Your reply is shown under the message with your name and the time.
Scheduled Visits
Scheduled Visits lists planned visits with the relative, the date and time, any notes and a status:Planned, Confirmed, Cancelled or Completed.
Wearables
Which residents have a wearable device, and recording consent.
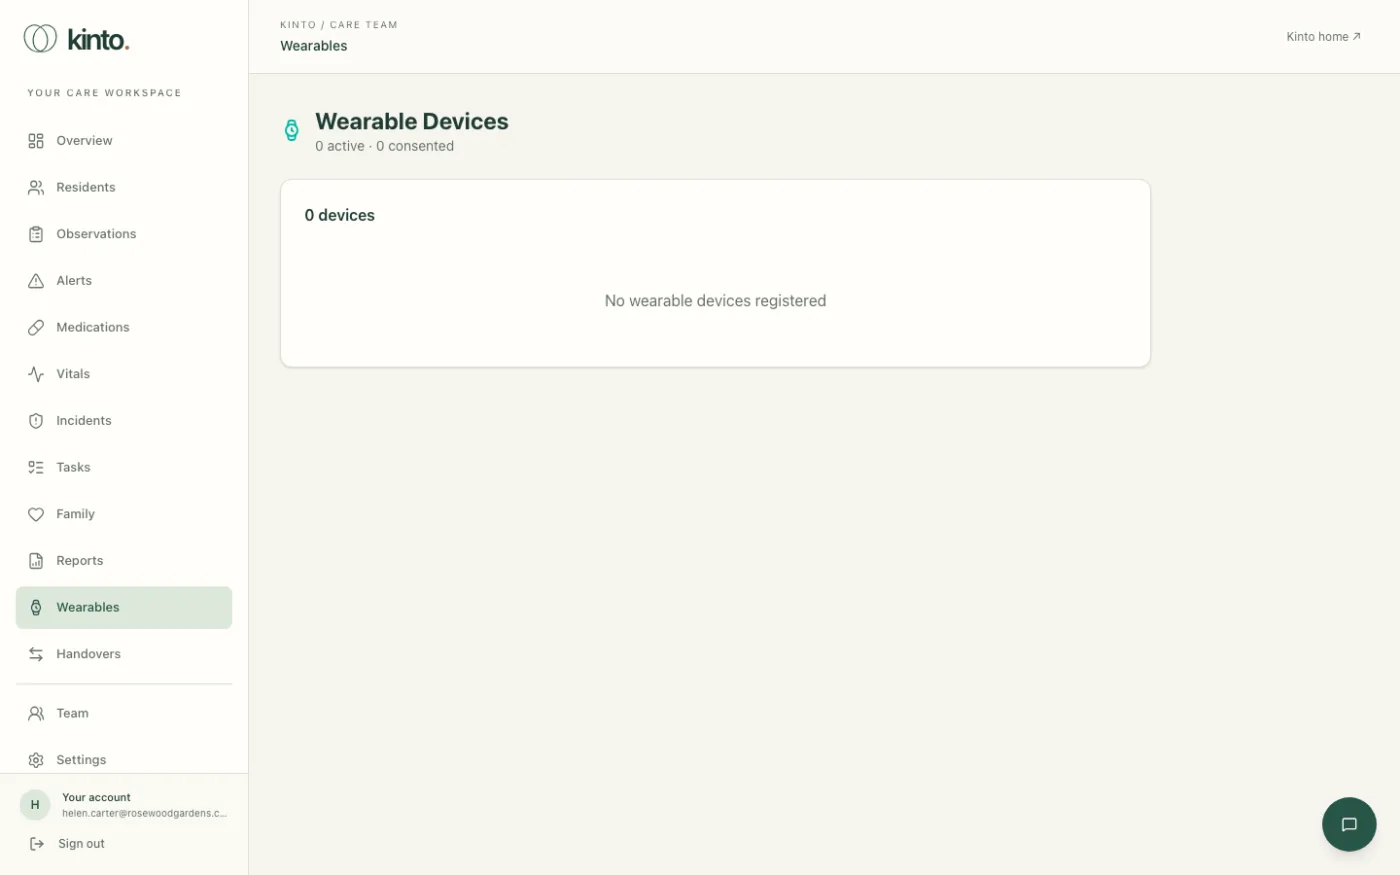
Wearables (Wearable Devices) lists wearable devices registered for your residents, such as a Fitbit, Apple Watch, Garmin, Oura Ring or Whoop, and whether the resident has consented to Kinto using its data. Under the heading you’ll see how many devices are active and how many have consent.
Each device shows
- the resident and the kind of device;
- Active or Inactive, and Consented or No Consent;
- the device ID and when it last synced.
Record or withdraw consent
- Make sure the resident has agreed, or that a best-interests decision has been made and recorded under the Mental Capacity Act.
- Select Grant Consent. You’ll see Consent granted.
- To withdraw it, select Revoke. You’ll see Consent revoked and the device is switched off in Kinto.
Ask Sarah, the care team assistant
What Sarah can answer for the care team, and how to use her safely.
Ask Sarah is an AI assistant for the care team. Ask in your own words and she looks up what’s already recorded in Kinto for your care home (residents, care records, medicines and the MAR, vital signs and NEWS2, alerts, incidents, tasks and handovers) so you don’t have to click through several pages. It’s available to owners, admins and carers.
Open Ask Sarah
- Select the round green chat button in the bottom right corner of any dashboard page.
- You’ll see Hi! I’m Sarah, your care-team assistant. with four suggestions.
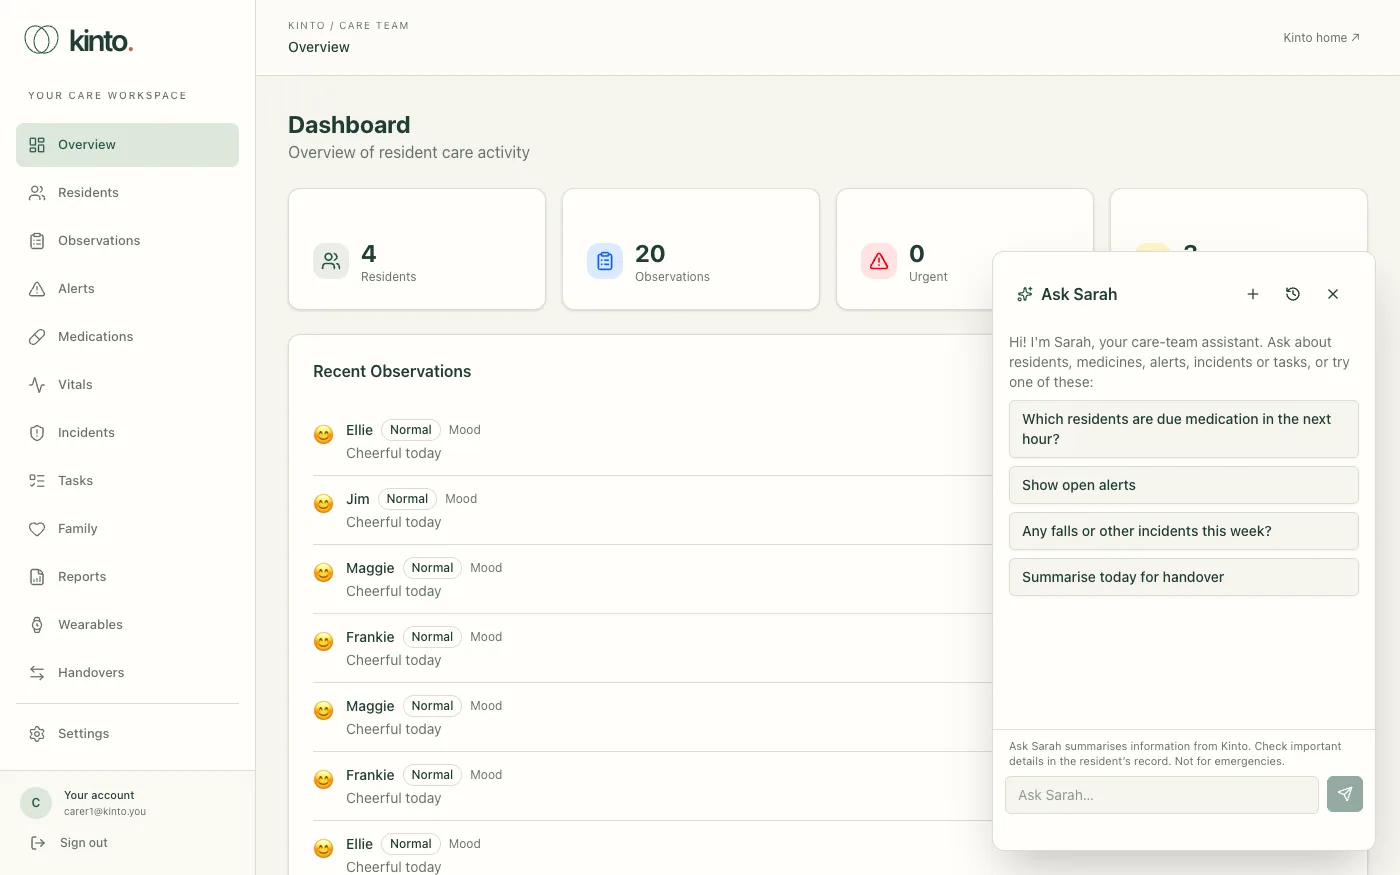
- Choose a suggestion, or type in Ask Sarah… and press Enter. While Sarah looks things up you’ll see what she’s checking, for example Checking medication records…, then her answer appears as she writes it.
- Above the message box, a reminder says: Ask Sarah summarises information from Kinto. Check important details in the resident’s record. Not for emergencies.
- Select the cross at the top of the panel to close it.
What you can ask
| For example | What Sarah looks at |
|---|---|
| Which residents are due medication in the next hour? Is anything overdue today? | Active prescriptions and today’s MAR entries, in UK time. |
| Tell me about Maggie: allergies and care plan highlights. | The resident’s conditions, allergies, care plan, medicines and treatments. |
| What’s Jim’s latest NEWS2 score? | Recent vital signs and the early-warning score, including which readings are missing. |
| Any falls or other incidents this week? | Incidents, observations and the MAR for the time you ask about. |
| Show open alerts. What tasks are still open? | Active alerts and today’s open or overdue care tasks. |
| Summarise today for handover | Drafts a handover for the last 8 hours. See Shift handovers. |
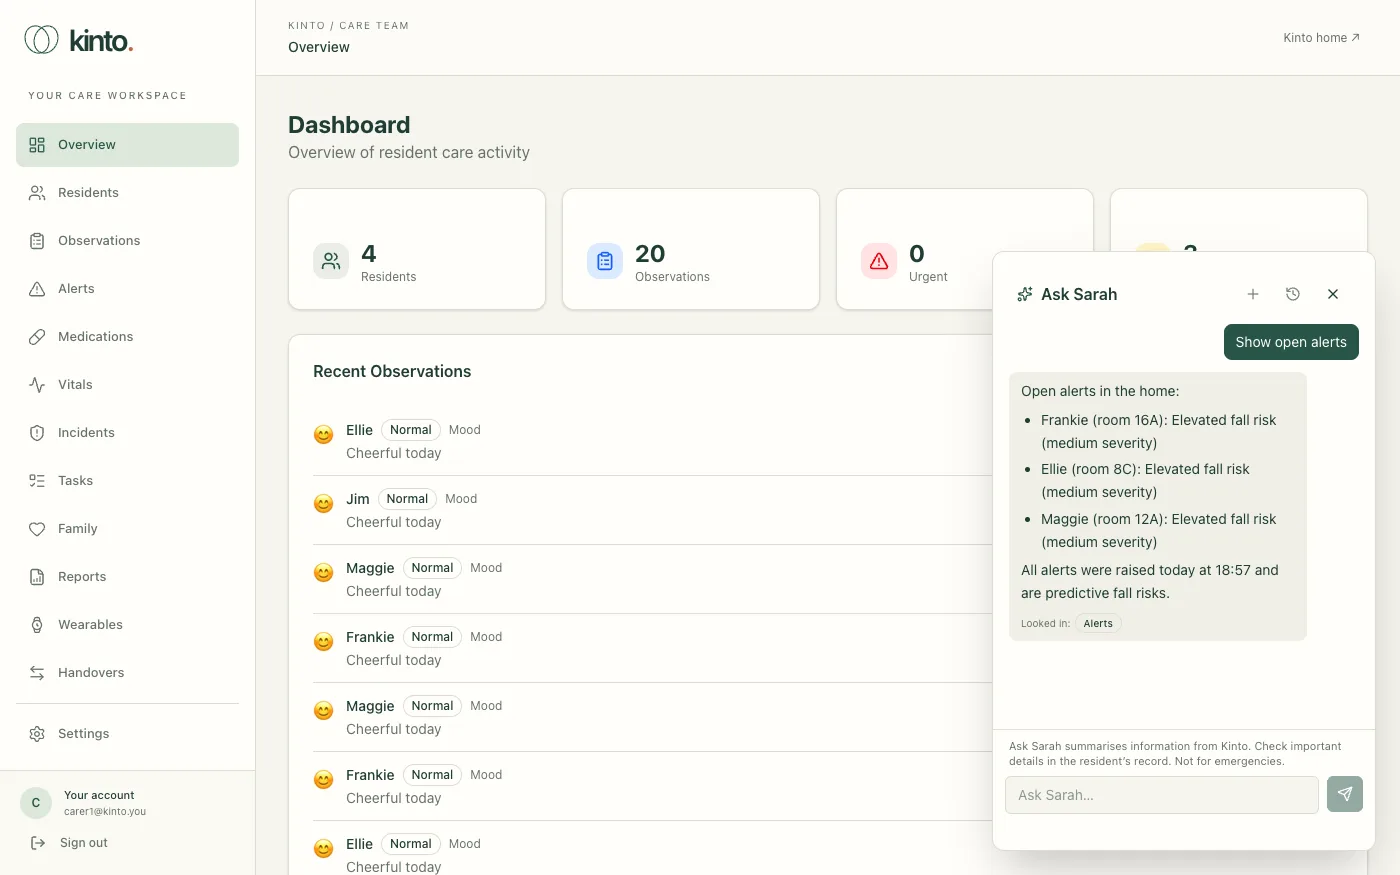
You can ask follow-up questions, such as “and her last oxygen reading?”. Sarah names the resident and the record and time she used. Under each answer, Looked in: shows which parts of Kinto she checked, for example Medicines due or Vitals and NEWS2. If something isn’t recorded, she says so rather than guessing.
Your chats
- Select + (New chat) at the top of the panel to start again.
- Select the clock (Recent chats) to reopen or delete one of your recent chats.
- Only you can see your chats, and only in the organisation you were using. They’re deleted 30 days after the last message.
What Sarah won’t do
- Change records. Sarah only reads. She can’t record a dose, an observation, an incident or a task, or sign off a handover. Do that in Kinto as usual.
- Make clinical decisions. She doesn’t diagnose, recommend treatment or suggest changing a medicine. Use your clinical judgement and your home’s policies, and speak to the nurse in charge, the GP or NHS 111.
- See other care homes. She only sees the organisation you’re signed in to.
- Help with anything else. Questions that aren’t about care work in your home get a polite no.
Using Ask Sarah safely
- Check before you act. Sarah is an AI and can be wrong or out of date, and only knows what’s recorded in Kinto. Check against the resident’s records.
- Never use it as the only source for medicines. Always give medicines from the prescription and your MAR, following your medicines policy.
- Keep personal details to a minimum. First names or room numbers are enough. Your questions and the records Sarah looks up are sent to our AI provider, OpenAI, to answer them (see the privacy policy).
- It doesn’t raise the alarm. Telling Sarah about an emergency doesn’t alert anyone.
Managing your team (owners and admins)
Invite people, change roles, remove someone, reset two-factor authentication and check the audit trail.
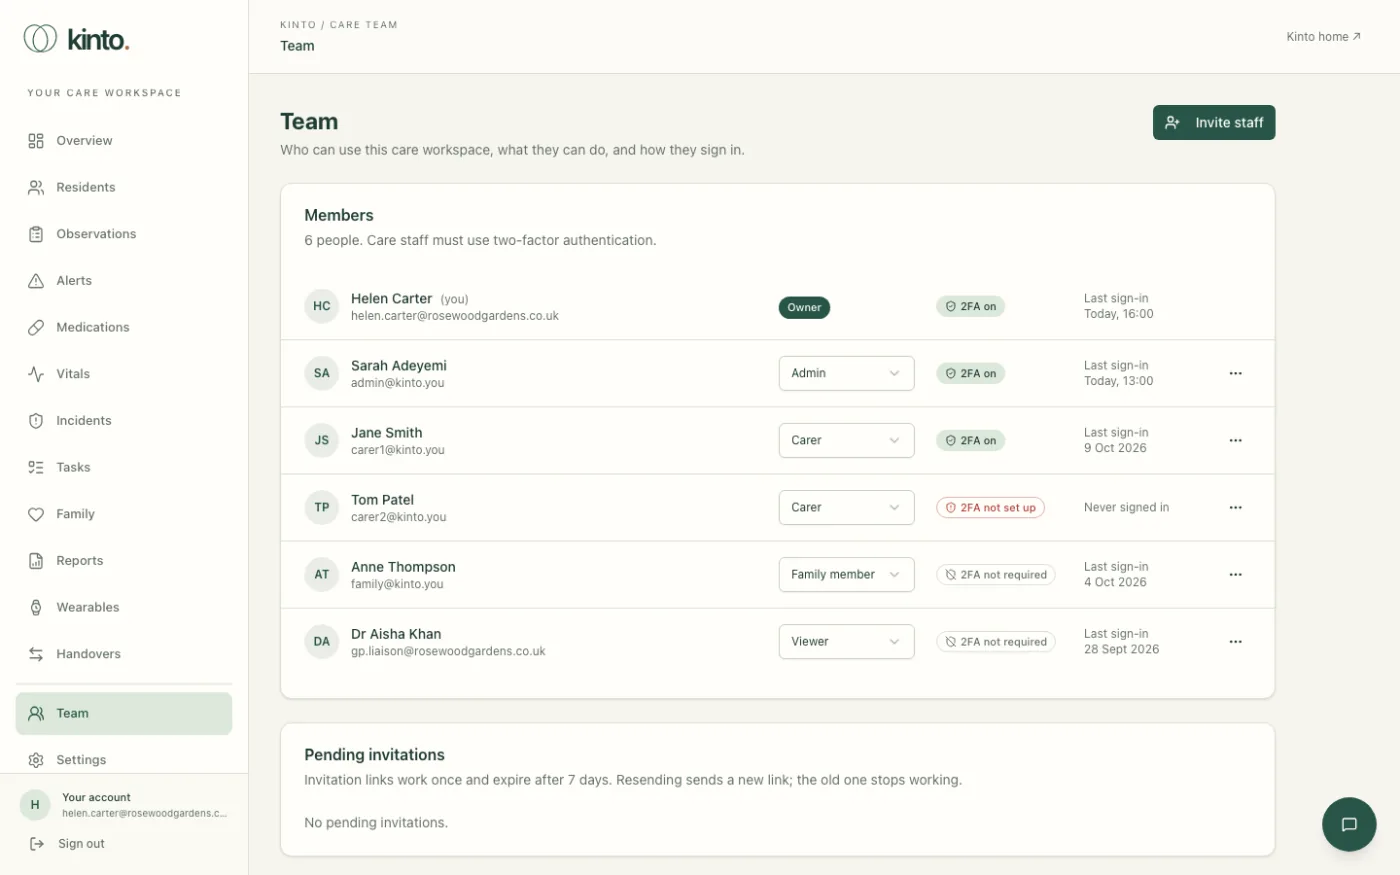
Owners and admins decide who can use the care team workspace and what they can do. Everything happens on the Team page, which only owners and admins can see in the menu.
Roles
| Role | What they can do | Two-factor |
|---|---|---|
| Owner | Full control, including other owners and the organisation itself. | Required |
| Admin | Manages the team and all care records. Can’t change owners. | Required |
| Carer | Reads and writes care records. Uses the Ask Sarah assistant. | Required |
| Viewer | Reads care records but can’t change them. Sees Read-only access at the top of every page. | Optional |
| Family member | No care team access. For relatives using the Kinto app. | Optional |
Owners can give any role. Admins can give admin, carer, viewer and family member, but can’t create, change or remove owners. Nobody can change their own role or remove themselves.
Invite someone
- Open Team and select Invite staff.
- Type their Work email.
- Choose a Role. A short description of the role appears underneath.
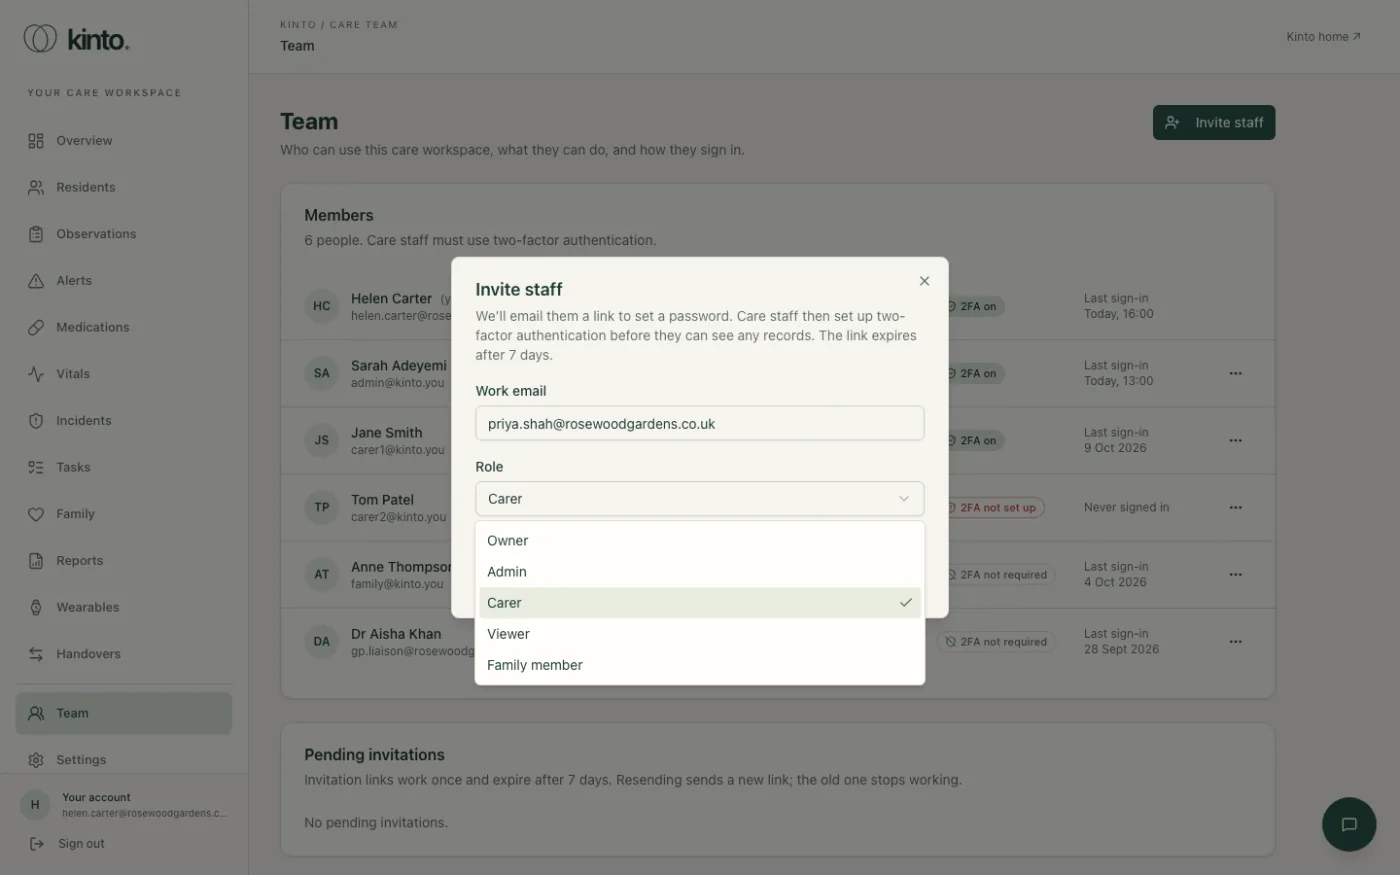
- Select Send invitation. You’ll see Invitation sent to … and they appear under Pending invitations.
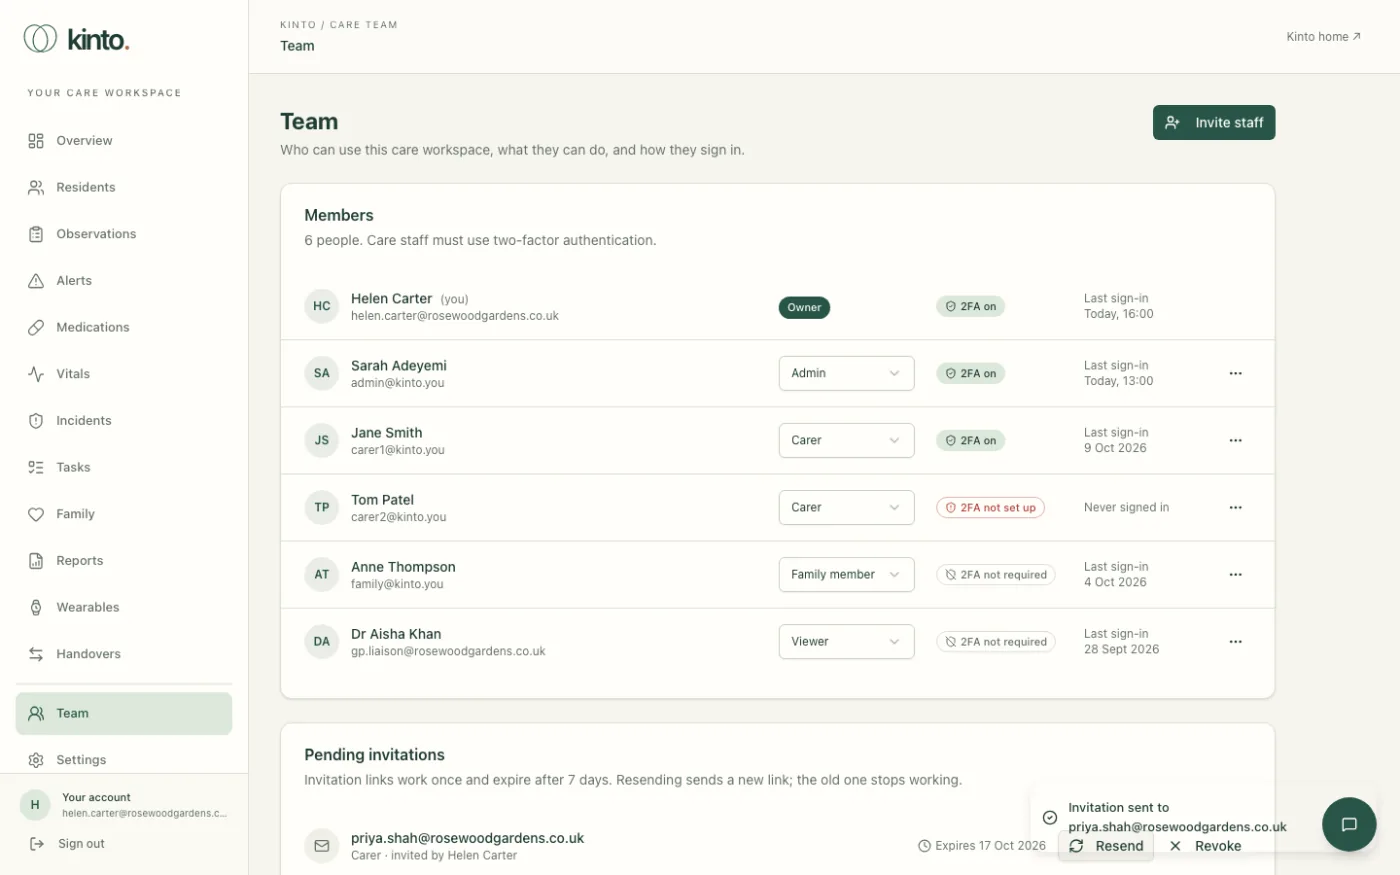
- Invitation links work once and expire after 7 days. If someone missed it, select Resend: this sends a new link and the old one stops working.
- Invited the wrong address? Select Revoke, then Revoke invitation.
- If you see Invitation saved, but the email couldn’t be sent., wait a moment and select Resend.
Check who has set up two-factor
Each person shows a badge:
- 2FA on: set up and working.
- 2FA not set up: required for their role but not done yet. They’ll be asked to set it up at their next sign-in and can’t see records until they do.
- 2FA not required: viewers and family members.
The last column shows their last sign-in, or Never signed in.
Change someone’s role
- Find the person and open the role list next to their name.
- Choose the new role.
- Read the confirmation, for example Make Tom Patel an admin?, and select Change role.
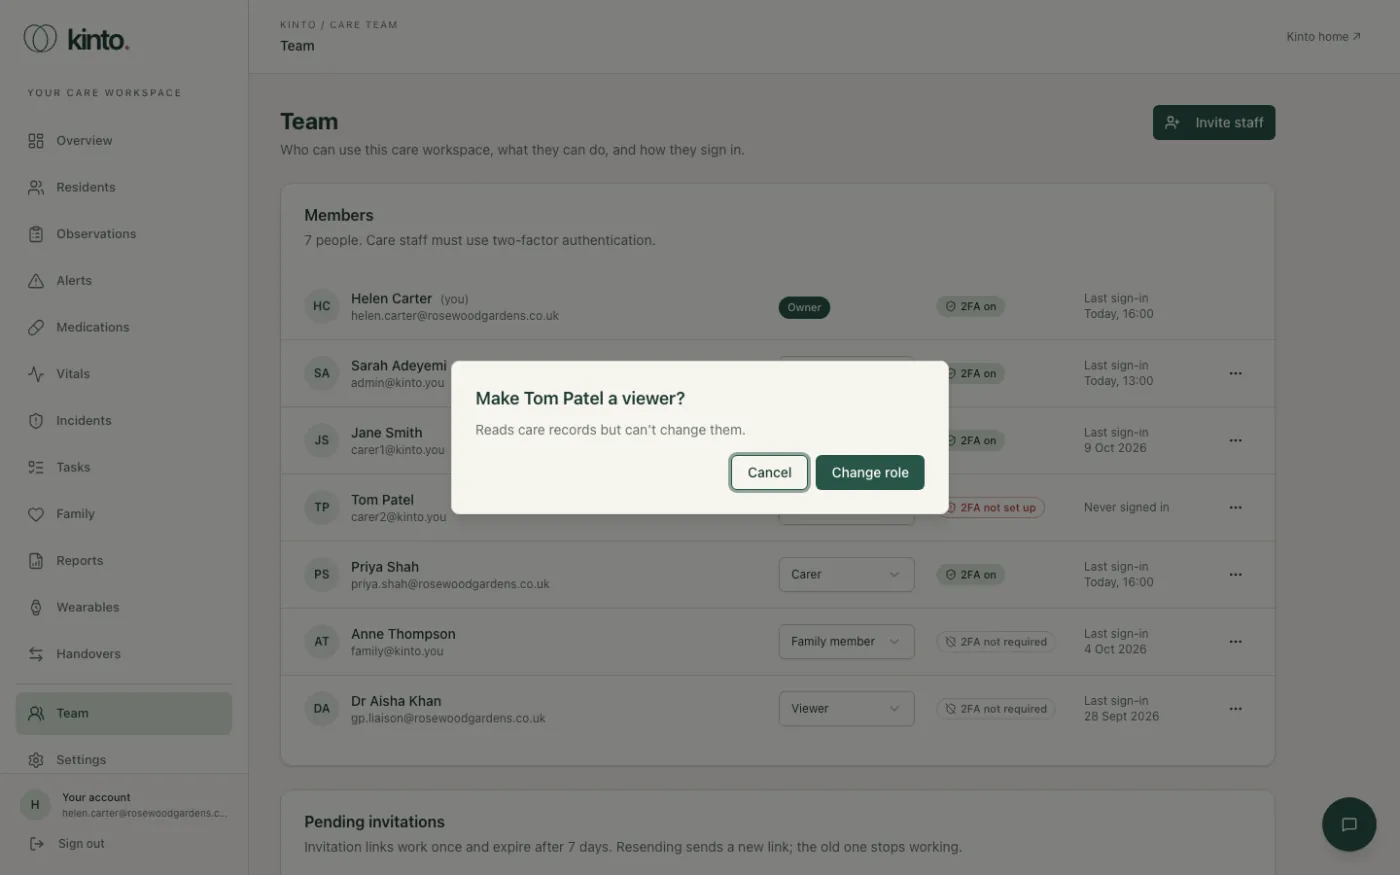
Moving a viewer to a care role means they’ll have to set up two-factor authentication before they can use the dashboard again.
Remove someone from the team
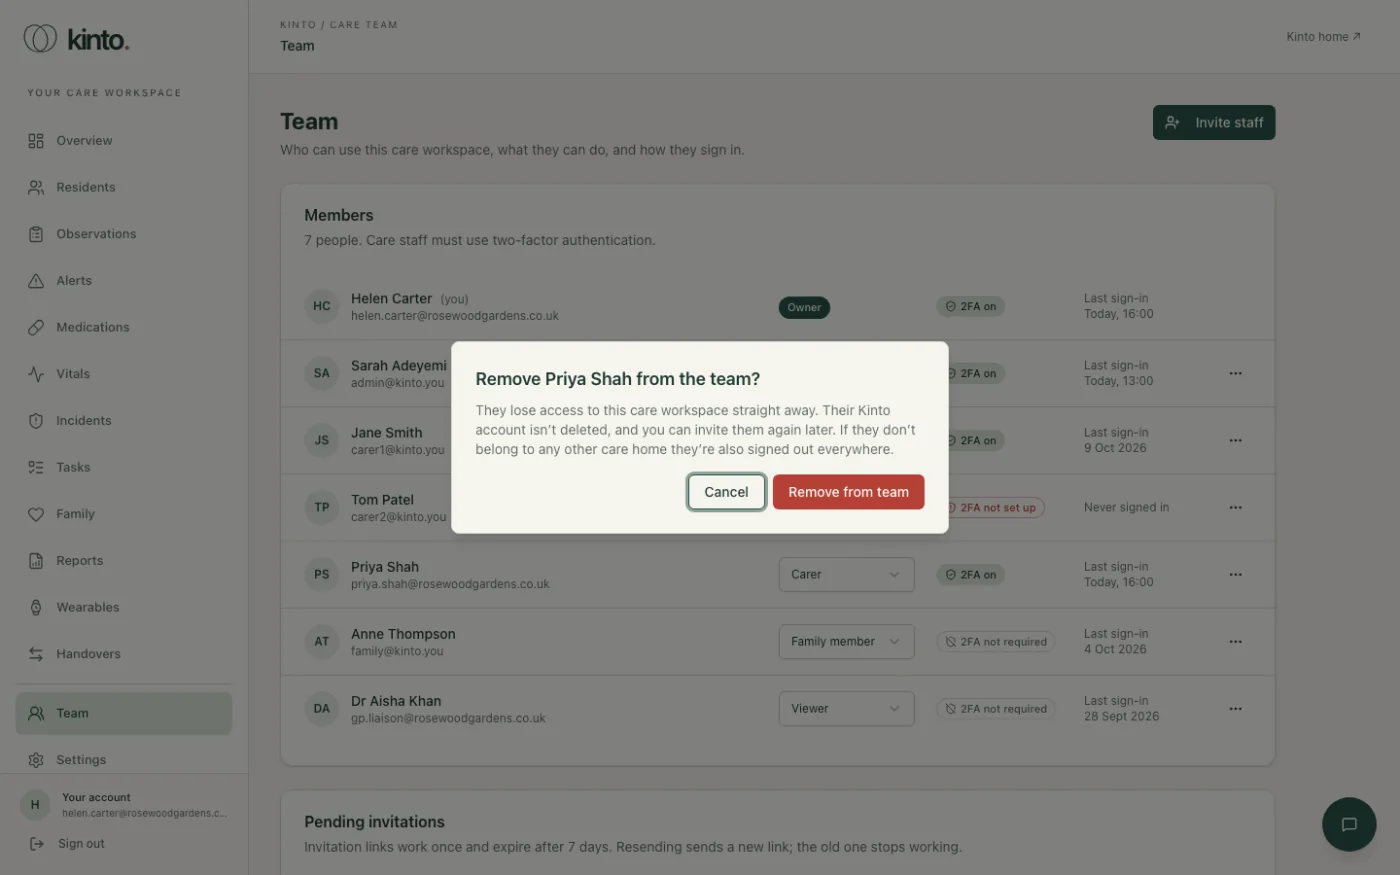
- Select the ⋯ button at the end of their row, then Remove from team.
- Select Remove from team to confirm.
They lose access straight away. Their Kinto account isn’t deleted and you can invite them again later. Remove leavers on their last day.
Reset someone’s two-factor authentication
Use this when someone has lost their phone and their recovery codes.
- Check it’s really them asking: in person, or by calling them on a number you already have.
- Select ⋯ on their row, then Reset two-factor.
- Select Reset two-factor to confirm.
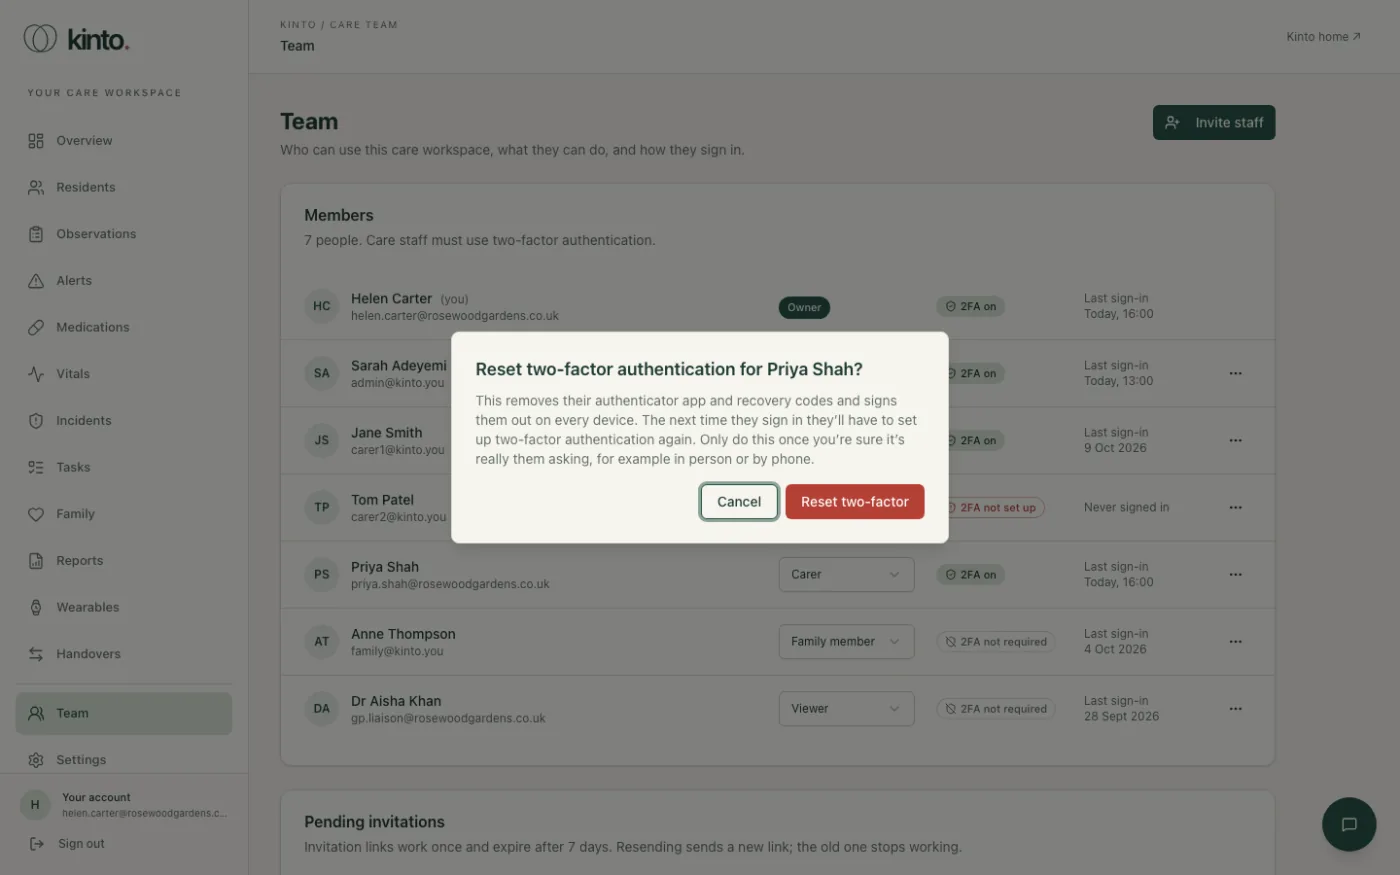
This removes their authenticator app and recovery codes and signs them out on every device. Their badge changes to 2FA not set up, and the next time they sign in they set it up again. If Reset two-factor is greyed out, that person hasn’t set up two-factor authentication yet, so there’s nothing to reset.
Rules that keep your home in charge
- An organisation always needs at least one owner. To remove or change the last owner, make someone else an owner first. You’ll see An organisation needs at least one owner. Make someone else an owner first.
- We recommend two owners, for example the registered manager and the provider’s nominated individual, so one can help the other.
- Review the Team page every month, and whenever someone leaves.
The audit trail
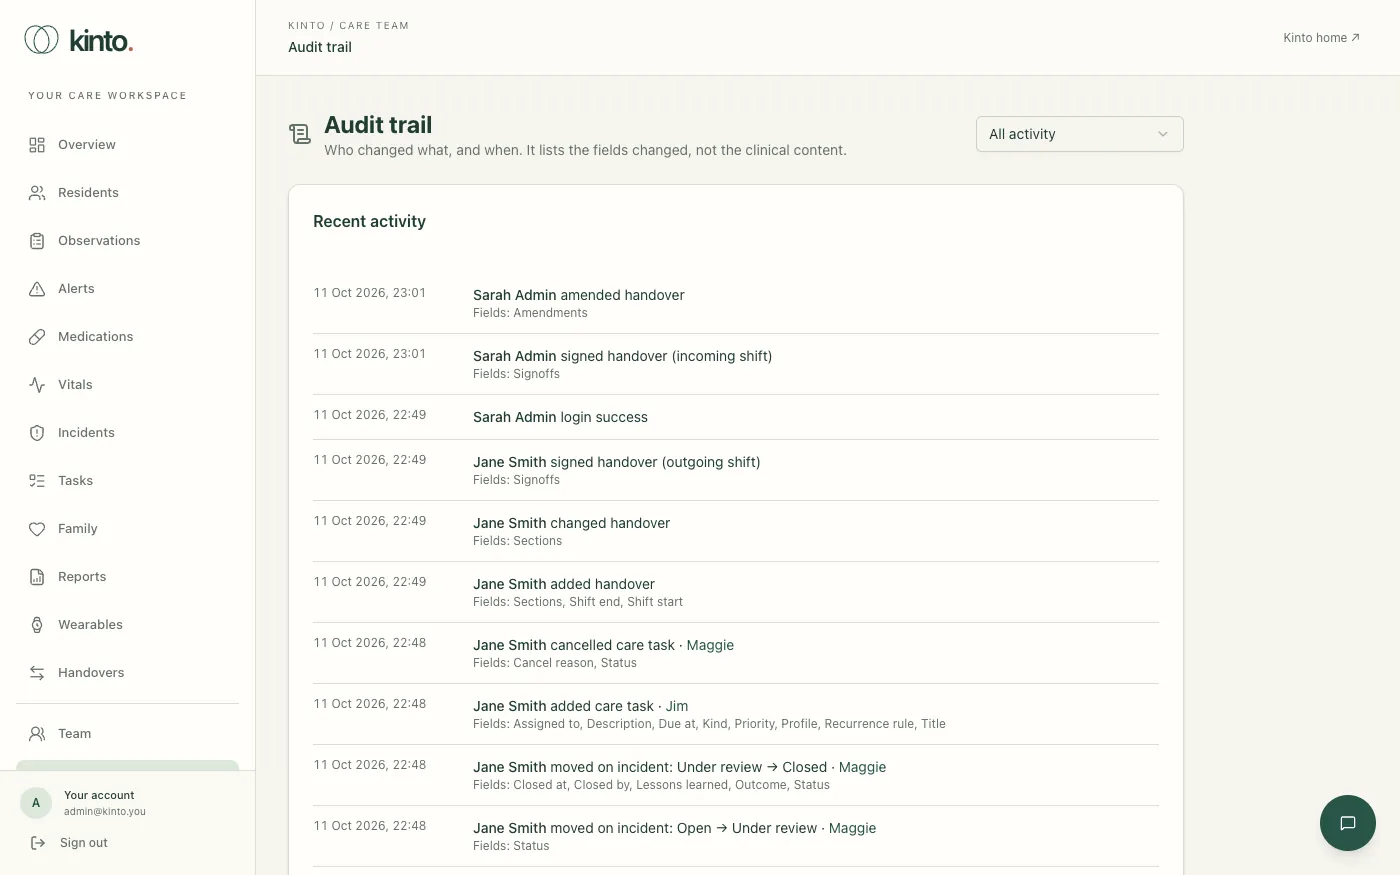
Audit trail, below Team in the menu, lists who changed what and when: residents added or edited, doses recorded, observations and their NEWS2 score, incidents moved on, tasks completed or cancelled, handovers signed, alerts dismissed, and sign-in, two-factor and team events. Each entry names the person, the record, the resident it belongs to and the fields that changed. It never shows the clinical content itself.
- Select Audit trail in the menu.
- Use the menu at the top right to show one area, for example Medicines (MAR) or Incidents.
- Select a resident’s name to open their profile, and Show more for older entries.
Your account and security settings
What’s in Settings, changing your password, recovery codes and keeping records safe.
Open Settings at the bottom of the menu to see your account and your sign-in security.
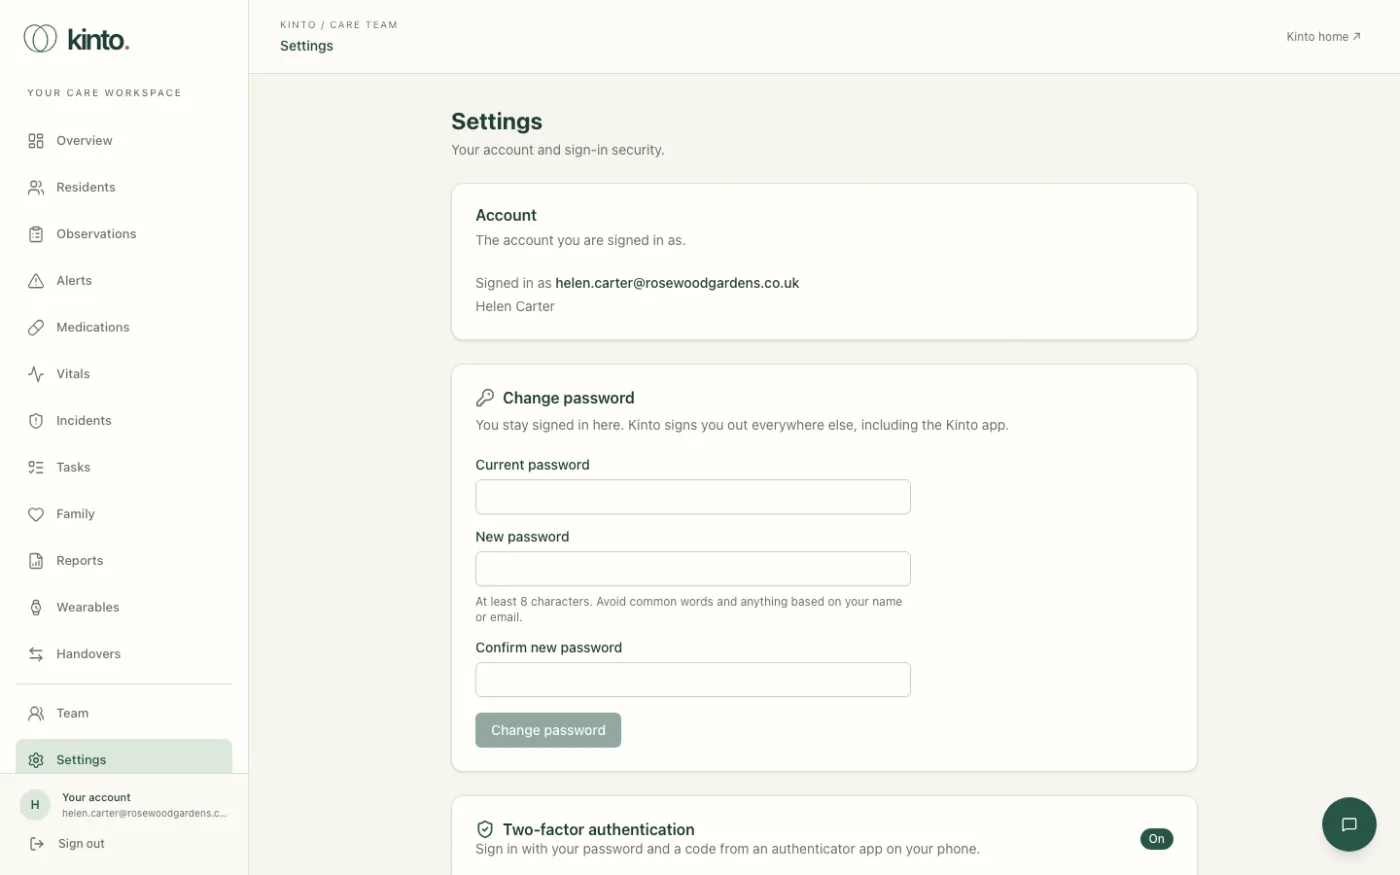
What’s in Settings
- Account: the email address you’re signed in with, and your name.
- Change password: change the password you sign in with (see below).
- Two-factor authentication: whether it’s On, how many recovery codes you have left, and the New recovery codes and Move to a new phone buttons. See Lost or new phone.
Changing your password
- Open Settings and find Change password.
- Type your Current password.
- Type your New password, then type it again in Confirm new password. Use at least 8 characters, and avoid common words and anything based on your name or email.
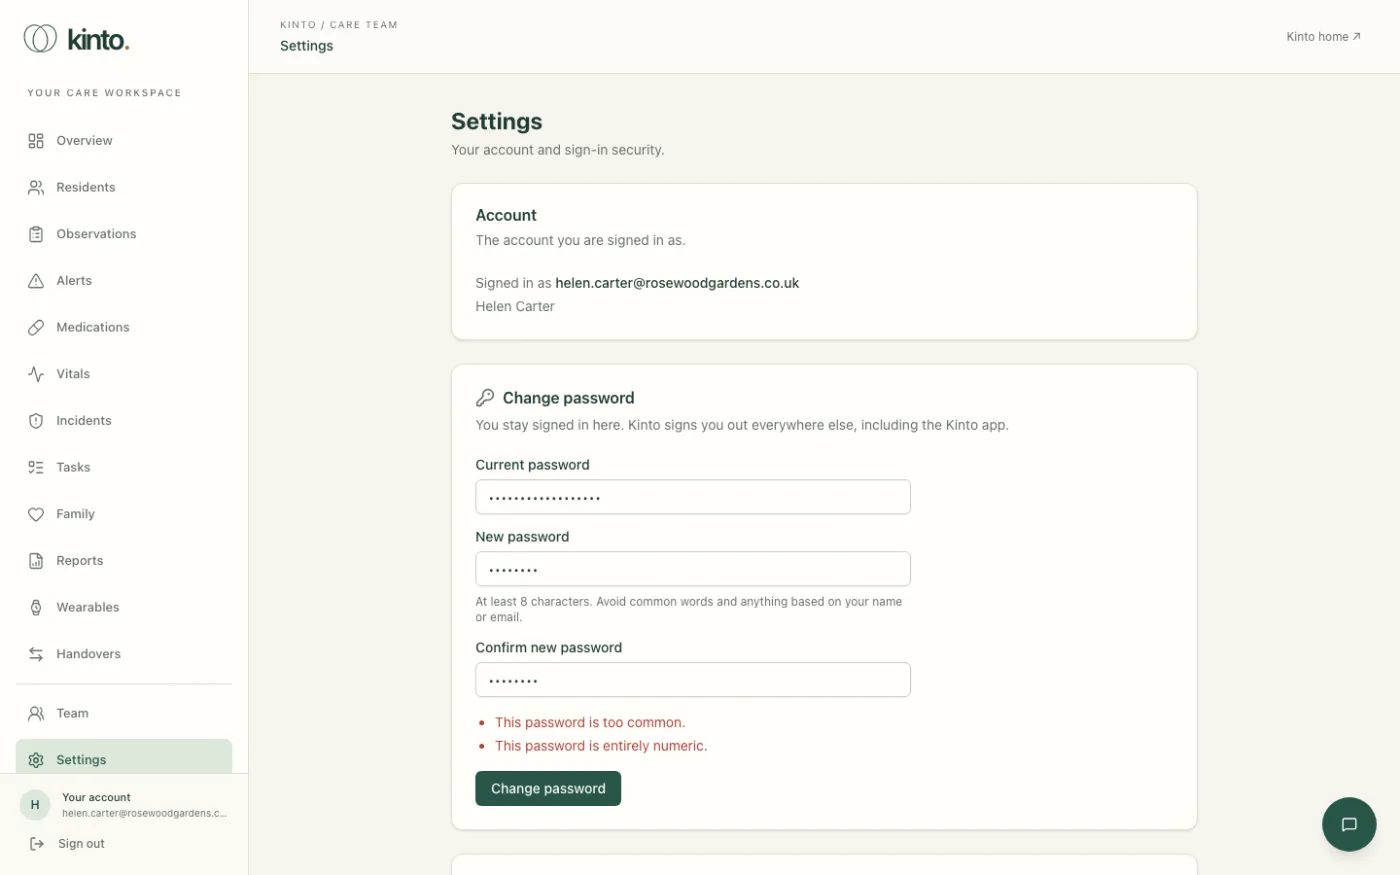
- Select Change password. You’ll see Password changed. You’ve been signed out on your other devices. You stay signed in on this computer. Anywhere else you were signed in, including the Kinto app, you’ll need to sign in again with the new password. Your two-factor set-up doesn’t change.
If the password isn’t accepted, the card says why, for example Old password is incorrect. or This password is too common. Fix it and try again.
Forgotten your password?
If you can’t remember your current password, use the reset link instead:
- On the sign-in page select Forgot password?.
- Type your email and select Send reset link. You’ll see Check your email.
- Open the email and select the link within one hour.
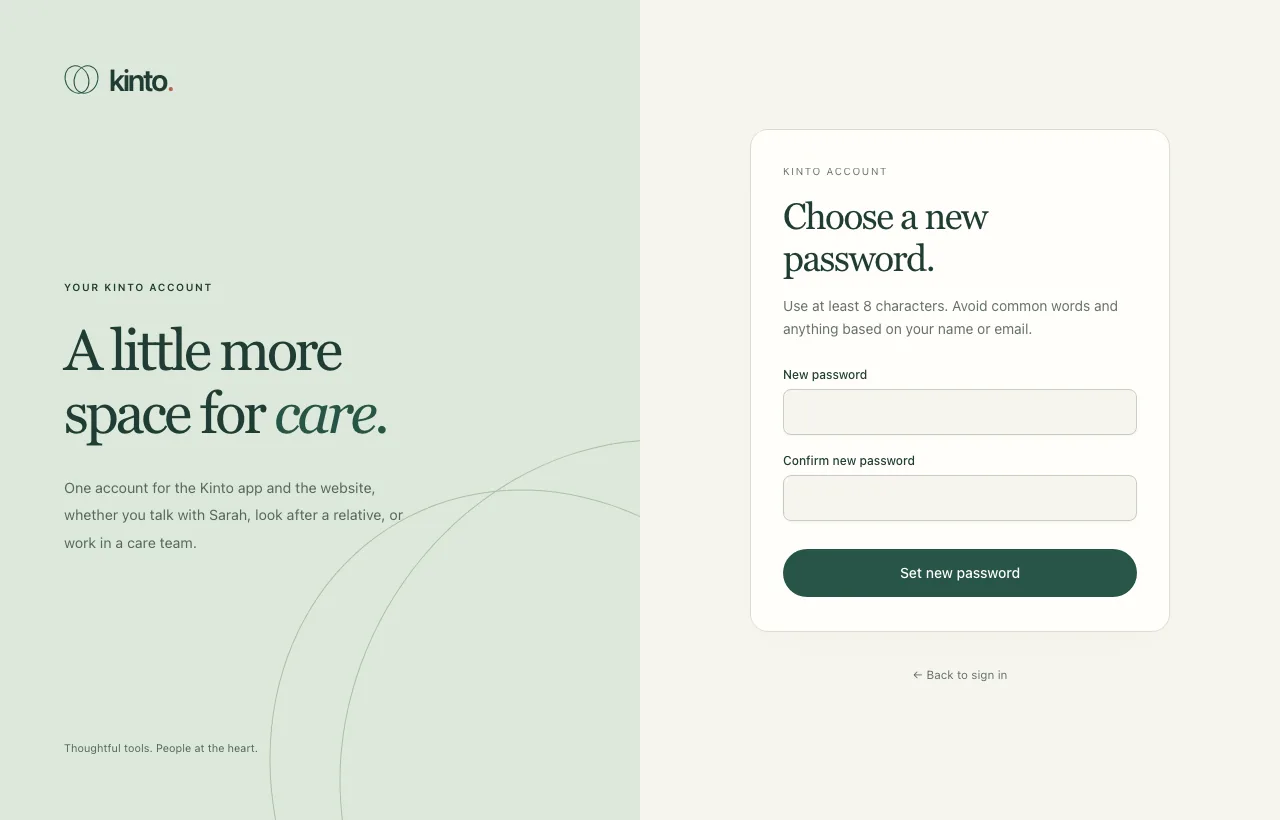
- On the Kinto account page, type your New password twice and select Set new password. You’ll see Password changed. and you’re signed out everywhere.
- Sign in with your new password and a code from your phone. Your two-factor set-up doesn’t change.
To change your name or email address, ask an owner or admin at your home to contact Kinto support.
Viewers: turning on two-factor
Two-factor authentication is optional for viewers, but we strongly recommend it. In Settings, select Set up two-factor authentication and follow the same steps as the first-time set-up. If you change your mind, the Turn off button asks for your password and a current code.
Good habits
- Lock your screen when you step away, and sign out of shared computers.
- Use a password you don’t use anywhere else.
- Don’t write residents’ details in emails to Kinto support. Describe the page and the problem instead.
- Tell your manager straight away if you think someone else knows your password or has your phone.
Troubleshooting sign-in
Locked out, code not accepted, session expired or invitation link not working.
The most common sign-in problems, what the message on screen means, and how to fix them.
| What you see | What it means and what to do |
|---|---|
| Invalid email or password | Check the email address for typos and that Caps Lock is off. If you’ve forgotten your password, select Forgot password?. |
| Too many failed sign-in attempts. Please wait 15 minutes or reset your password. | After 10 wrong passwords or codes within 15 minutes, Kinto locks sign-in for that email for 15 minutes to protect it. Wait, then try again carefully, or reset your password. If you didn’t cause this, tell your manager: someone may be guessing your password. |
| That code didn’t work. Please try again. | Wait for a fresh code. Check the phone’s date and time are set automatically. Make sure you’re reading the Kinto entry. See Signing in. |
| That sign-in took too long. Please enter your password again. | The code must be entered within 5 minutes of your password. Start again. |
| You’re back on the sign-in page unexpectedly | Your session ended: staff are signed out after 12 hours without using Kinto, and always after 7 days. A password reset or a two-factor reset also signs you out everywhere. Sign in again. |
| Set up two-factor authentication. | Your role needs it, and it isn’t set up (or an admin reset it). Follow the set-up steps. |
| This invitation can’t be used. | The link expired (after 7 days), was already used, or was replaced by a newer one. Ask your manager to select Resend on the Team page, and use the newest email. |
| The two passwords don’t match. | Retype both password boxes so they’re the same. |
| This workspace is for the care team | You’re signed in with a family member account. Care records are only for care staff. If you work at the home, ask your manager to change your role. |
| You’re not part of a care team yet | Your account isn’t linked to a care home. Ask your manager to invite you, then open the link in the email. |
| No reset email arrives | Check your spam or junk folder, and that you typed the email you sign in with. Reset links work for one hour. Request a new one if it has expired. |
| A button you expect is missing | Your role decides what you can do. Viewers can read but not change records, and only owners and admins see Team. |
Still stuck?
Speak to an owner or admin at your home first: they can resend invitations and reset two-factor authentication. For anything else, email support@kinto.you with the page you were on, what you expected and the exact message you saw. Please don’t include residents’ details.